Joy-Con Drift Repair Kit Contents Checklist: Parts and Tools a Complete Kit Should Include
A Joy-Con drift repair kit contents checklist describes the replacement parts and essential tools a typical complete kit should include for an analog-stick replacement. It helps buyers check whether a kit covers the core components needed before buying.
Joy-Con drift repair kits vary widely in what they include, and an incomplete set can lead to extra purchases or accidental damage during disassembly. A checklist lets you compare itemized contents against listing photos to see what is included and what is missing. Here, 'complete' means the kit contains the main replacement stick module and the minimum tools to open the controller, not a guarantee of results. For a broader view of how kit types differ, refer to the Joy-Con drift repair kit hub.
What a Complete Joy-Con Drift Repair Kit Includes and What Is Commonly Missing
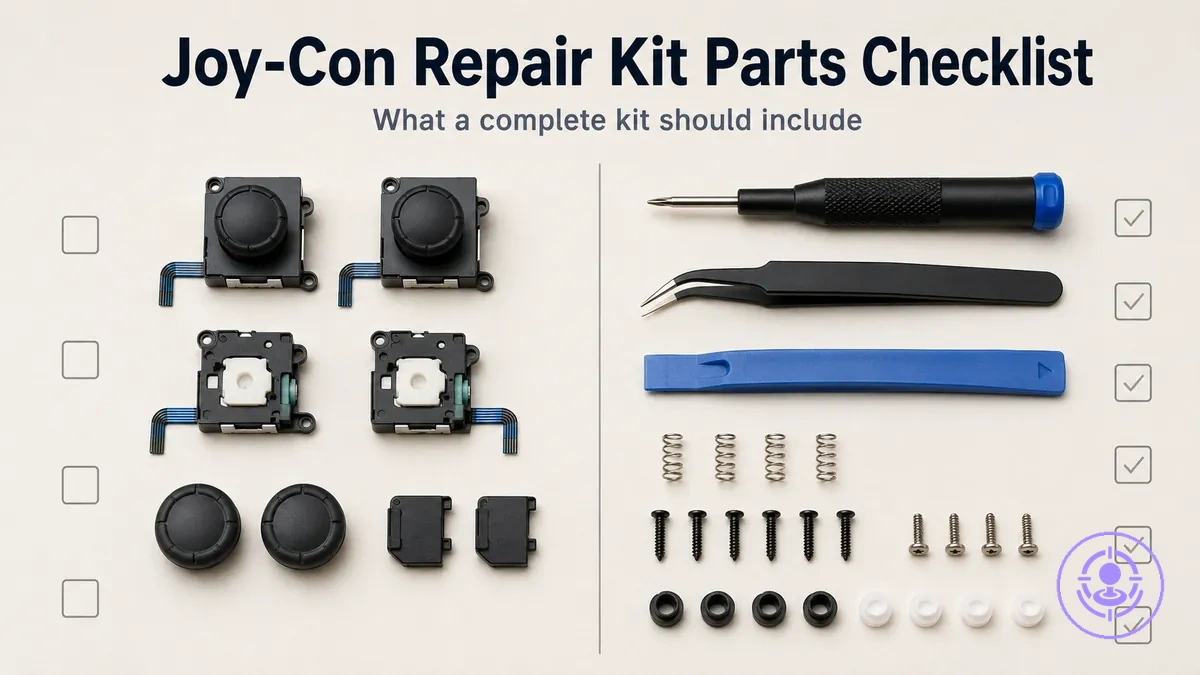
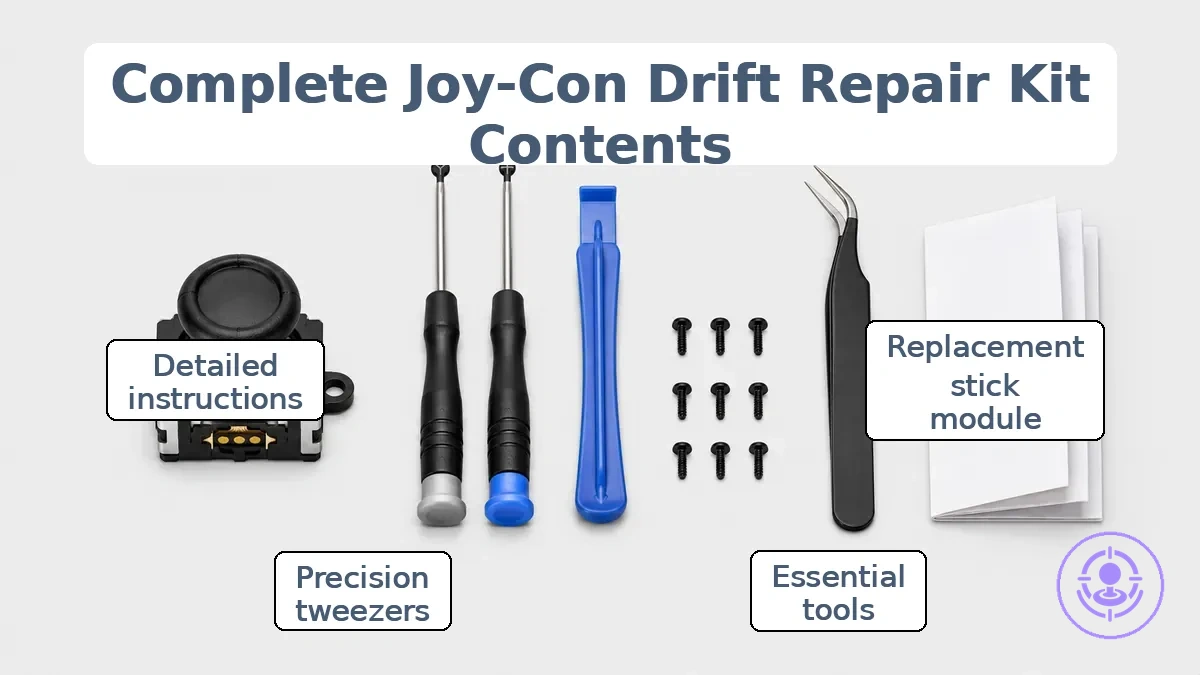
A complete Joy-Con drift repair kit includes a replacement stick module and the minimum tools needed to open, swap, and reassemble without avoidable damage. This separates what is typically included from what is commonly missing or low‑quality.
When browsing kits online, the listed contents often appear similar, but the quality and completeness of the tools vary. Relying on itemized photos and parts lists — rather than marketing claims — gives a clearer picture of what will arrive.
The image labels the two buckets — included parts and commonly missing or low-quality items — to help reduce misinterpretation of listing language.
The lists detail what is typically included and what is often missing or low‑quality.
Usually included
- Replacement stick module (1–2 units)
- Y-shaped (tri‑wing) screwdriver
- Small Phillips‑head screwdriver
- Plastic pry tool
- Replacement screws (Y‑type and Phillips‑type)
Often missing or low‑quality
- Precision tweezers (often too blunt for ribbon cables → higher risk of cable damage)
- Screwdriver bit quality (may strip screws → failed repair)
- Organizer or container for small parts (lost screws → frustration and reassembly errors)
- Detailed disassembly guide or step‑by‑step instructions (longer repair time and possible mistakes)
- Extra thumbstick caps or dust covers (often missing → limited customization options; additional purchase needed if desired)
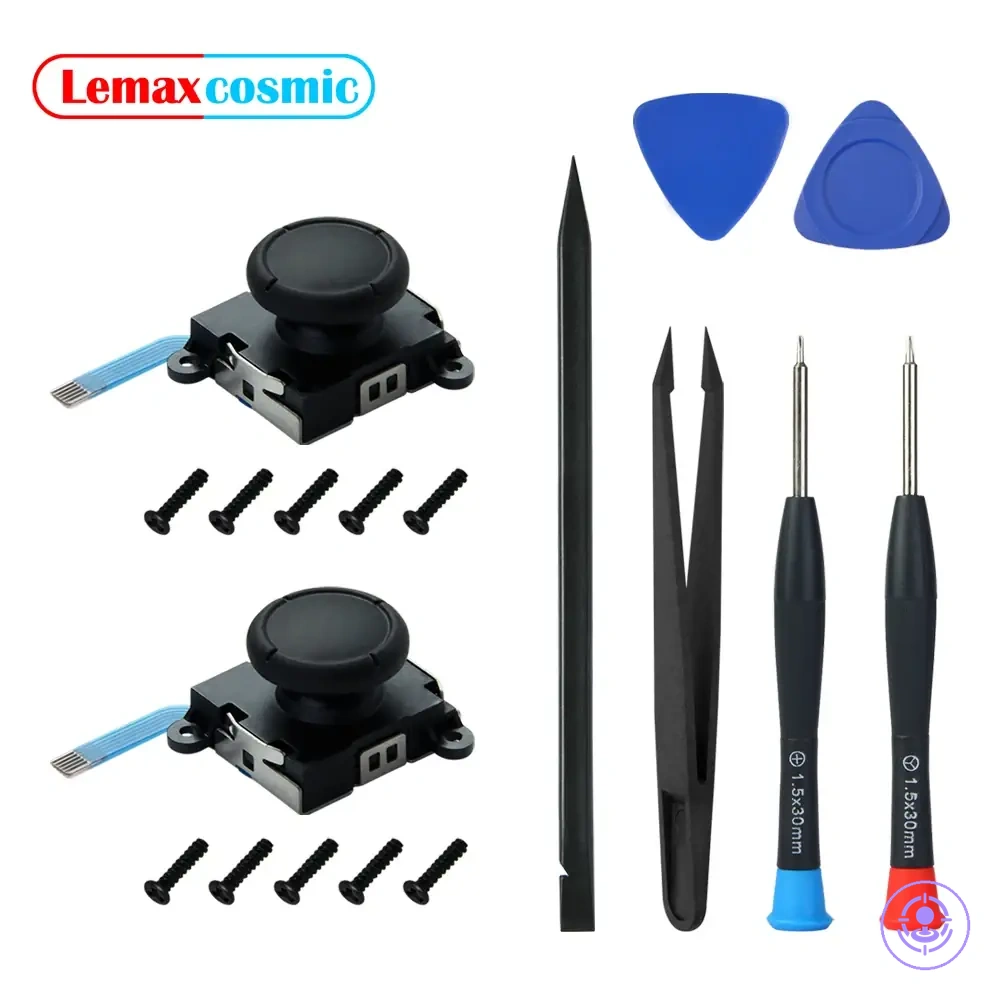
Replacement parts included in Joy-Con drift repair kits
The replacement analog stick module is the core part that makes a drift repair kit a repair kit rather than just a tool set. Without this module, the kit may not address the worn internal component that typically causes drift.
The image labels the key replacement parts included in these kits.
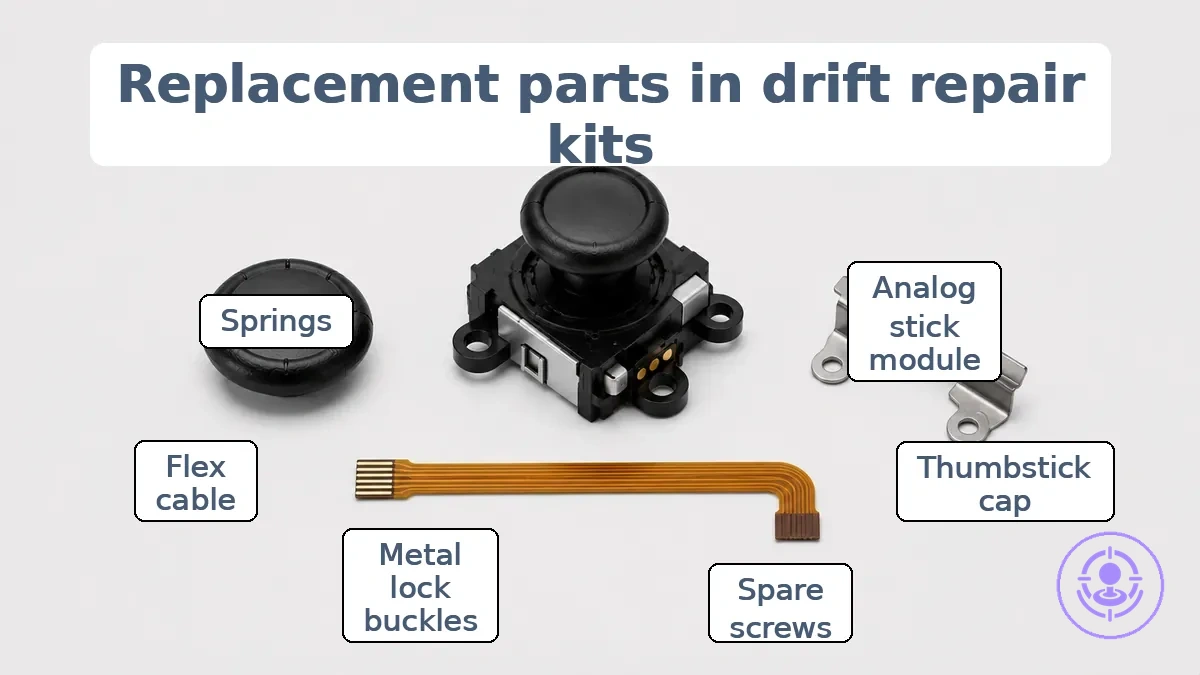
Common listing language maps to these actual replacement parts, helping identify what the listing provides.
- Analog stick module (joystick module): Listed as 'joystick replacement' or '3D analog joystick.' This is typically the primary component that addresses drift. It includes a ribbon cable and connector that require careful handling.
- Thumbstick cap: Often listed as 'thumbstick grip' or 'thumbstick cap.' This part sits on top of the module and affects feel. Its inclusion is useful but does not replace the need for the module itself.
- Spare screws (small hardware): Listed as 'spare screws' or 'replacement screws.' These reduce the risk of stalled reassembly if original screws are lost or stripped. If you don't already have spare screws, a missing screw can delay the repair.
- Metal lock buckles (alloy slider locks): Listed as 'buckle lock' or 'metal latch.' These replace the plastic rail lock that can wear over time. Their inclusion adds durability to the Joy-Con connection.
- Flex cable or ribbon cable: Listed as 'flex cable set' or 'ribbon cable.' Some kits include extra cables for buttons or the charging port. This can be helpful if those components are damaged, but the stick module remains the primary component for addressing drift.
- Springs: Listed as 'springs' or 'replacement springs.' These are small hardware items that support button or trigger reassembly. Their presence improves completeness but is not essential for the stick replacement itself.
Boundary cue: 'replacement stick included' must mean the module is included, not just caps—caps-only kits may not fix drift—and should be verified via photos or itemized contents.
Replacement analog stick modules and thumbstick caps in the kit
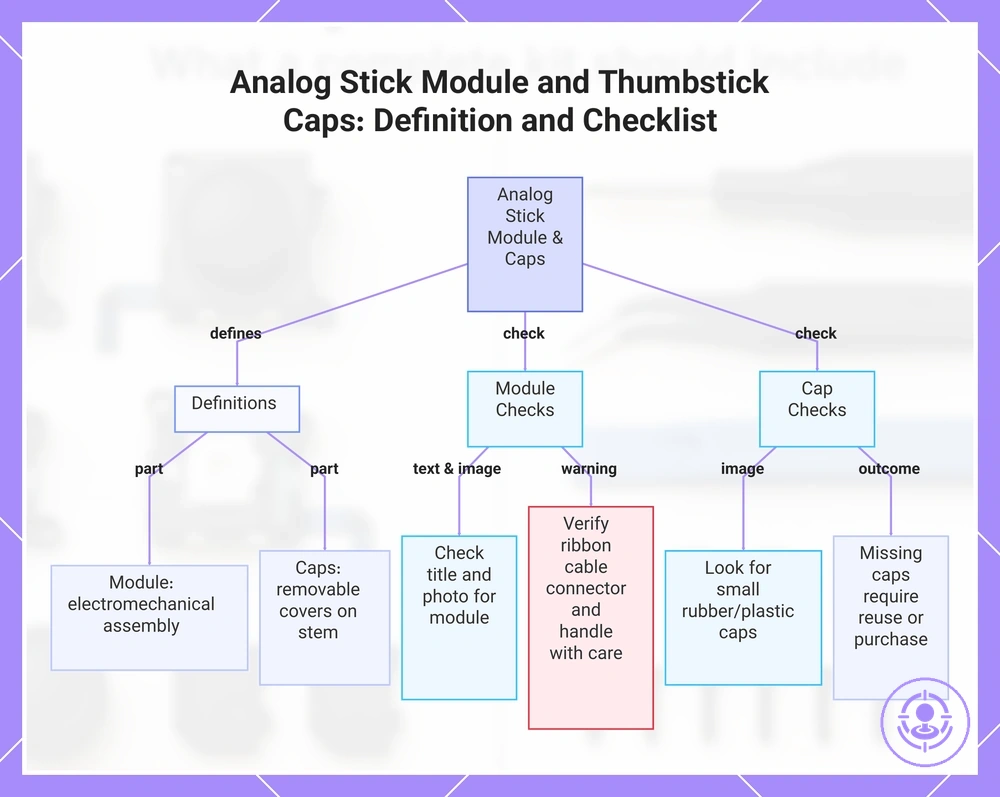
Analog stick module (also called joystick module) is the internal electromechanical assembly that houses the potentiometers and the mechanical base, while thumbstick caps are the removable covers that sit on the module stem. The following checklist helps confirm if the analog stick module and thumbstick caps are included.
- Look for the phrase 'analog stick module' or 'joystick module' in the itemized list or product title.
- In photos, look for a square or rectangular component with a protruding stem and a connected ribbon cable — that indicates the module.
- If small rubber or plastic caps appear in the image or are named in the description, those are thumbstick caps included with the module.
- If caps are not pictured or listed, the kit likely supplies only the module; original caps may be reused or purchased separately.
- Check that the module includes a ribbon cable connector; handle it carefully to avoid damage.
This chart defines the analog stick module and thumbstick caps, and provides a checklist to confirm their inclusion in a kit.
Spare Screws and Small Hardware Bundled with Replacement Sticks
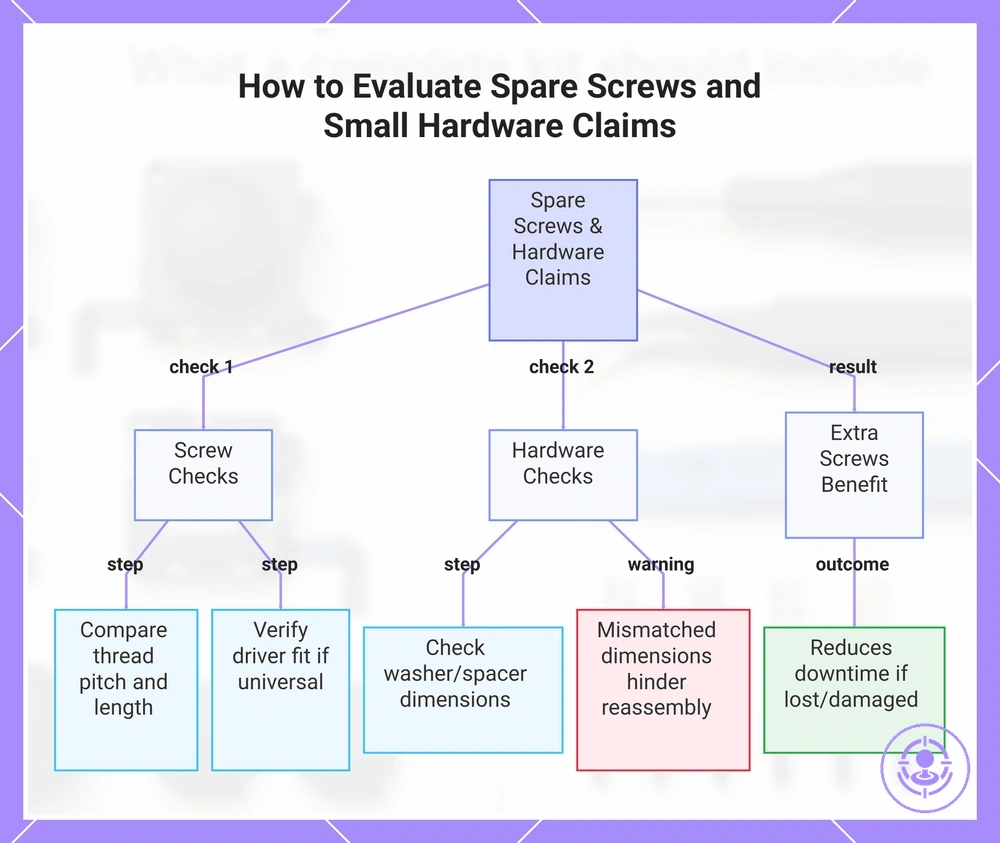
Spare screws and small hardware included with replacement sticks may not match the length or thread pattern required for safe reassembly. Verify spare parts against the original hardware or an itemized list; treat spare screws claims as optional unless clearly enumerated. Use these points to evaluate claims about spare screws and small hardware.
- If the listing claims included screws match the original, compare thread pitch and length with the existing screws; mismatches can lead to a loose or over-tightened joint.
- If spare screws are described as 'universal' or require a different tool, verify the driver fit; a mismatched driver profile increases the risk of stripping and stalled repair.
- If small hardware like washers or spacers are included, check that they match the original parts' diameter and thickness; mismatched dimensions may hinder proper reassembly.
- If the kit includes extra screws beyond what is needed, they can reduce downtime if a screw is lost or damaged during installation.
This chart shows the key checks and benefits when evaluating spare screws and small hardware bundled with replacement sticks.
Other small consumables sometimes included with Joy-Con drift repair kits
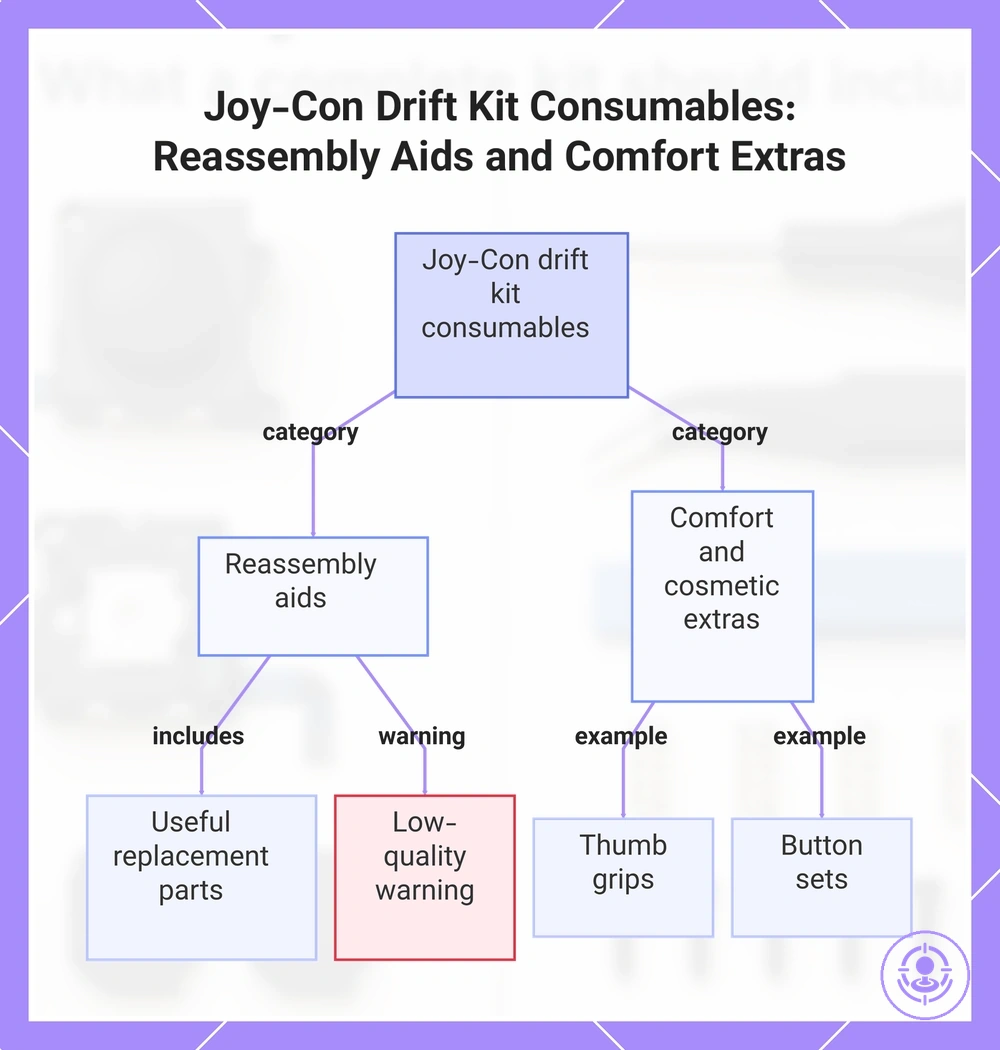
These small consumables are optional convenience items grouped by function that support cleaner handling and reassembly but are not required for repair.
- Reassembly aids – may reduce the need to reuse worn parts:
- Spare screws – useful if originals are stripped or lost.
- Metal lock buckles – can provide a more secure latch during reassembly.
- Flex cables – can replace damaged ribbon cables without sourcing separately.
- Low-quality screws or buckles – may leave residue or cause wasted effort; inspect before use.
- Missing consumables – user supplies them separately.
- Comfort and cosmetic extras – optional upgrades that improve feel or appearance without affecting drift repair:
- Thumb grips – add cushioning and grip for comfort.
- Button sets – allow color customization or replace worn buttons.
This chart categorizes the optional consumables included in Joy-Con drift repair kits, showing their purpose and usage notes.
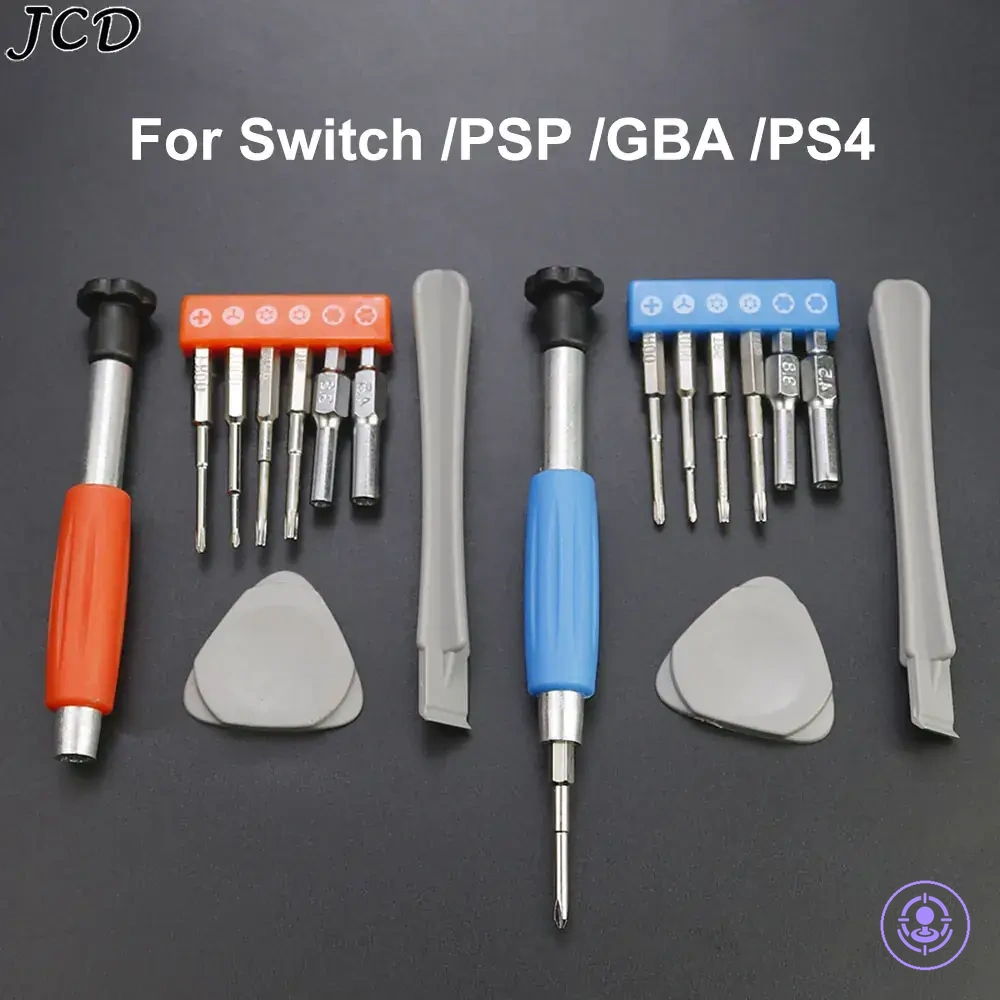
Tools Included in Joy-Con Drift Repair Kits
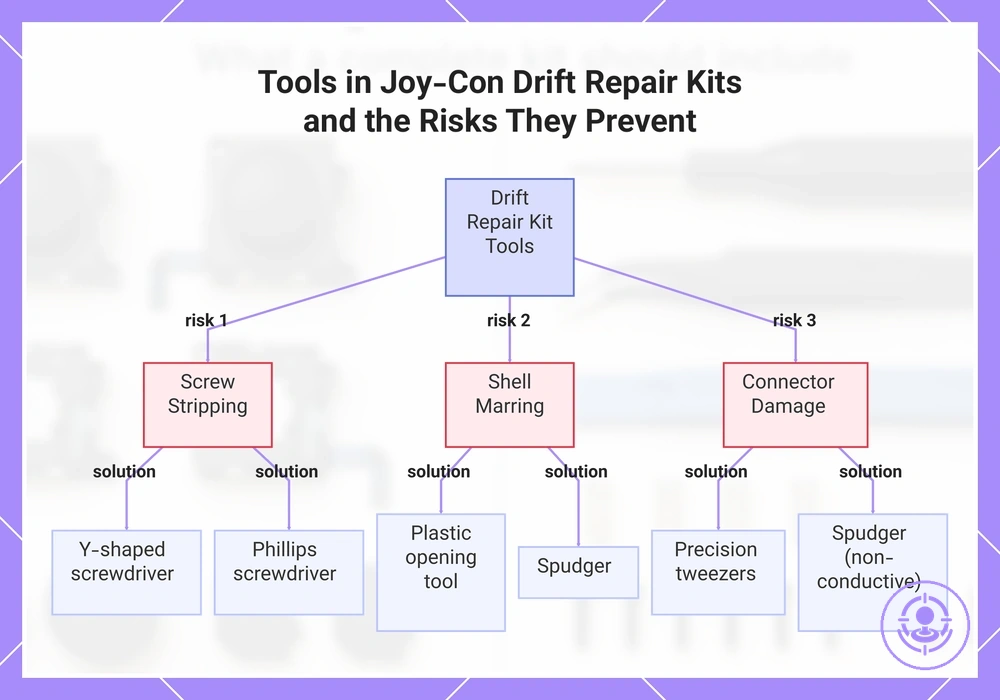
A complete set of tools — screwdrivers, opening tools, prying tools, tweezers, and spudger — reduces stripping, shell marring, and connector damage by lowering the risk of damaging screws, housing clips, or delicate ribbon cables. This checklist groups tools included in Joy-Con drift repair kits by job and the risk each tool helps prevent.
- Fasteners
- Y-shaped screwdriver – Opens the tri-point screws on Joy-Con shells; using the correct bit reduces the risk of stripping screw heads.
- Phillips screwdriver – Fits standard screws inside the controller; a properly sized tip reduces cam-out and damage.
- Spare screws – Replace lost or damaged screws; extras reduce the chance of reassembly issues from missing fasteners.
- Opening/Prying
- Plastic opening tool – Separates the shell halves without scratching or marring the plastic finish.
- Spudger – Pries open clips and lifts adhesive-secured components without gouging the housing.
- Pry bar or flat tool – Releases side clips on the Joy-Con rail; using a non-metallic tool reduces the chance of bending metal contacts.
- Handling/Connectors
- Tweezers – Grasp small ribbon cables and reposition connectors without tearing the delicate traces.
- Precision tweezers (curved or fine tip) – Maneuver flex cables in tight spaces and align connector latches.
- Spudger (non-conductive) – Disconnects ribbon cables from their sockets by flipping the latch; reduces the risk of shorting or tearing.
- Organization
- Magnetic mat or parts tray – Keeps screws grouped by size and location; reduces the chance of lost parts and reassembly mistakes.
- Small container – Holds removed screws and small components; prevents scattering during the repair.
- Screwdriver bit set or magnetic screwdriver – Allows quick bit changes and reduces the chance of dropping screws inside the controller.
Tools listed in a kit may not always match the tools actually usable — fit, quality, and listing clarity determine whether each tool works as expected.
This chart shows the three main risks (screw stripping, shell marring, connector damage) and the key tools in Joy-Con drift repair kits that prevent each risk.
Precision screwdrivers and bits typically needed for Joy-Con screws
For Joy-Con repairs, the fit of the precision screwdriver matters more than owning a large set of random bits. Listings that clearly specify the included bit types help buyers avoid tools that do not align with Joy-Con fasteners.
Precision screwdrivers and bits are often described by their intended use in product listings. The following points show what to look for in listing claims. Deeper screw and driver requirements are covered on the screwdriver and screw requirements page.
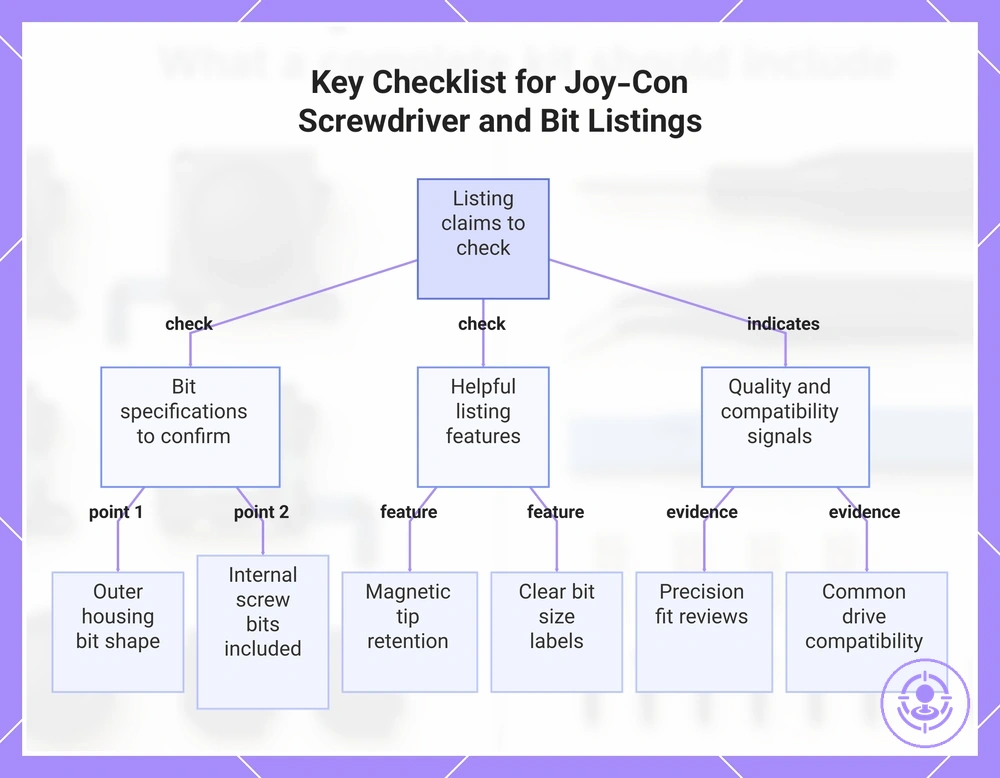
- A listing specifying the required bit shape for the outer housing confirms driver fit and reduces the risk of stripping screw heads.
- Including a bit for internal screws signals broader coverage and lowers the chance of using an incorrect driver.
- A magnetic tip, if mentioned, helps retain small screws and improves control during placement.
- Clear labeling of bit sizes reduces guesswork and the risk of selecting a driver that does not fit.
- Reviews mentioning precision fit or reduced cam-out indicate the driver engages screw heads without slipping, preventing damage.
- A set describing its included bit types as compatible with common screw drives helps avoid incomplete tool coverage.
This chart shows the main points to verify when evaluating precision screwdriver listings for Joy-Con repairs.
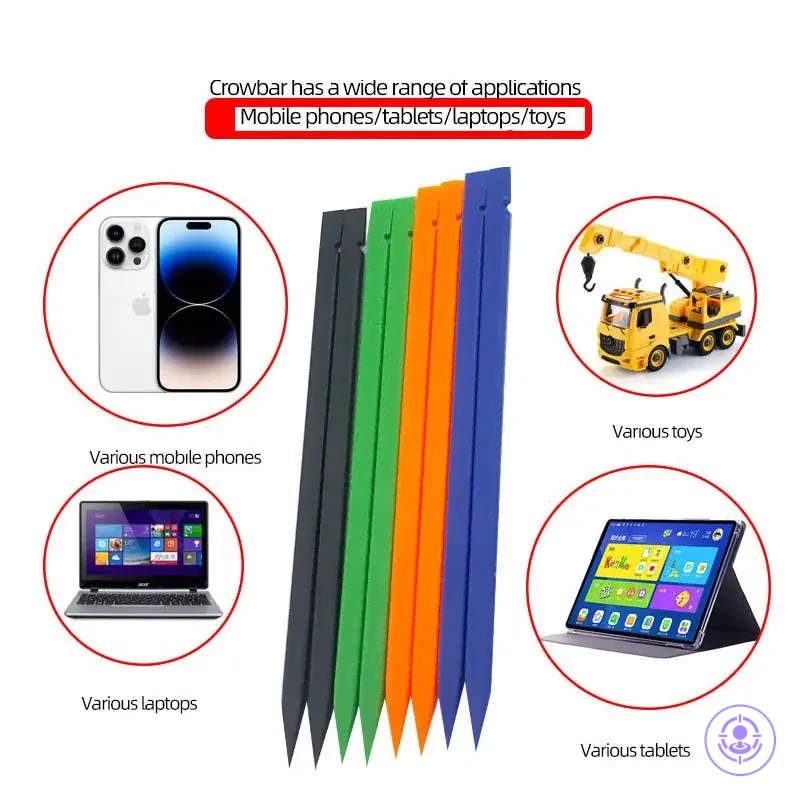
Opening and prying tools for the Joy-Con shell without marring
Purpose-made opening tools reduce the risk of marring the Joy-Con shell compared to improvised substitutes. These opening and prying tools are grouped by the specific risk each prevents.
Seam opening:
- Plastic opening pick – its fine tip reduces surface scratches when starting the seam between shell halves.
- Thin spudger – its narrow edge prevents gouging the seam edge during initial insertion.
- Wedge-shaped opening pick – separates shell halves typically without forcing the seam.
Clip release:
- Curved plastic pry bar – its curved shape releases internal clips typically without snapping them.
Gentle leverage:
- Flat plastic pry tool – its flat edge applies even leverage to reduce warping risk.
- Triangular paddle – spreads prying force, reducing localized stress and clip damage.
Caution: Improvised tools such as metal implements or household items can increase cosmetic risk and may leave visible marks or broken clips on the shell.
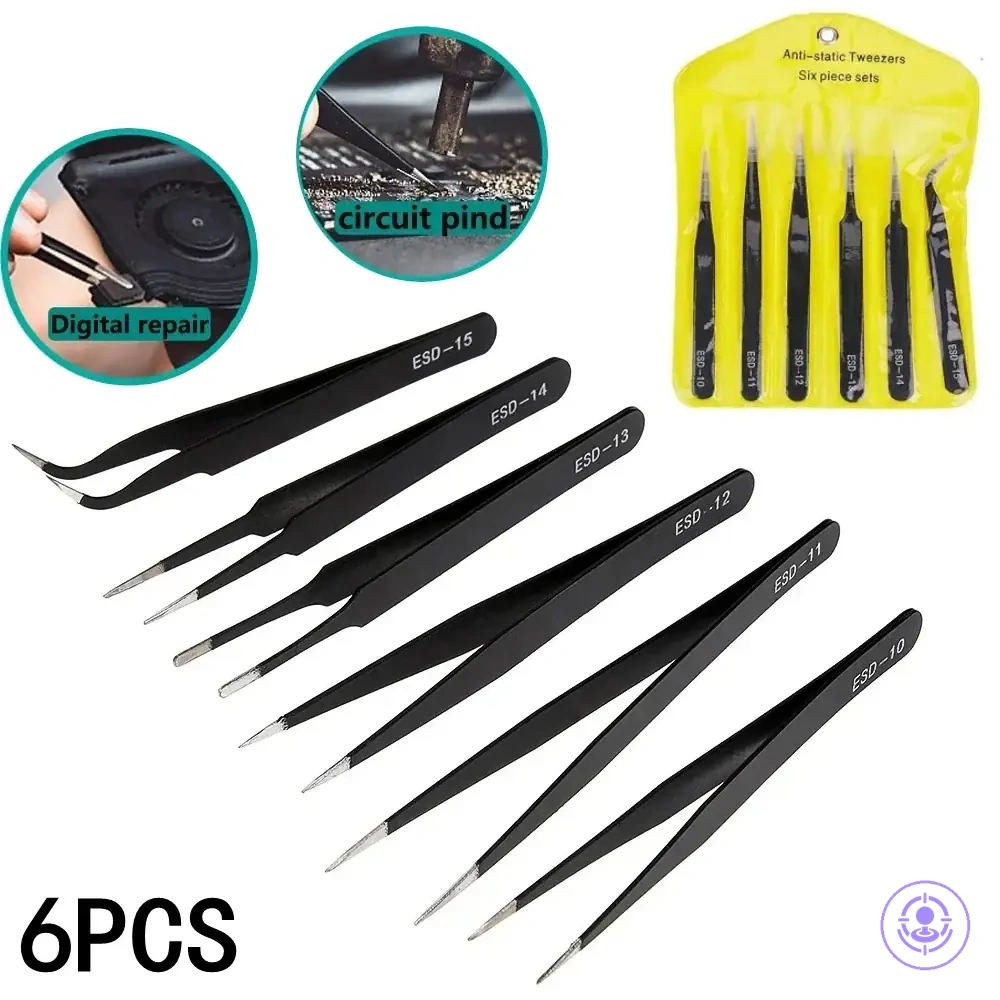
Tweezers and Spudgers for Ribbon Cables and Small Connectors
Handling ribbon cables and small connectors often leads to damage during repairs, so including tweezers and spudgers in a parts kit helps reduce that risk. The bullets below separate their roles to improve connector-handling safety.
- Tweezers with properly aligned and finished tips provide precision grip on ribbon cables, reducing tearing risk during disconnection.
- Micro-point tips improve grip on connector latches and flex cable ends, lowering the chance of tearing from handling errors.
- Curved tweezers improve visibility and access in tight spaces, reducing the chance of pulling on the wrong part.
- Flat-tip tweezers provide broader contact for flex cables and adhesive strips, lowering puncture risk compared to sharp points.
- Spudgers (plastic pry tools) apply non-marring leverage to release connectors, helping avoid scratching boards or bending pins.
- Thin nylon spudgers slide under flex cables smoothly, helping avoid damage that metal tools can cause with careless use.
- Many plastic spudgers include anti-static construction as a general precaution for sensitive electronics, but guaranteed anti-static protection should not be assumed.
- Without these tools, torn ribbons, loose connections, or damaged latches become more likely, requiring extra repairs.
'Tweezers included' is a common listing claim, but actual utility depends on tip shape, finish, and control, not just presence.
Screw Organization and Small-Part Handling Extras Sometimes Bundled
Optional organization aids bundled with screw and small-part handling extras help reduce lost screws and reassembly mistakes. These organization and small-part handling extras each target a specific mistake:
- Small parts organizer with divided drawers – helps prevent mixing screw sizes.
- Stackable container with clear compartments – reduces the chance of losing small parts and screws during multi-step repairs.
- Magnetic parts tray – minimizes the risk of screws rolling off the work surface or falling into inaccessible areas.
- Compartment box with removable dividers – allows quick sorting by size or type, reducing time spent searching for the right part.
- Wall-mounted storage bins – keeps small hardware within reach and reduces the likelihood of placing parts in the wrong bin after disassembly.
- Clear mason jars or reusable containers – provides visibility of contents without opening, helping prevent accidental mixing of similar-looking items.
Using the checklist to evaluate kit listings and bundles before buying
Evaluate kit listings and bundles by matching the itemized contents to the specific repair job you need, rather than relying on a 'complete' marketing label. A kit that works for one repair may lack the tools or module for another.
Clear evidence from a product listing comes from photos and itemized contents, not the headline description. If a listing shows only a generic image, you cannot verify what is included. For a deeper breakdown of what to check, refer to the selection criteria for a repair kit.
A common myth is that any kit labeled 'complete' will cover your repair. The truth is that completeness depends on whether the bundle includes the specific module, drivers, opening tools, and handling tools your repair requires. The phrase 'complete kit' often varies and should be translated into checkable categories. To evaluate kit listings and bundles, the table organizes criteria by category so you can verify completeness.
| Category | What to verify in the listing | Why it matters |
|---|---|---|
| Stick module | Confirm the listing shows the exact module type (e.g., left/right, color, revision). | Wrong module may not fit or function properly; missing module means the kit is incomplete. |
| Screwdrivers / bits | Check photos for the required bit sizes (e.g., Y-triwing, crosshead). | Missing or wrong bits can strip screws and stall the repair. |
| Opening tools | Look for spudgers, pry tools, or plastic openers in the itemized list. | Without proper opening tools, you risk damaging the housing during disassembly. |
| Tweezers / spudgers | Verify that fine-tipped tweezers or spudgers are included for ribbon cables. | Handling small connectors without these tools increases the chance of tearing cables. |
| Organization extras | See if the listing includes a screw mat, tray, or labeled compartments. | Keeping screws organized prevents confusion during reassembly. |
| Spare screws / hardware | Check if the bundle provides replacement screws or brackets. | Missing hardware can force you to reuse worn parts or make extra purchases. |
If a listing is vague about any category, you may face extra purchases or a stalled repair. Missing tools increase the risk of damaging components during disassembly. Deeper quality signals and fit checks are handled in the buyer-guide page, not fully solved here. Use this framework to decide whether a kit listing is worth your time.
Here are product examples that may make comparison easier. Before buying, always review the compatibility criteria, essential features, and product details.
Recognizing parts-only kits versus full tool kits from the contents list
Parts-only kits supply the replacement component alongside minimal tools or none, assuming you already own the screwdrivers and spudgers needed for disassembly. Full tool kits bundle those opening tools and handling aids with the replacement part, often covering the repair sequence from case separation to reassembly.
Recognizing parts-only kits versus full tool kits from the contents list helps you classify a listing by typical contents. For a deeper comparison, see repair kit types compared.
Parts-only kits often include:
- Replacement module only – you must supply all disassembly tools from your own collection.
- One small plastic pry tool – enough for basic case opening but not for fine handling.
- No screwdriver bits – assumes you already have a Phillips #00 or Y-tip driver.
- No tweezers – ribbon cable handling requires separate fine-tip tweezers you already own.
Full tool kits often include:
- Set of screwdriver bits (Phillips, Y-tip, tri-wing) – covers most screws encountered during typical repairs.
- Tweezers with fine pointed tips – allows safe manipulation of delicate ribbon cables and small parts.
- Plastic opening tools (spudgers, pry bars) – reduces risk of scratching the housing during case separation.
- Suction cup or adhesive remover – aids in lifting the screen or battery with reduced risk of damage.
- Small parts organizer or magnetic mat – helps keep screws sorted by location, reducing the chance of lost hardware.
Completeness red flags that usually lead to extra purchases or repair risk
Completeness red flags are signals such as missing job-critical categories, unclear contents, or photos that prevent verification. These red flags indicate likely extra purchases or repair risk.
- Unclear contents or missing photos — the resulting verification gap may raise decision risk.
- Missing screwdrivers from the itemized list — may lead to stripping risk, stalled repair, and extra tool purchases.
- Missing opening tools — may cause shell marring or clip damage during disassembly.
- Missing tweezers or spudger — may increase risk when handling ribbon cables and connectors.
- Description without category labels — may hide whether essential tools are included.
- Single packaging photo without contents — may prevent verification of completeness.
- No mention of replacement parts categories — may require separate purchases later.
- Vague material descriptions — can lead to using wrong tools and damaging components.
- Incomplete itemized list — can make it hard to confirm if all parts are included.