Preventing recurring Joy-Con drift after a repair kit: why it returns and how maintenance improves long-term stability
Preventing recurring Joy-Con drift after a repair kit means lowering the probability that drift-like inputs reappear, rather than a one-time fix. Understanding why it returns and how maintenance improves long-term stability is central, as maintenance actions can reduce that risk. The focus here is on those maintenance actions, not on the repair workflow itself.
Three main mechanism classes drive recurrence: contamination from dust or residue, wear from repeated friction cycles, and fit-related alignment changes in the stick assembly.
- Contamination: Dust and residue can interfere with contact surfaces, producing erratic inputs.
- Wear: Friction from regular use gradually changes tolerance, allowing unintended movement.
- Fit: Slight shifts in alignment after reassembly may cause the stick to register off-center positions.
Recurring drift after a Joy-Con repair: what it looks like and what is still in scope
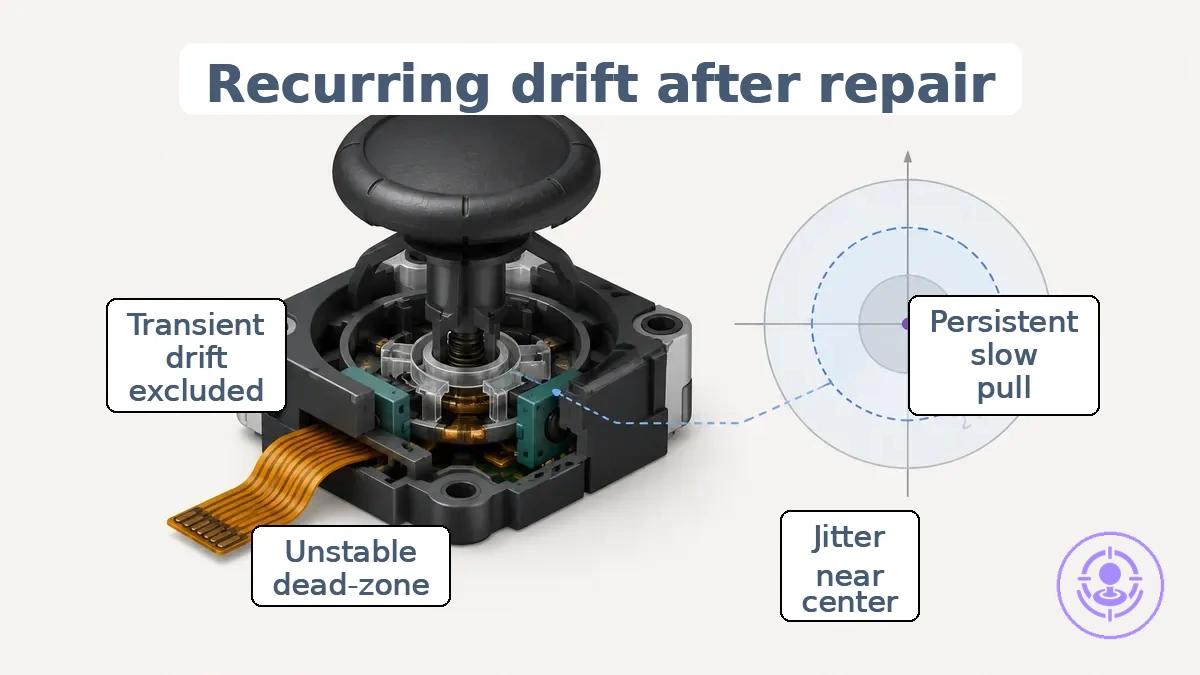
Recurring drift after a Joy-Con repair is unintended stick input that returns after an initial period of normal behavior. This reappearance can occur days or weeks later, often after the controller has been used for a few sessions or exposed to typical conditions. This symptom pattern defines what remains in scope.
Not every unwanted stick movement after repair signals a true recurrence. A persistent slow pull, jitter near the center, or an unstable dead-zone that appears consistently across multiple sessions points to a recurring issue. In contrast, drift-like behavior that changes or disappears after recalibrating the control sticks may be transient and not a genuine recurrence.
Distinguishing these patterns helps determine whether the cause lies in the stick mechanism itself or in the controller's calibration or settings. Recurring drift after a Joy-Con repair often presents as a biased stick input or jitter near the dead-zone, as shown in the following diagram.
- Persistent across sessions: slow pull in one direction (e.g., downward) that typically does not change after recalibration.
- Persistent across sessions: jitter that appears in the calibration screen, indicating a recurring issue.
- Persistent across sessions: unstable dead-zone causing repeated unintended inputs, especially after heavy use or dust exposure.
- Drift that appears after heavy use or reassembly and fades within a session or a few minutes.
- A symptom that appears often when the stick is held in a particular position (e.g., up-left) and resolves when moved.
- Drift that can start after a controller firmware update or system update and then settle.
- Changes after calibration: drift behavior that appears only during specific games with sensitive dead-zone settings and stops when the game is closed or after recalibration.
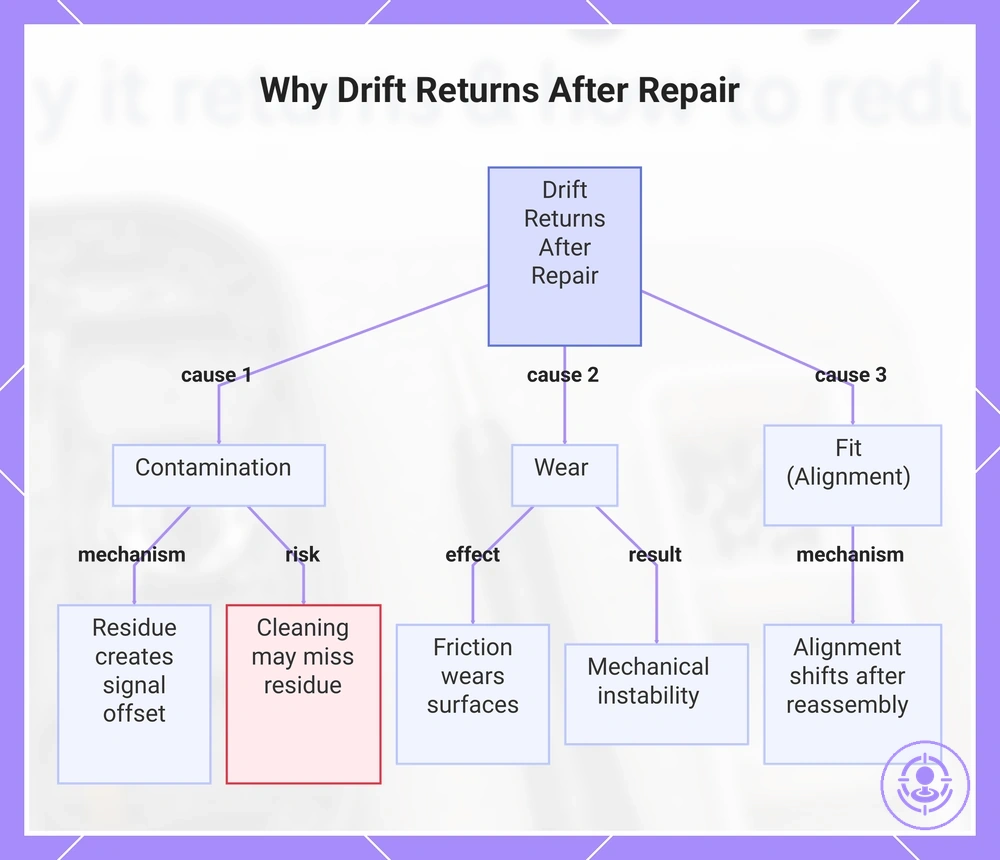
Why Drift Returns After Repair: Contamination, Wear, and Post-Repair Variables That Reintroduce Symptoms
Recurring drift after repair most often stems from a small set of variables: contamination, wear, and fit (alignment).
Contamination involves residue — dust, skin oils, or debris that build up on the internal contacts. Over time, this residue can create a conductive bridge or insulative layer that produces a signal offset, making the stick register movement when none is intended. Cleaning targets this contamination directly, but if residue remains in crevices or reaccumulates quickly, drift symptoms can return shortly after the repair.
Wear and fit are distinct but related mechanisms. Friction from repeated use wears down surfaces, and alignment can shift after reassembly, creating mechanical instability that a repair may temporarily fix but not eliminate. Repair may restore function, but exposure and wear can resume, so underlying conditions can reemerge. Whether drift returns later or never improves depends on the specific combination of mechanisms and variability in use and environment.
This chart shows the three main causes of drift recurrence after repair: contamination, wear, and fit (alignment), and how each contributes to symptom return.
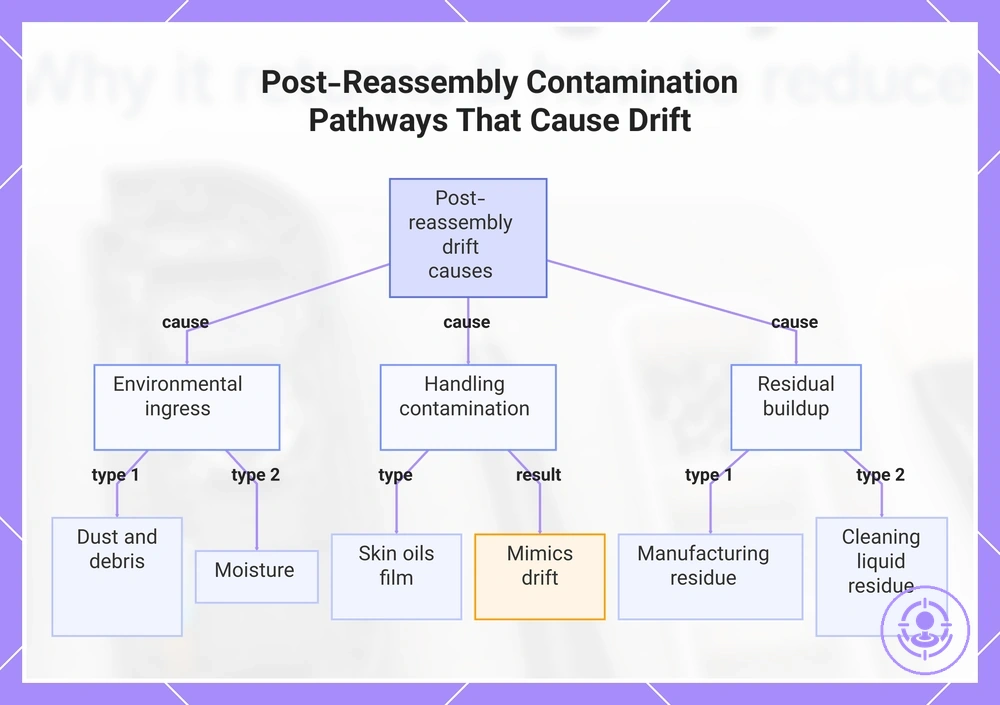
Contamination and residue pathways that build up again after reassembly
Dust, skin oils, and residue can re-enter or remain near the stick contacts after reassembly, often accumulating gradually. These contaminants settle on the contacts or form a film that interferes with electrical readings, leading to drift-like behavior that can return gradually.
- Dust and debris from the environment enter through gaps around the joystick module and can land directly on the stick contacts, causing intermittent contact noise.
- Skin oils from fingers during handling can leave a thin film on the contacts and internal surfaces, which can create a conductive or insulating layer that mimics drift.
- Residue from manufacturing or repair can remain near the contacts and attract more grime over time, gradually degrading signal quality.
- Over-application of cleaning liquids during spot cleaning can spread dissolved grime into crevices, where it dries into a residue that can build up with repeated use.
- Moisture from humid environments can settle on the stick contacts after reassembly, interfering with electrical readings.
This chart shows the main contamination pathways that can cause drift-like behavior after reassembly, including environmental ingress, handling contamination, and residual buildup.
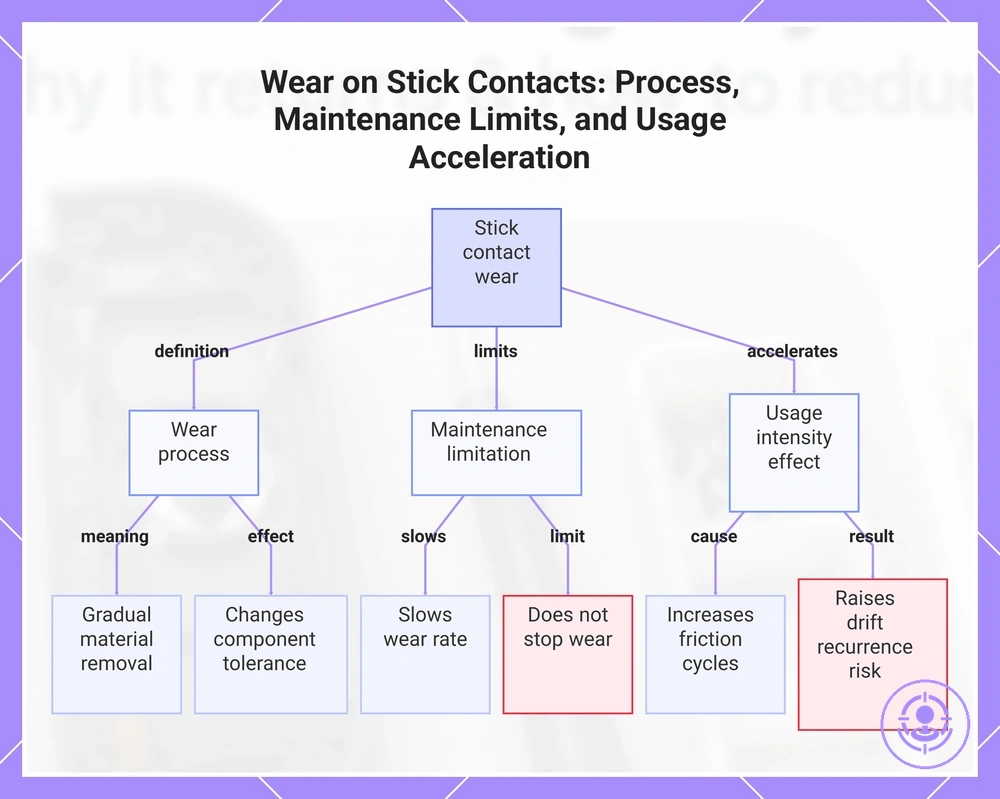
Wear and friction patterns that maintenance can slow but not fully eliminate
Wear is the gradual removal or deformation of material from contact surfaces under repeated friction and cycles. On stick contact surfaces, this process changes the tolerance between components over time. Maintenance slows the rate of wear but does not stop it entirely.
Higher usage intensity increases the number of friction cycles, which accelerates tolerance change and can introduce signal noise. This instability can raise the likelihood of drift recurrence even after a repair kit has been applied. Maintenance reduces the frequency of recurrence, not the certainty. The rate of return depends on how intensively the device is used.
- High usage intensity accelerates wear.
- Frequent friction cycles increase wear.
- Tolerance drift progresses with use.
- Signal noise can indicate wear progression.
- Recurrence risk rises with continued use.
This chart shows the nature of wear on stick contact surfaces, the effect of maintenance in slowing but not stopping wear, and how high usage intensity accelerates wear and increases recurrence risk.
Fit, pressure, and alignment variables that can re-trigger drift-like inputs
After a repair, subtle fit, pressure, or alignment conditions can create a mechanical offset or pressure point (bias) that may be mistaken for component wear. These symptoms are often conditional, appearing only at certain holding angles, grip pressures, or stick positions.
- Seating of the stick module – A module that is not fully seated can create a mechanical bias that restricts motion in one axis. That can produce an offset signal resembling drift, especially when pressing the stick toward that side.
- Pressure from internal housing – Uneven contact between the housing and the stick assembly can apply unintended pressure, causing restricted movement that triggers drift-like inputs at certain grip pressures.
- Alignment of the stick cap – A slightly misaligned cap shifts the neutral point, resulting in an angle-dependent bias that fades when the stick is moved away from the offset position.
- Uneven screw torque during reassembly – Over‑tightening or uneven tightening of housing screws can warp the board or module mount, introducing a pressure point that produces intermittent offset signals under normal use.
- Sensor alignment relative to the magnetic field – A slight shift in the Hall‑effect sensor or potentiometer can cause the signal to read differently when the stick is tilted forward versus backward. This bias often appears only in specific movement ranges.
- Fit of the ribbon cable – A poorly seated or pinched ribbon cable can create intermittent contact changes that mimic drift. The symptom may appear only when the controller is held in a certain way.
Before concluding that the repair has failed or that wear has returned, rule out a conditional bias that changes with angle or grip pressure. This kind of offset can often be detected by gently varying the hold angle or applying light pressure to different parts of the housing while observing the input signal.
Cleaning after replacement: a low-risk routine that targets the main drift-return mechanisms
Gentle, repeatable cleaning reduces the chance that drift will return after a replacement by removing dust and residue before they reach the contact area.
When drift returns days or weeks after a repair, light cleaning is often the appropriate first response. The problem may be caused by fine debris that settled around the stick base during regular use. Cleaning this area with a soft, damp cloth can clear the debris without opening the controller. When the drift returns quickly after this cleaning, the cause is likely deeper than surface residue, and further confirmation steps are needed.
The annotations in the image show where to apply gentle cleaning on a Joy-Con and where to avoid liquid, highlighting safe cleaning points and a warning not to saturate the stick area. The following steps organize this low-risk routine.
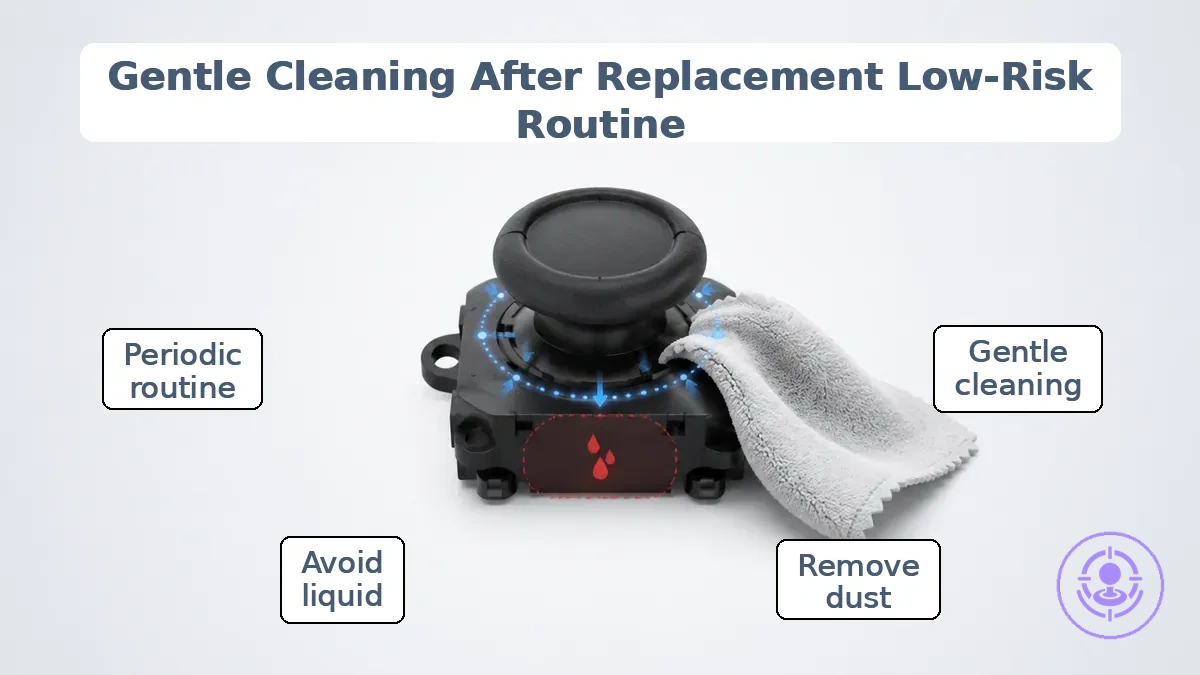
- Power off the controller completely and inspect the base of the analog stick for visible dust or debris.
- Lightly dampen a soft, lint-free cloth or a cotton swab with isopropyl alcohol. Squeeze out any excess liquid—the cloth should be damp, not wet.
- Gently wipe around the circumference of the stick where it meets the housing. This removes dust and residue without flooding the contact area. Do not force the swab into the gap.
- Use a dry cloth or swab to pick up loosened particles. Repeat the light wipe if residue remains visible.
- Allow the cleaned area to dry fully before using the controller. Sufficient dry time reduces the risk of moisture migrating into the mechanism.
- Repeat this routine periodically, such as once a week or after extended play sessions. Consistent, gentle cleaning reduces recurrence risk without exposing the stick to harsh chemicals or excessive wiping.
When these conditions appear, cleaning is unlikely to resolve the drift and you should switch to confirmation checks.
- Drift reappears within hours of cleaning.
- The stick feels loose, gritty, or does not return to center.
- Cleaning leaves visible residue or liquid inside the stick area.
- Drift is consistent in one direction and does not vary with debris removal.
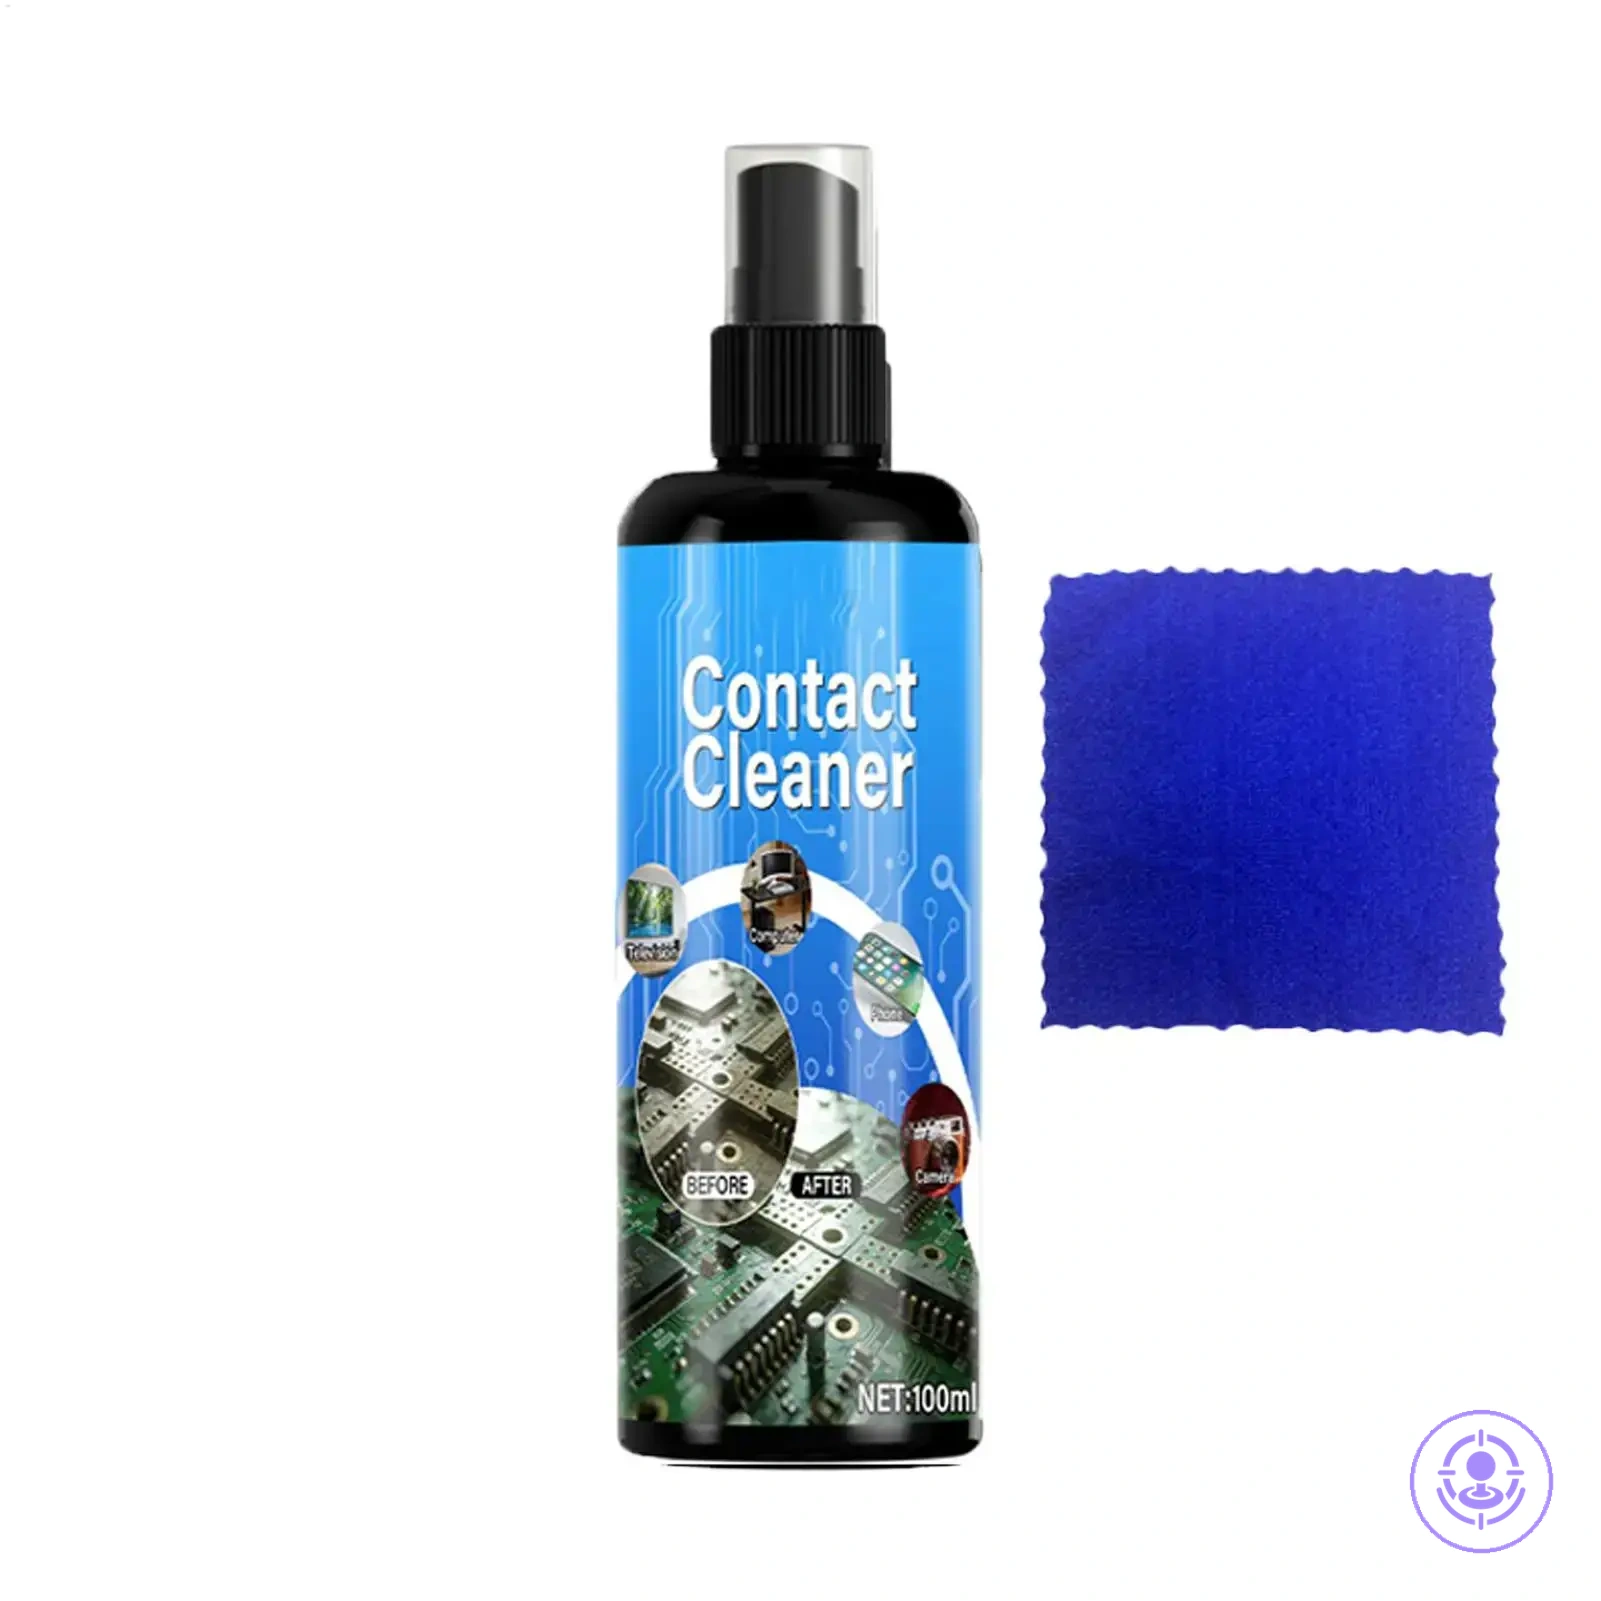
Cleaner selection and safe application boundaries for Joy-Con internals
Low-risk cleaning agents for Joy-Con internals are those that evaporate quickly, leave minimal residue, and expose components to limited moisture.
Even with low-risk agents, boundaries on amount, distance, and drying time need to be followed to prevent damage.
Safer usage patterns include:
- Applying the cleaner to a brush or cloth first, not directly to the controller, to control moisture exposure.
- Using only enough cleaner to lightly dampen the application tool; excess liquid increases residue and prolongs drying time.
- Allowing sufficient drying time (at least 30 seconds to a few minutes) before reassembly or powering on.
Common risky mistakes include:
- Applying large amounts of liquid directly to the rail or stick base; excess liquid can seep into components and cause short circuits.
- Using harsh solvents or abrasive cleaners that may damage plastics and leave conductive residues.
- Powering on or using the controller before the cleaner has fully evaporated; moisture combined with electricity creates a risk of short circuits.
- Ignoring warning signs such as sticky buttons, delayed response, or visible moisture after cleaning; these indicate improper application that should be corrected before reuse.
A maintenance cadence based on usage intensity and environment exposure
The right maintenance cadence for Joy-Con drift prevention depends on your usage intensity and the dust and humidity the controllers face (exposure). The checklist below assigns a tier based on your conditions and explains which actions to repeat and when to adjust.
- Light usage with low dust and humidity: choose a light cadence with occasional dust removal and quick inspection.
- Controllers used a few times a week and kept in a clean indoor case: a light cadence with infrequent cleaning handles drift risk well.
- Minimal usage and low exposure: a light cadence with periodic inspection is adequate.
- Daily usage with moderate dust and humidity: use a moderate cadence with regular dust removal and periodic inspection.
- Taking Joy-Cons to different environments with moderate use: a moderate cadence with more frequent cleaning helps.
- Moderate usage with noticeable but not heavy exposure: a moderate cadence with inspection every few sessions works.
- Heavy daily use with low exposure: adopt a heavy cadence with frequent cleaning and regular inspection.
- Severe dust or humidity with moderate usage: opt for a heavy cadence with cleaning after each session and thorough inspection.
- Heavy use in a dirty environment: use the heaviest cadence—cleaning after every use and inspecting after each session.
- If you notice a sudden increase in jitter after dusty travel: move up one tier and increase cleaning frequency accordingly.
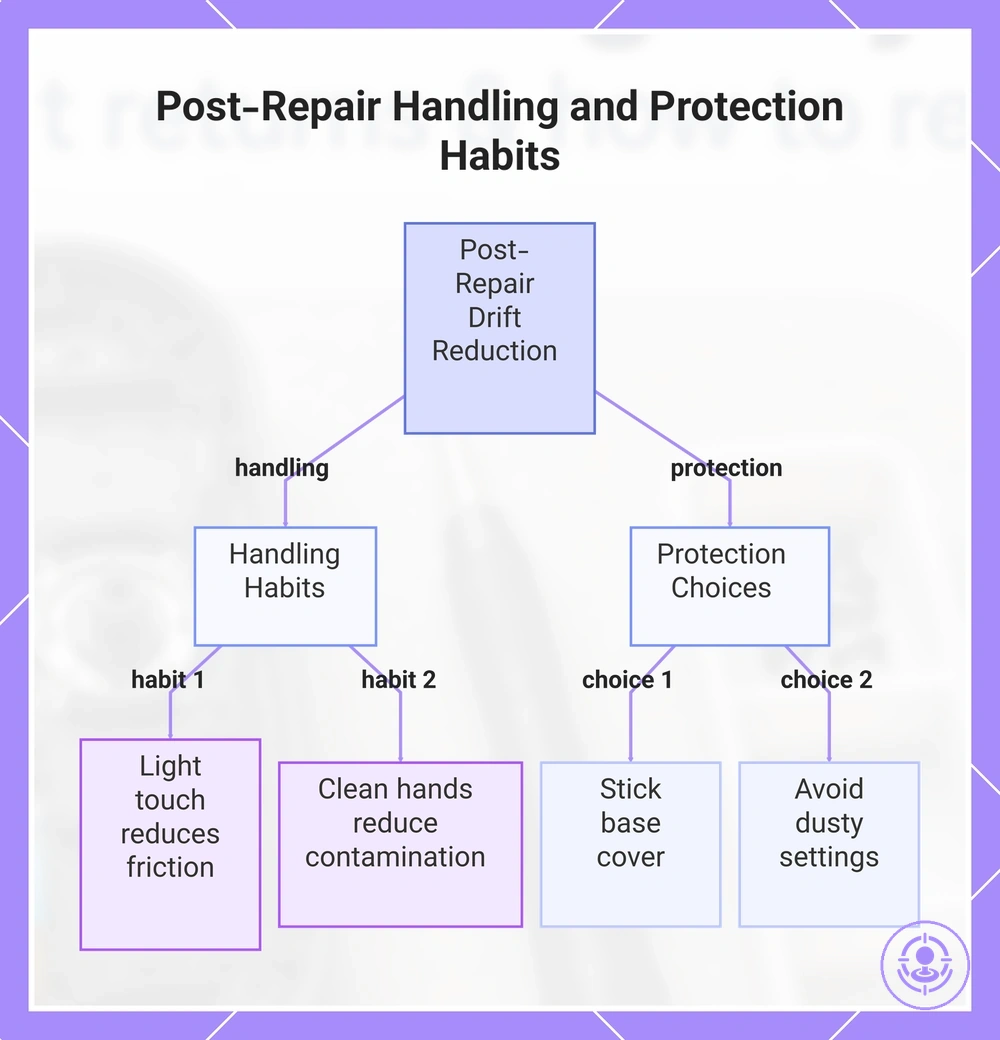
Reducing wear after repair: handling habits and protection choices that lower drift recurrence
Reducing friction and contamination exposure in daily use helps delay drift recurrence after a repair. Friction wears the internal contact surfaces, and dust and debris can interfere with the sensor's movement; light touch and clean hands allow the stick mechanism to operate with less resistance, whereas constant force and dirty environments can accelerate wear. These habits are part of post-repair maintenance; the full process is at the Joy-Con drift repair kit hub. The effect depends on individual usage patterns, but these habits can help extend the stable period.
Handling
- A light grip reduces pressure on the stick, lessening friction and delaying wear on internal parts.
- Clean hands before each session limit contamination exposure by reducing dust and oils that enter the mechanism.
- Avoiding hard presses during fast movements cuts unnecessary force that can accelerate degradation.
- Releasing the stick fully between inputs lets internal components rest, reducing sustained pressure that can speed wear.
- Gentle flicks instead of sustained holds reduce tension on the spring and sensor contacts.
Protection
- A thin cap or grip covering the stick base reduces dust and debris entry during use without adding resistance.
- Keeping the controller on a clean, dry surface during use reduces exposure to dust and spills from the environment.
- A soft cover over the thumbstick protects from spills and particles that could enter the sensor area.
- Avoiding use in dusty or dirty settings reduces the amount of debris that can settle on the stick mechanism.
This chart shows the key handling habits and protection choices that help reduce the chance of drift returning after a Joy-Con stick repair.
Environment and Storage Conditions That Shorten Post-Repair Stability
Environmental exposure factors such as humidity, dust load, and temperature swings influence the speed at which contaminants build and materials degrade after a Joy-Con drift repair. High humidity can leave conductive residue on contact surfaces, increasing the likelihood of recurrence. Dust ingress into the stick assembly can lead to increased friction or erratic movement. Temperature fluctuations stress plastic components and adhesives, weakening their long-term stability.
This table organizes environment and storage conditions by mechanism and typical symptom timing effect.
| Factor | What it changes | Typical symptom timing effect | Simple mitigation |
|---|---|---|---|
| Humidity | Residue buildup on contacts | Drift may return sooner if stored in high-humidity areas | Keep controller in dry, enclosed storage |
| Dust load | Ingress into stick area | Increased stickiness or erratic movement can appear within weeks | Use a protective case when not in use |
| Temperature swings | Material stress and adhesive weakening | Gradual loosening of internal parts may occur over months | Avoid leaving controller in hot or cold environments |
Storage changes may delay drift recurrence, but the actual timing depends on individual storage conditions and local climate.
- High-exposure storage (e.g., a dusty room or humid environment) can accelerate recurrence.
- Lower-exposure storage (e.g., a drawer or climate-controlled case) typically provides longer post-repair stability.
When Drift Seems Back: Quick Confirmation Steps Before Assuming the Repair Failed
Recurring drift reports sometimes stem from settings, calibration, or transient input noise rather than immediate hardware failure. These confirmation checks let you interpret results accurately and avoid unnecessary rework.
When drift seems back, these quick confirmation steps separate true hardware recurrence from resolvable settings issues. Begin with testing and calibration after repair, since calibration errors often mimic drift.
The flow chart organizes the check–observe–interpret logic of the quick confirmation steps, making symptom interpretation straightforward.
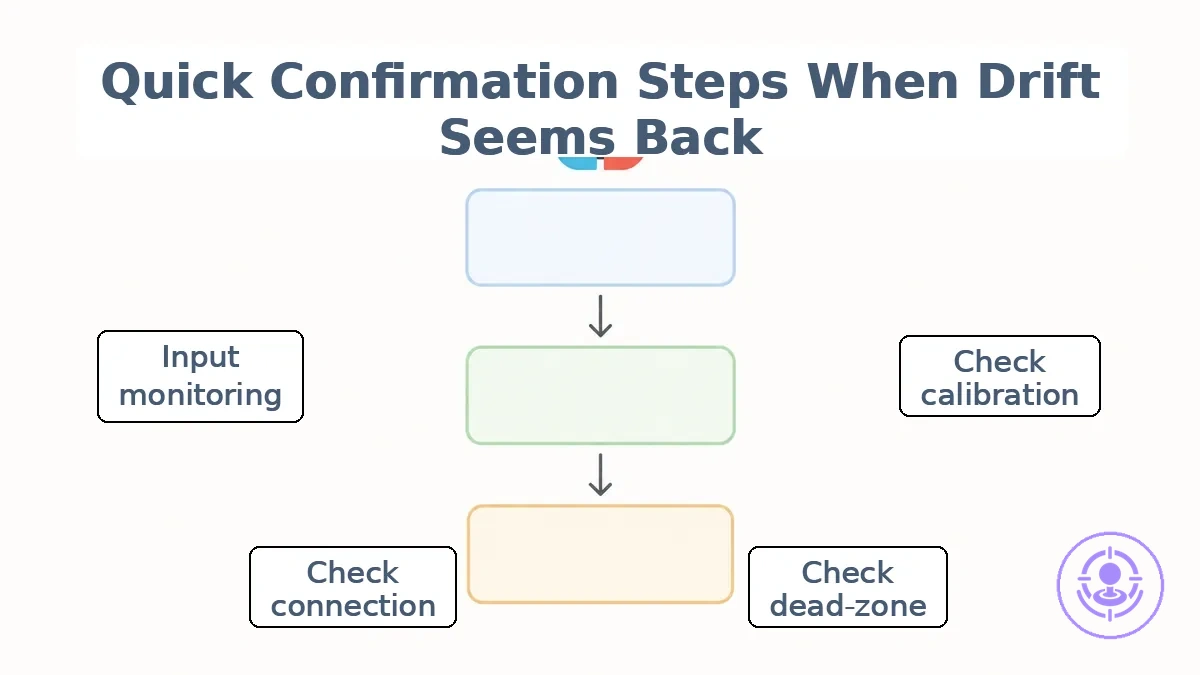
- Check calibration using the controller’s calibration tool. Observe whether drift stops after the procedure. Interpret: If drift disappears, it suggests a calibration misalignment rather than mechanical wear. If drift remains, proceed to a dead-zone check.
- Check dead-zone settings in game or system menus. Increase the dead-zone value. Observe if minimal drift no longer registers. Interpret: If increasing dead-zone masks the symptom, the drift is minor and may be acceptable. If drift continues even at maximum dead-zone, hardware involvement becomes more likely.
- Check connection stability by verifying the controller is properly paired and away from metal surfaces or wireless interference. Observe whether drift occurs only in wireless mode or also when connected via USB. Interpret: Drift limited to wireless mode points to intermittent packet loss; re-pairing the controller can often resolve it. Drift present in both modes suggests a hardware issue.
- Check behavior across games by testing the same joystick in multiple titles with different default dead-zone settings. Observe if the drift is consistent across all games. Interpret: Consistent drift across games points to a hardware origin. Drift confined to one game suggests software sensitivity rather than a controller defect.
- Use input monitoring by connecting the controller to a PC or using built-in test software to view raw joystick values. Observe whether the axis returns to center when released. Interpret: A non-zero reading when the stick is untouched suggests drift. This result strongly suggests the joystick module is the cause.
- Reset controller software by performing a full power cycle or sync-button reset. Observe if the drift clears immediately. Interpret: If drift disappears after reset but returns within a short session, it points to a worn module rather than a temporary glitch. If drift never returns, the issue was likely a transient error.
- Compare with a separate controller on the same game and system. Observe whether the second controller also drifts. Interpret: If the second controller shows no drift, the original controller likely has a hardware issue. If both drift, the cause is game or system settings. For deeper analysis, refer to post-repair troubleshooting checks.
Decision gate: If symptoms change after calibration, pause and retest. If they persist unchanged across checks, move on to replacement or rework signals.
Calibration and settings checks that can mimic recurring drift symptoms
Calibration or settings states can mimic drift-like behavior by altering input interpretation—for example, a narrow dead-zone or aggressive sensitivity curve can make normal stick movements appear as unintended input. A change after adjustment can indicate whether the symptom was settings-driven rather than hardware-driven.
- A dead-zone set too low can mimic constant drift by interpreting slight stick movement as input. Confirmation indicator: after increasing the dead-zone, the symptom often reduces or disappears.
- A dead-zone set too high can mimic intermittent drift or delayed response by requiring excessive stick travel before recognition. Confirmation indicator: after reducing the dead-zone, responsiveness often improves without drift.
- A sensitivity curve that is too aggressive can mimic jitter or twitchy input, especially near center. Confirmation indicator: after lowering sensitivity or switching to a linear curve, jitter often stops.
- A calibration offset that has not been reset can mimic persistent drift in a single direction. Confirmation indicator: after performing a factory calibration reset, drift often stops.
- An in-game calibration override can mimic stick drift if the game's calibration is misaligned with system settings. Confirmation indicator: after resetting in-game calibration to default, the issue often resolves.
- Sticks that are not re-centered after calibration can mimic drift if the software does not detect the true center. Confirmation indicator: after recalibrating and ensuring the stick is centered, drift often stops.
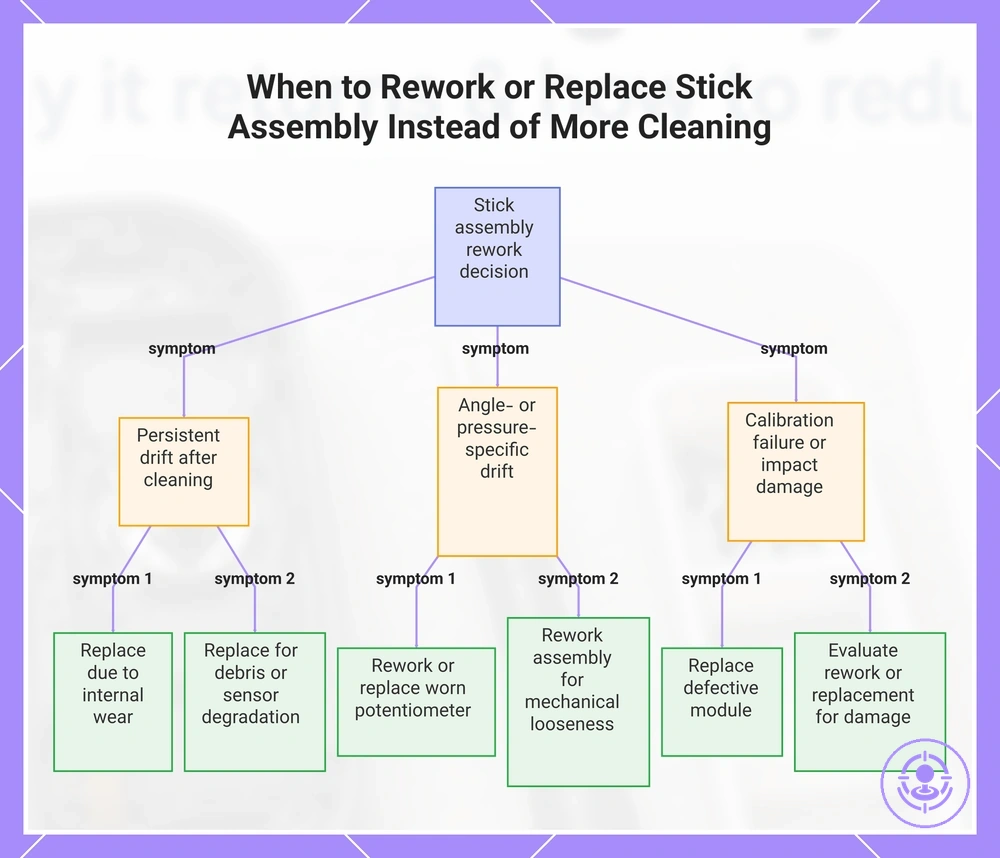
Signs the stick assembly needs rework or replacement rather than more cleaning
When persistent symptoms like stick drift or erratic input persist after safe cleaning and calibration checks, the stick assembly may have a physical issue that cleaning alone cannot fix. This persistence after confirmation checks marks the point where maintenance reaches its limits. Further cleaning is unlikely to help at this stage.
Patterns such as drift returning immediately after cleaning or at a specific angle suggest that part tolerance or fit may be involved. This checklist maps symptom patterns to likely issue classes to help decide whether rework, replacement, or deeper guidance is appropriate. When repeated failures relate to part tolerance and kit quality decisions, choose a kit to reduce risk to improve the outcome.
- If drift continues after thorough cleaning, internal wear is likely; consider replacement.
- If drift recurs at the same stick angle, a worn potentiometer is probable; rework or sensor replacement may help.
- If calibration fails repeatedly, a defective module is plausible; replacement is consistent.
- If drift worsens with slight pressure, mechanical looseness may be present; reworking the assembly can help.
- If the stick returns to center but input bias remains, electronic drift is likely; sensor replacement may resolve it.
- If drift improves temporarily after cleaning but returns quickly, residual debris or sensor degradation are possible; deeper cleaning or replacement is worth exploring.
- If only one controller shows the pattern, unit-specific wear is probable; replacing that assembly is reasonable.
- If the issue appears after a drop or impact, physical damage is strong; evaluate rework or replacement based on visible condition.
Many expect more cleaning to fix all drift issues. However, when the same bias reappears at the same angle despite repeated cleaning, the pattern points to wear rather than debris, making rework or replacement appropriate. Choosing the next step depends on part condition and available tools.
A few edge cases illustrate conditional outcomes: If drift is intermittent and only occurs in one game, the issue may be software-related and warrants further testing before hardware changes. If the stick feels loose or has excessive play, mechanical wear is consistent and replacement is likely more effective. If the controller has visible damage or was submerged, internal corrosion may cause persistent drift that may require module swap. These examples show that the symptom pattern determines whether rework, replacement, or deeper guidance is appropriate.
Here are product examples that may make comparison easier. Before buying, always review the compatibility criteria, essential features, and product details.
This chart maps persistent stick drift symptom patterns to likely issues and recommended actions for deciding between rework or replacement.