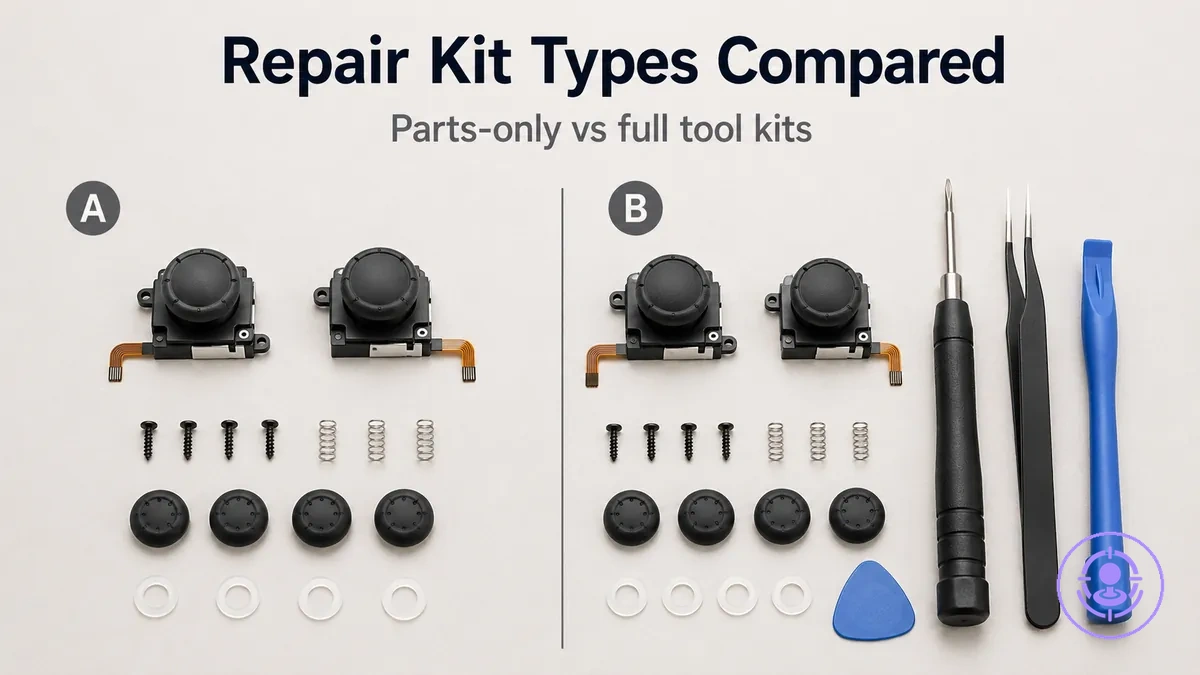
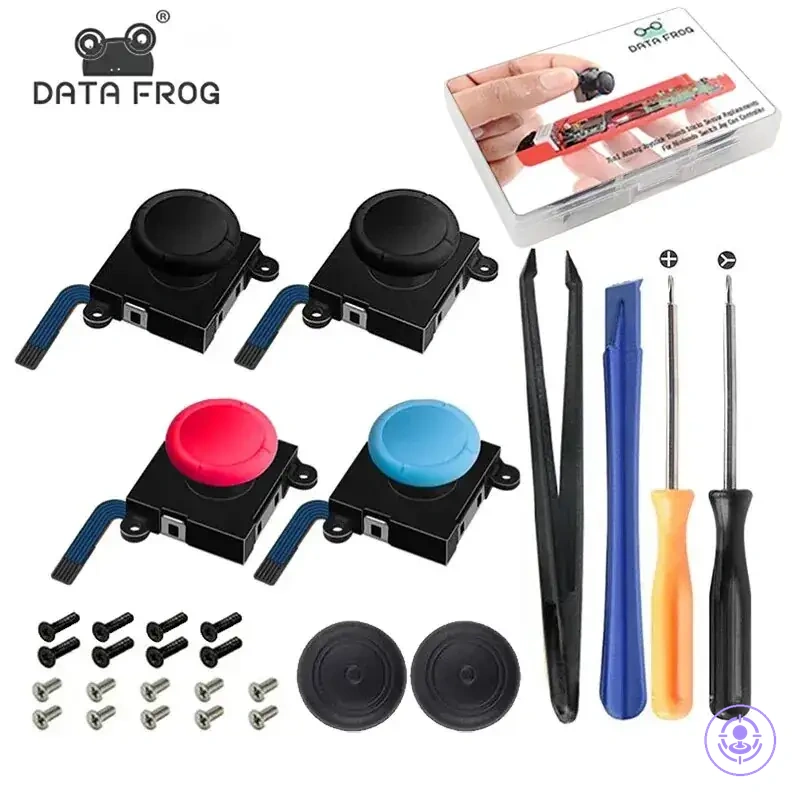
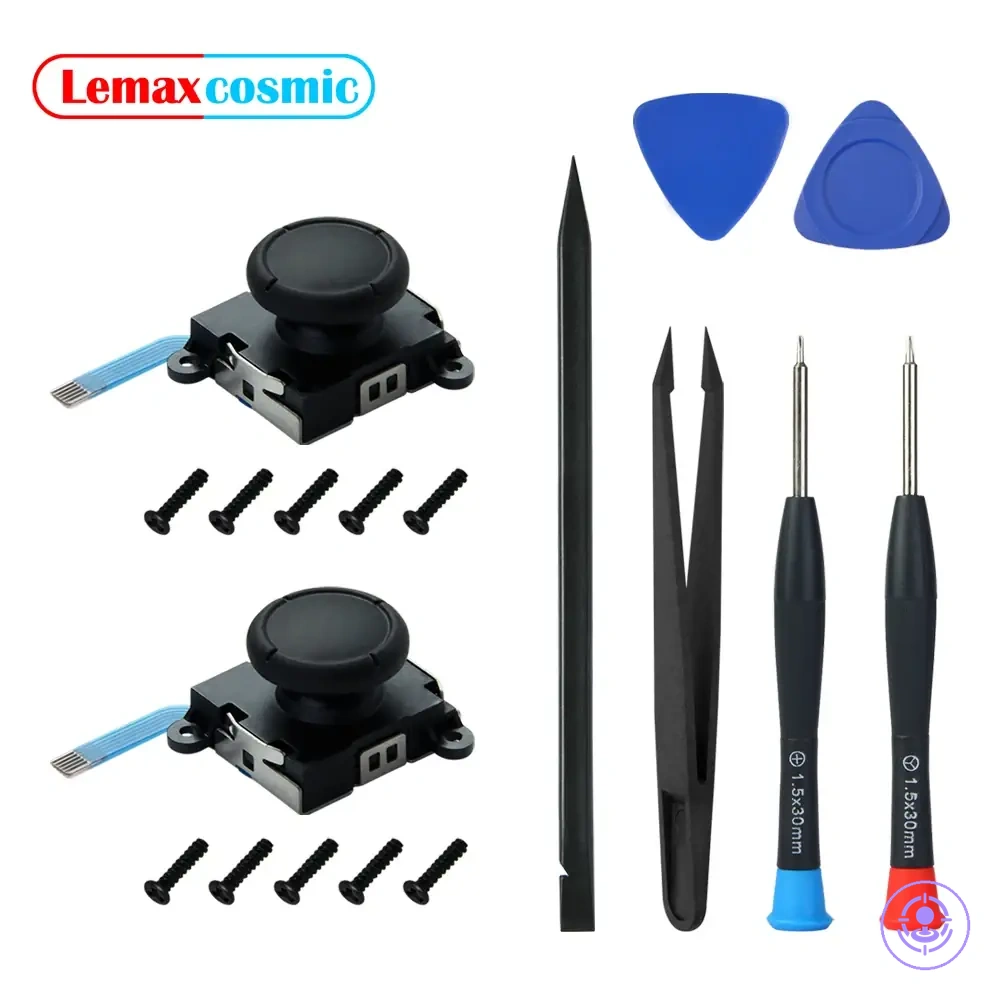
Joy-Con drift repair kit types compared: parts-only packs vs tool kits
Parts-only packs supply replacement joystick modules (sometimes with bumper clips), while tool-inclusive kits add the screwdrivers and pry tools needed for the swap; the right choice depends on whether you already own those tools and how many repairs you anticipate.
Three main factors guide that decision:
- whether you already own a tri-wing and cross-head screwdriver
- how many Joy-Cons you plan to fix
- how comfortable you are with the risk of stripping tiny screws or damaging ribbon cables without proper tools
A parts-only pack may be sufficient if you repair a single controller and already own the correct bits. A tool kit reduces the chance of a stalled repair when you expect multiple repairs or lack the right tools. Results vary because screw condition, tool fit, and handling technique all affect the outcome.
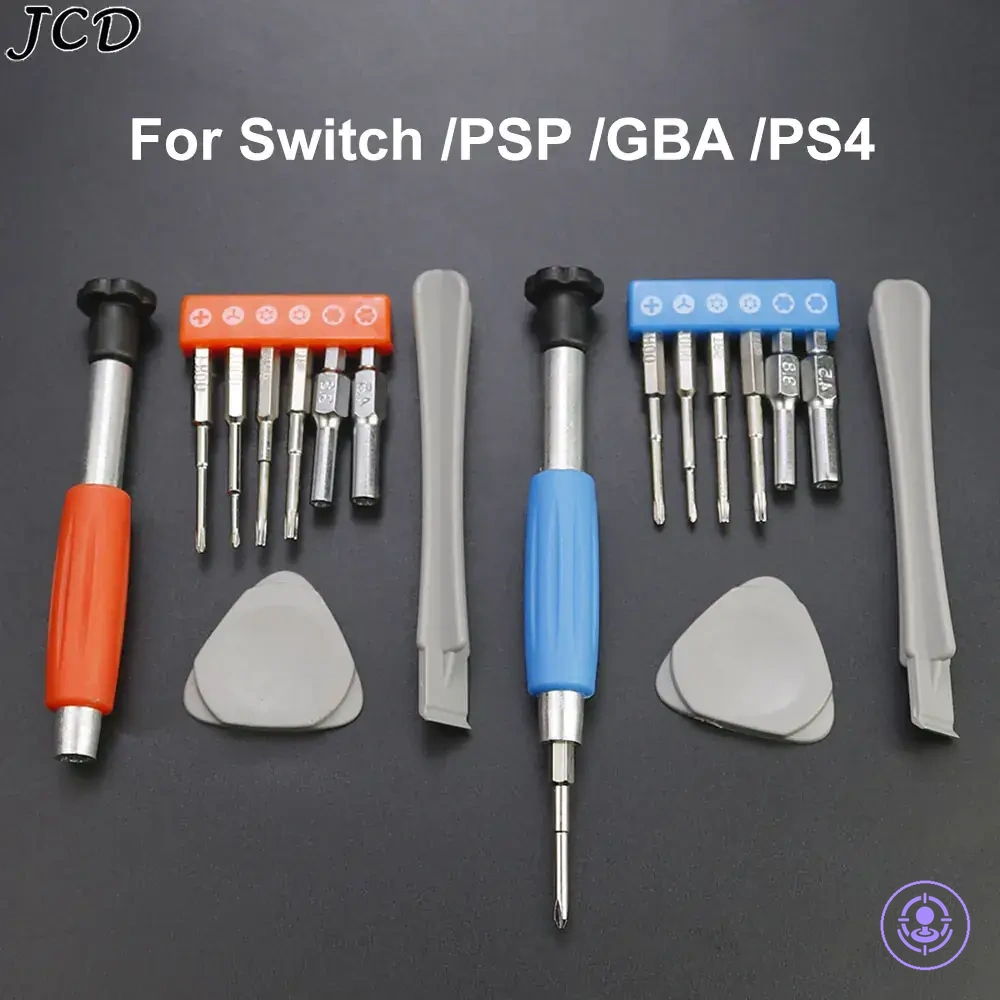
Tool kits commonly add items such as a Y-shaped (tri-wing) screwdriver, a cross-head screwdriver, a plastic pry tool, and tweezers—tools that match the specific screw types and the tight interior space of a Joy-Con. This comparison covers the two bundle archetypes and the value each offers, not the full disassembly and reassembly process.
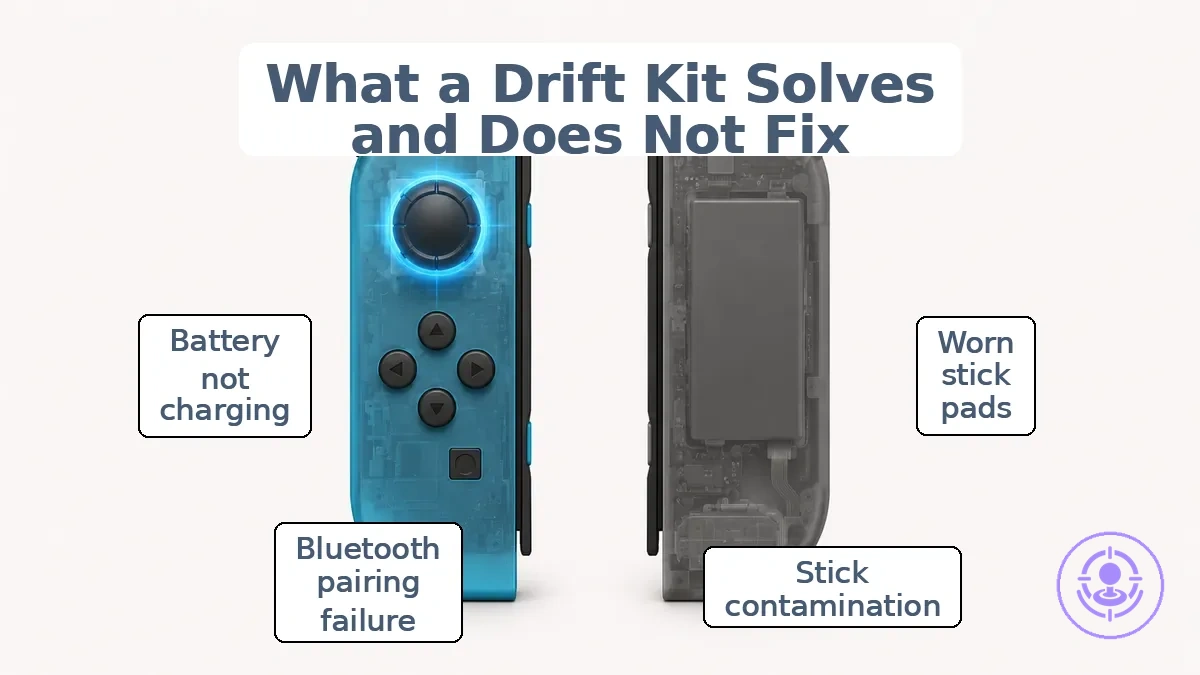
What a Joy-Con drift repair kit solves and what it will not fix
A Joy-Con drift repair kit solves drift caused by a worn or contaminated stick module, but it does not fix issues from other controller faults.
When the drift symptom appears consistently, the stick module is a likely culprit. Replacing it with a new module often restores normal response. This is the kit's scope: it solves drift caused by stick module wear or contamination (scope-in) but will not fix other controller faults like pairing or battery issues (scope-out). For a broader view of what a kit covers, see the Joy-Con drift repair kit hub.
Likely fixed by a kit (scope-in):
- Worn analog stick pads – the new stick module directly replaces the failing component.
- Contamination inside the stick assembly – swapping the module removes debris that causes intermittent drift.
- Loss of centering accuracy due to internal wear – a fresh module can restore precise neutral behavior.
- Stick that registers movement without physical contact – the replacement module can resolve the fault.
Unlikely fixed by a kit (scope-out):
- Bluetooth pairing failure – this involves the wireless module or system board, not the stick module.
- Battery not charging – a separate power circuit issue that the stick kit does not address.
- Button unresponsiveness – mechanical or contact problems on the logic board, outside the kit scope.
- System-level control sensor errors – calibration or firmware-level issues that a hardware swap is unlikely to address.
For example, a controller that drifts and one that fails to pair may both lead to unplayable input. The drift symptom typically points to the stick module, while a pairing failure points to the wireless subsystem, which a kit focused on the stick module is unlikely to resolve.
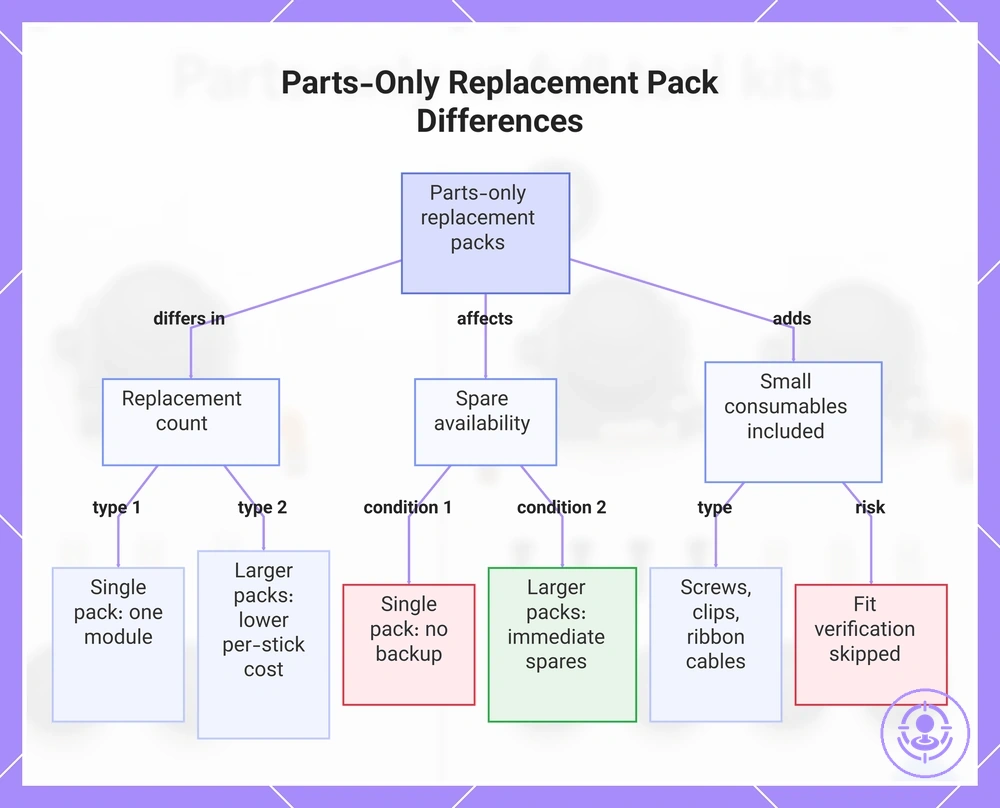
Parts-Only Replacement Packs and How Their Bundles Differ
Parts-only replacement packs for Joy-Con drift repairs differ in stick module count: single packs include one module, pair packs include two, and multipacks include three or more. That count affects cost per repair and whether spare modules are available, so bundle usefulness depends on how many repairs you plan and whether you want backups.
Grouped by function, these packs differ in replacement count, spare availability, and what small consumables they include.
- Replacement count and pairing logic
- Single packs match one-controller repairs; no spare module remains after use.
- Pair packs cover the typical two-Joy-Con set, often at a lower per-stick price than buying two singles.
- Multipacks provide the lowest per-stick cost when multiple repairs are needed but require higher upfront spending.
- Spare availability
- Larger packs include spare modules for future repairs after the first use.
- A single pack leaves no backup; pair and multipacks provide immediate spares.
- Spares from larger packs can eliminate separate purchases, but unused modules are wasted if only one controller ever fails.
- Small consumables and reassembly impact
- Some packs include small consumables like screws, clip retainers, or ribbon cables, which can simplify reassembly.
- The completeness and tolerance of these parts vary; they may or may not match original components.
- Relying on included consumables means you skip fit verification, which adds uncertainty during reassembly.
Bundle size changes total cost and the number of spares, but not the stick module's quality—that varies by supplier and batch.
This chart shows how parts-only replacement packs for Joy-Con drift repairs differ in replacement count, spare availability, and included consumables.
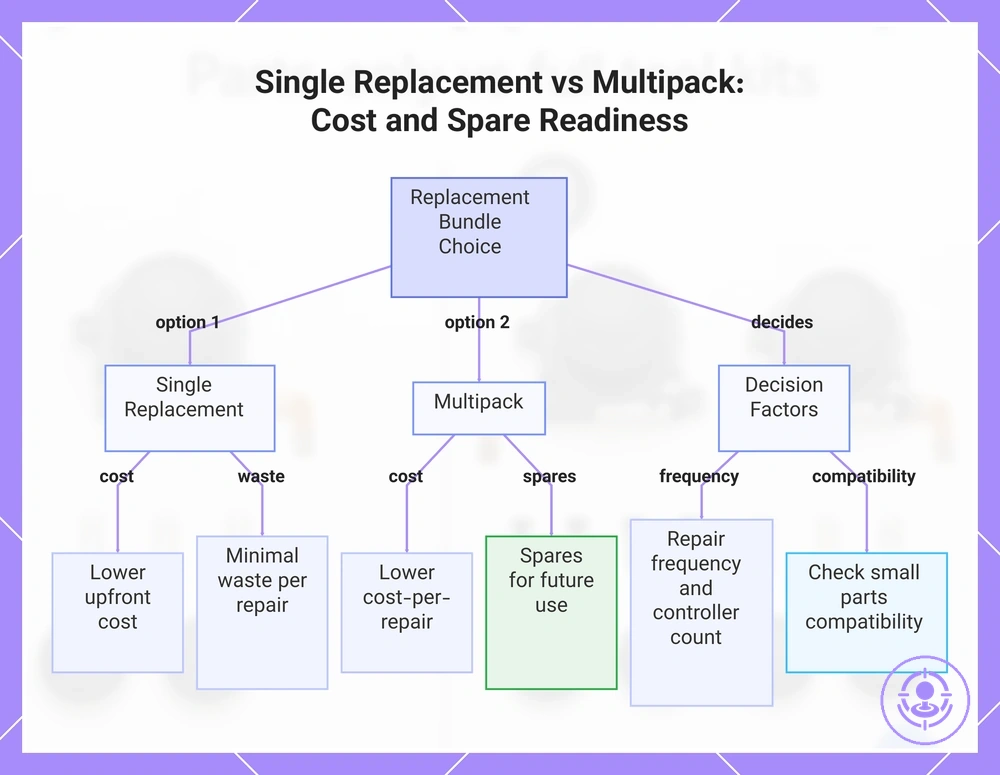
Single replacement vs multipacks and the extra small parts that matter
A single replacement offers lower upfront cost and minimal waste for one controller, while a multipack provides spares that lower cost-per-repair across multiple controllers.
A single replacement usually fits the need for a single controller with drift. A multipack may offer better value for managing several controllers or future drift, as it keeps spares ready without separate purchases each time.
Single
- Typically lower upfront cost per repair cycle
- Minimal excess parts for one controller
- Less chance of unused spares
Multipack
- Typically lower cost-per-repair across multiple controllers
- Spares available for future use
- Extra small parts (e.g., washers) may affect reassembly tolerance only if they match your controller’s design
How often you repair and how many controllers you have decide which bundle keeps cost and spare readiness in your favor.
This chart compares single replacement and multipack options for joystick repair, highlighting cost differences, waste, spare availability, and the key decision factors.
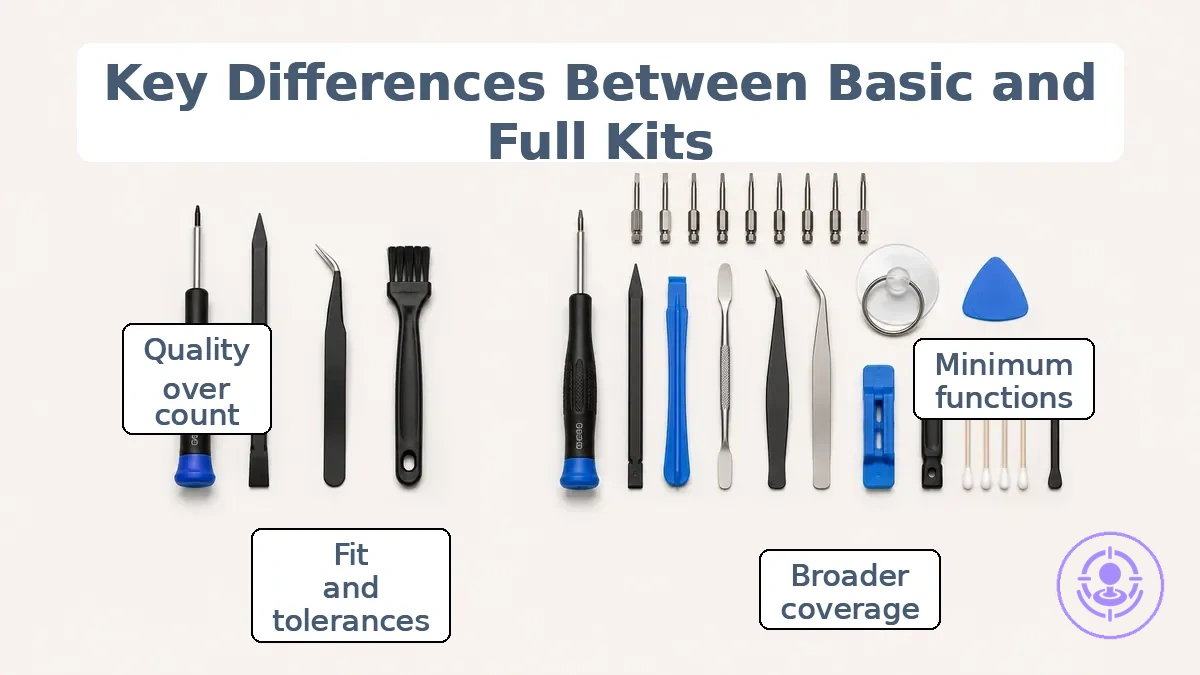
Tool-inclusive kits and the difference between a basic and a full kit
A tool-inclusive kit is a curated set of tools bundled for a specific repair task—here, Joy-Con drift disassembly. The difference between a basic kit and a full kit lies in how thoroughly each tool job is covered rather than the number of items. A basic kit provides minimum functions for common screws and openings, while a full kit aims for broader handling coverage. Yet tool quality—specifically fit and tolerances—often matters more than tool count to avoid stripped screws or damaged connectors.
The difference between a basic and a full kit is organized by tool job for the four main repair stages in the grouped list below.
- Drivers and bits: Basic typically includes #00 Phillips and tri-wing bits. Full typically adds Y00, JIS, and a steel precision driver handle.
- Drivers and bits (size variety): Basic typically covers the most common screw heads. Full typically includes multiple sizes to reduce the chance of bit slip.
- Opening and prying tools: Basic may include one plastic spudger. Full typically adds a metal spudger, a dedicated pry bar, and a suction cup for potentially safer screen removal.
- Opening and prying tools (alternatives): Basic typically relies on one opening point. Full typically provides several tool shapes to help avoid cracking plastic.
- Handling connectors and ribbon cables: Basic typically includes plastic tweezers. Full typically includes antistatic metal tweezers and a connector lift tool for ZIF sockets.
- Handling (cable control): Basic may lack a dedicated cable grip. Full often includes a non-marring tool to ease ribbon repositioning.
- Cleaning and preparation: Basic typically includes a small brush for debris. Full typically adds isopropyl alcohol swabs, a microfiber cloth, and a cleaning pick for contact surfaces.
- Cleaning (precision): Basic typically addresses only surface dust. Full typically addresses contact oxidation, which can affect drift after reassembly.
The risk of stripping screws or damaging ribbon cables is higher with a basic kit if its tools have poor fit. A full kit can lower handling risk when the fit and tolerances are good—but only if the user checks the tool quality before use.
If you already own precision screwdrivers and pry tools, a full kit may not be necessary. Focus on the fit and tolerances of the bits and opening tools rather than the item count.
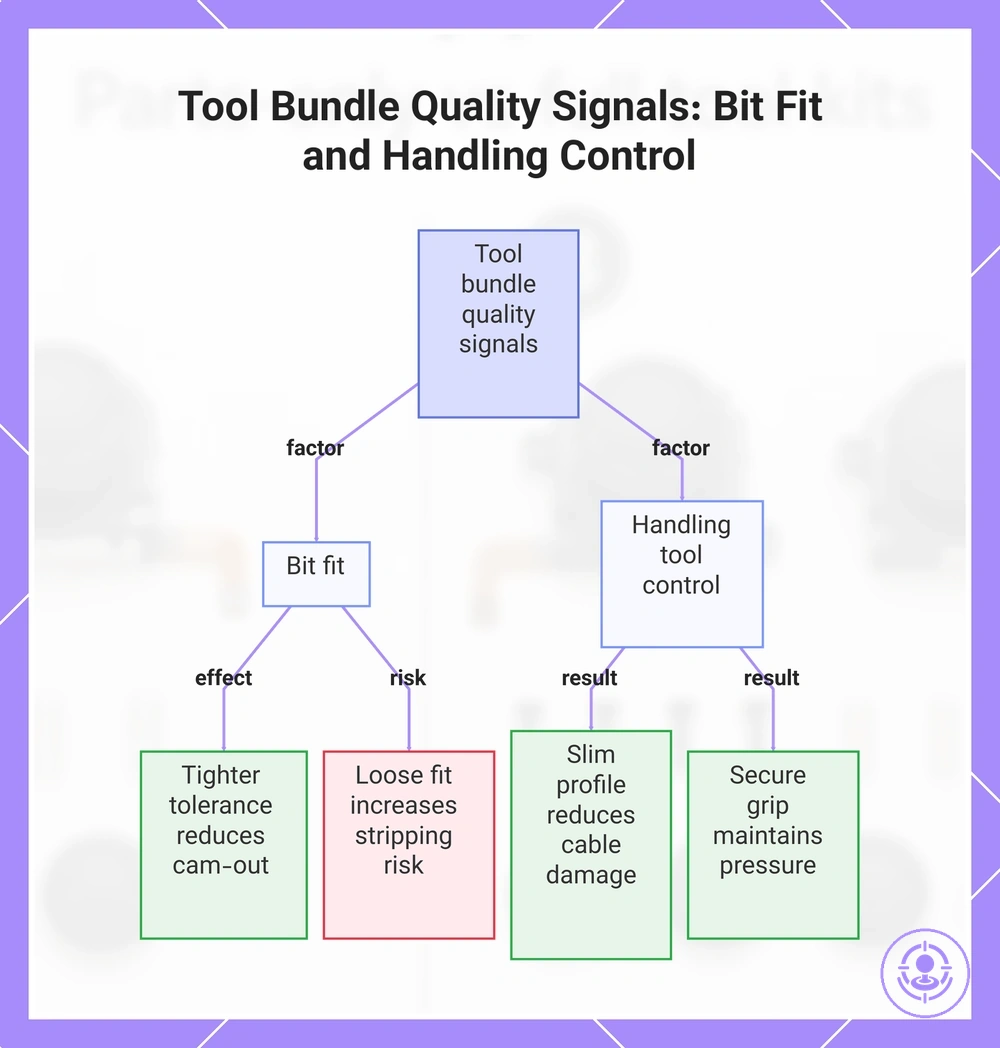
Tool bundle quality signals that affect screw damage and opening safety
Tool bundle quality signals come down to two measurable factors: bit fit and handling tool control.
Bit fit describes how precisely the driver engages the screw head; handling tool control covers managing connectors and cables to avoid accidental damage. Use these checks when evaluating tool bundle quality.
- Bit tolerance and fit: Tighter tolerances reduce cam-out likelihood, lowering the risk of stripped screws.
- Cam-out risk: Bits that slip under torque can damage the screw head; a snug fit reduces that risk.
- Stripping risk: Repeated cam-out can deform the screw head, making removal harder and increasing stripping risk.
- Handling tools and connector control: Slim profiles and non-slip grips improve control near ribbon cables and small connectors.
- Cable damage risk: Poorly shaped or oversized tools can bend or tear connectors; well-designed tools reduce that risk.
- Grip and engagement: A secure grip helps maintain steady pressure, supporting consistent bit engagement and reducing accidental slips.
For example, with worn or tight screws, loose bit tolerances may cam out more easily, increasing stripping risk. Choosing a set with tighter fit and better handling control can help, but results depend on screw condition and your technique.
This chart shows the two main measurable factors of tool bundle quality and how they affect screw damage and opening safety.
What you actually need for a successful repair: minimum viable kit vs nice-to-have extras
A minimum viable kit for most Joy-Con stick replacements includes the replacement joystick module, a tri-wing screwdriver (the correct driver for the screws), and a spudger for safe prying. This assumes standard screw condition—no stripped threads or stripped screws—and no prior physical damage to the housing or ribbon cables.
This diagram groups items by necessity tier, separating the minimum viable kit from nice-to-have extras. See the kit contents checklist for a full breakdown.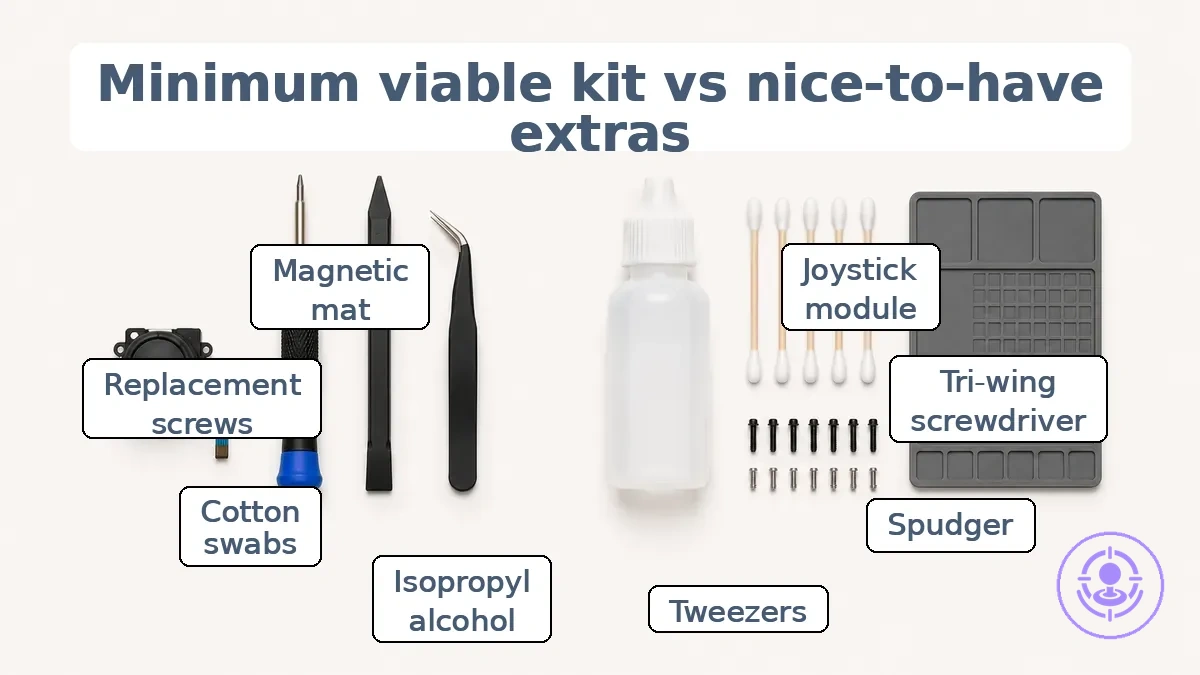
To prevent overbuying, separate your shopping into two tiers: minimum reduces risk of failure, while extras reduce hassle. A minimum viable kit typically contains:
- Replacement joystick module – the core part that addresses drift
- Tri-wing screwdriver – required driver fit for Joy-Con outer and inner screws
- Spudger – provides safe handling access to separate clips, reducing the risk of damage
- Pair of tweezers – helps grip small ribbon cables and connectors
Nice-to-have extras (optional but reduce friction or risk):
- Isopropyl alcohol and cotton swabs – clean debris from the old module area
- Replacement screws – useful if originals show wear or risk stripping
- Magnetic project mat – keeps small parts organized and helps prevent loss
Confirm that your screwdriver matches the screw head exactly—poor driver fit is a common cause of stripped screws and unnecessary damage.
Minimum parts to have on hand before starting the repair
The minimum parts are the replacement stick module(s) — in the correct count and for the correct side. Confirm you have the correct module for the affected side (left or right) and the required count.
- Replacement stick module for the affected side (left or right)
- One module per controller when repairing only one side
- Two modules if you plan to repair both controllers
Do not open the controller until you have these parts ready.
Minimum tools that prevent stripped screws and connector damage
The minimum tools to reduce stripped screws and connector damage are a correctly sized driver with a fresh bit and a non-marring handling tool.
Their effectiveness depends on proper technique and the condition of the screw or connector; fit and control still matter.
- Use the correct driver bit that matches the screw drive type and size exactly; proper bit fit minimizes cam-out and reduces the risk of stripped screw heads.
- Replace worn bits regularly; a dull or deformed bit reduces engagement and increases the chance of screw stripping.
- Apply steady, moderate torque instead of excessive force; over-torquing is a common cause of both drive and thread stripping.
- Use a non-marring handling tool, such as a plastic spudger or nylon pry tool, to disconnect cables and connectors; this reduces the risk of damaged pins, torn ribbon cables, or bent connector housings.
- For small or delicate screws, consider a torque-limiting screwdriver or a driver with an adjustable clutch to help reduce the risk of overtightening.
Comparison dimensions that change which kit type is the better buy
Which kit type offers better value depends on a few decision dimensions that shift the trade-off between parts-only and tool kits. Verify your setup against these criteria to see which usually fits.
| Dimension | What to verify | Usually favors |
|---|---|---|
| Tools owned | If you already own precision screwdrivers, spudgers, and tweezers, parts-only may be adequate. | Parts-only kit |
| Repair frequency | Frequent repairs increase the value of spare parts in a multipack. | Multipack (parts-only) |
| Risk tolerance | Low tolerance favors a precise tool kit to reduce stripping risk; quality can vary. | Tool kit |
| Skill level | Beginners benefit from a complete tool kit; experienced users may reuse existing tools. | Tool kit (beginners) / Parts-only (experienced) |
For example, a user who owns basic tools but has low risk tolerance may still prefer a tool kit for added safety.
Repair Difficulty and Risk Points That Make Tools Worth Paying For
Tiny screws and delicate connectors are the main risk points where tool quality matters most. These components are more likely to be damaged if handled with imprecise tools.
- Tiny screws: driver fit and control affect the risk of screw stripping; a kit with a precisely sized driver reduces that risk.
- Stripped screws: even one stripped screw can make the repair much harder, making precise driver fit a critical risk point.
- Connectors and cables: these are fragile; using the right handling tool, like a plastic spudger, improves control when separating them.
- Handling risk: without proper tool control, cables may tear, adding cost and complexity.
- Because these risk points occur where tool quality matters most, paying more for a kit with better driver fit and cable-handling tools is often worthwhile.
Part consistency checks that matter more than bundle size
The smoothness and deadzone behavior of a replacement stick module are observable cues that can suggest how it will perform and whether drift is likely to return.
- Stick module smoothness — uniform resistance across its full range. Variability in feel can indicate inconsistent internal tolerances.
- Stick module deadzone — clean return to center. A clean deadzone often signals better centering mechanics.
- Stick module consistency — repeatable feel after several deflections. Inconsistent feel may signal part variability affecting control behavior.
- Fit of accessories — caps, brackets, or other add-ons seat without excessive force. High reassembly friction can suggest a tolerance mismatch.
- Fit stability — module stays secure in the housing after installation. Loose fit increases wear and can lead to early drift.
- Reassembly friction — screws align smoothly and housing closes without gaps. Excessive friction may indicate off-tolerance areas affecting long-term fit.
- Control behavior after installation — proportional response to input. Jerky or delayed response can reflect inconsistent internal smoothness.
These checks are signals, not proof. Consistent cues correlate with fewer repeat repairs, but no single indicator guarantees long-term reliability.
Reusability across controllers and whether a toolkit keeps paying off
Reusing a toolkit across multiple repairs changes the effective cost per repair. How much it changes depends on assumptions about the number of uses and whether the toolkit's components maintain their durability and fit over time.
Whether a toolkit keeps paying off depends on how many repairs are made. The number of uses affects the effective cost under those same durability and fit assumptions:
| Uses | What changes | Why it matters |
|---|---|---|
| Few repairs | Effective cost per repair stays relatively high | The toolkit investment is not spread across enough uses, so the value per repair is limited |
| Many repairs | Effective cost per repair can drop substantially | The toolkit's durability and proper fit across repeat uses make it more economical over time |
If tool durability or fit fails after limited use, reuse does not lower the effective cost as assumed.
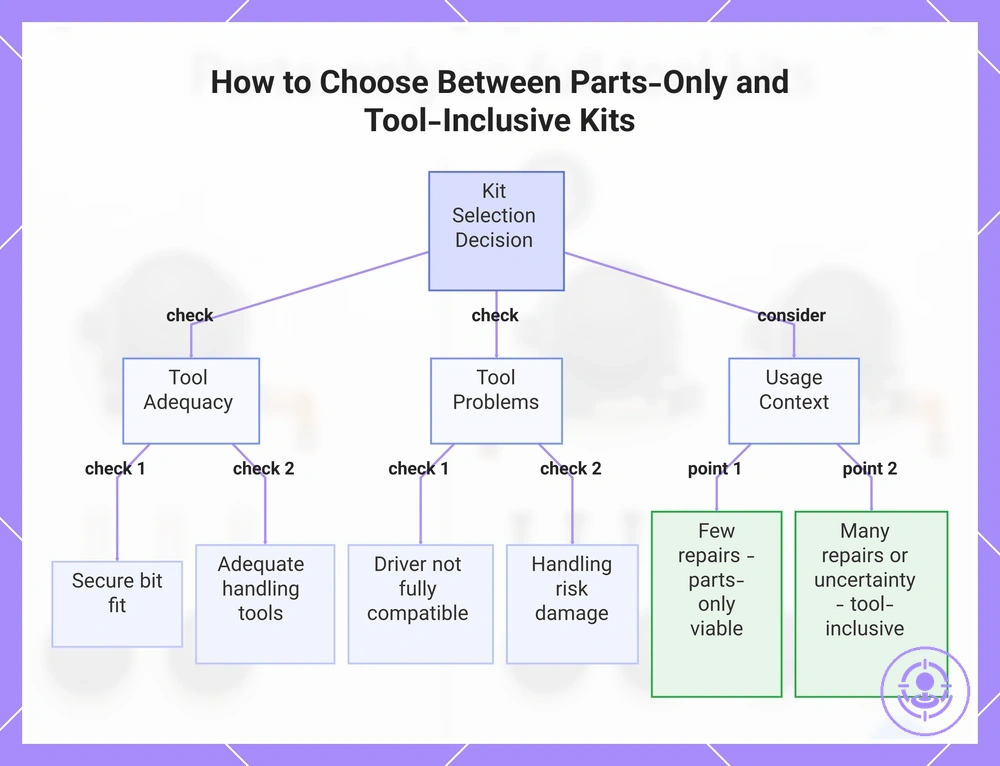
Choosing parts-only vs full tool kits based on what you already own
Choose a parts-only kit when you already own the correct driver and handling tools that fit the repair. If your existing tools are not adequate for precise disassembly or lack proper bit fit, a tool-inclusive kit is the safer route.
Adequacy means your screwdriver tip matches the screw head securely (bit fit) and your handling tools (tweezers, spudgers) give steady control without slipping. To learn how to choose the right kit, verify these conditions against the repair's demands.
Your decision rule depends on what you already own and repair frequency. Use this checklist:
- If you have a correct driver with secure bit fit → choose parts-only.
- If your handling tools are adequate for delicate work → choose parts-only.
- If you lack a suitable driver → choose a tool-inclusive kit (safer).
- If your handling tools risk damaging components → choose a tool-inclusive kit.
- If you expect few repairs, a parts-only multipack can still offer good spare value.
- If you anticipate many repairs, a tool-inclusive kit with spares can improve cost-per-use.
- If you are unsure about bit compatibility or handling control → prefer a tool-inclusive kit.
For tools that are partially suitable (e.g., a driver that almost fits but feels loose), the risk increases. In that edge case, the tool-inclusive option typically reduces the risk of stripped screws or damaged parts.
This chart shows the decision rules for selecting a parts-only kit versus a tool-inclusive kit based on your existing tools and repair frequency.
When parts-only is the right buy because your existing tools are sufficient
A parts-only purchase is low-regret when your existing tools are sufficient for the driver fit and handling control the repair requires. Check these conditions before buying:
- Your driver or bit achieves full bit fit without excessive play or wobble.
- Bit engagement is firm enough to transmit torque without slipping, reducing stripping risk.
- You have adequate control over the tool to avoid cam-out or overtightening.
- Your handling tools (pliers, spanners) fit the connector snugly and allow secure grip.
- You can maintain control when disconnecting cables to avoid damaging insulation or pins.
- The screwdriver type (e.g., JIS, Phillips, Pozidriv) matches the fastener head.
When your existing tools cannot be verified against these checks, a tool kit may be a safer investment than parts alone.
When a tool-inclusive kit is the safer first purchase
When you are uncertain about tool fit or lack confidence handling specific connectors, a tool-inclusive kit is the safer first purchase.
- Mismatched driver or bit sizes can increase cam-out risk and cause stripped fasteners; matched bits in a tool-inclusive kit lower that risk.
- Handling small connectors or clips raises handling risk; dedicated connector tools in a kit reduce that risk.
- Limited experience selecting individual components often leads to incomplete fits; a pre-assembled set reduces that guesswork.
Choosing a tool-inclusive kit under these conditions improves the likelihood of a smooth repair without promising guaranteed results.
Compatibility and fit checks that prevent ordering the wrong kit
Compatibility and fit checks help you avoid ordering the wrong kit—verify the controller variant, stick module revision, and screw type before buying. A kit intended for a left Joy-Con may not fit a right controller, and driver bits that work on original screws may not match stripped or replaced fasteners.
The checks cover common points of confusion—what to examine and why it matters. Because listings vary, double-check your device details before finalizing.
| Item to verify | What to look at | Why it matters |
|---|---|---|
| Controller variant | Stick module fit and screw expectations | A kit for a left Joy-Con may not align with right-side internal mounts; screw placement can differ between standard and Lite models. |
| Screw type | Driver bit size and shape (tri-wing, cross, Y-shaped) | Using the wrong bit strips screws, making opening difficult and risking damage to the housing. |
| Listing wording | Compatibility notes, revision markers, and included model numbers | Ambiguous wording like "fits most" can hide restrictions; missing revision info may lead to ordering the wrong generation. |
| Included bits | Bit type and count (tri-wing, Philips, Y-shaped, and spare fasteners) | Kits with missing or incompatible bits prevent proper disassembly and reassembly. |
| Stick module revision | Joystick housing design and connector type | Older stick modules may have different mounting tabs or ribbon cable lengths that do not fit newer controller shells. |
A listing that claims universal fit may actually lack the correct screwdriver for your controller revision. Compare the listing photos and description against your controller's visible features when wording is unclear.
Joy-Con versions, controller variants, and common listing mismatches
Common listing mismatches between Joy-Con variant labels and actual hardware arise when the label implies a stick type and screw expectations that may not match your device. These mismatches often include omitted left/right designation, ambiguous color naming, or unspecified revision details.
- Color-only listings (e.g., "Neon Blue Joy-Con") omit left/right designation; in some regions only one side may be sold separately, creating mismatch risk.
- Listings without console revision (original vs. 2019 revised) imply a standard stick housing, but revised models may have different housing and screw pattern, altering screw expectations.
- Bundle listings, e.g., Super Mario Party packs, include non‑standard color pairs (Neon Green L + Neon Yellow R) without obvious pairing, increasing fit risk if you expect matching colors.
- Similar names like "Mario Red" and "Neon Red" refer to distinct color variants released mainly in specific bundles, not as standalone pairs universally.
- A "fits all Switch models" claim implies universal compatibility, but stick housing and screw pattern can vary between revisions.
To avoid fit risk, verify listing wording against your device's hardware specifications.
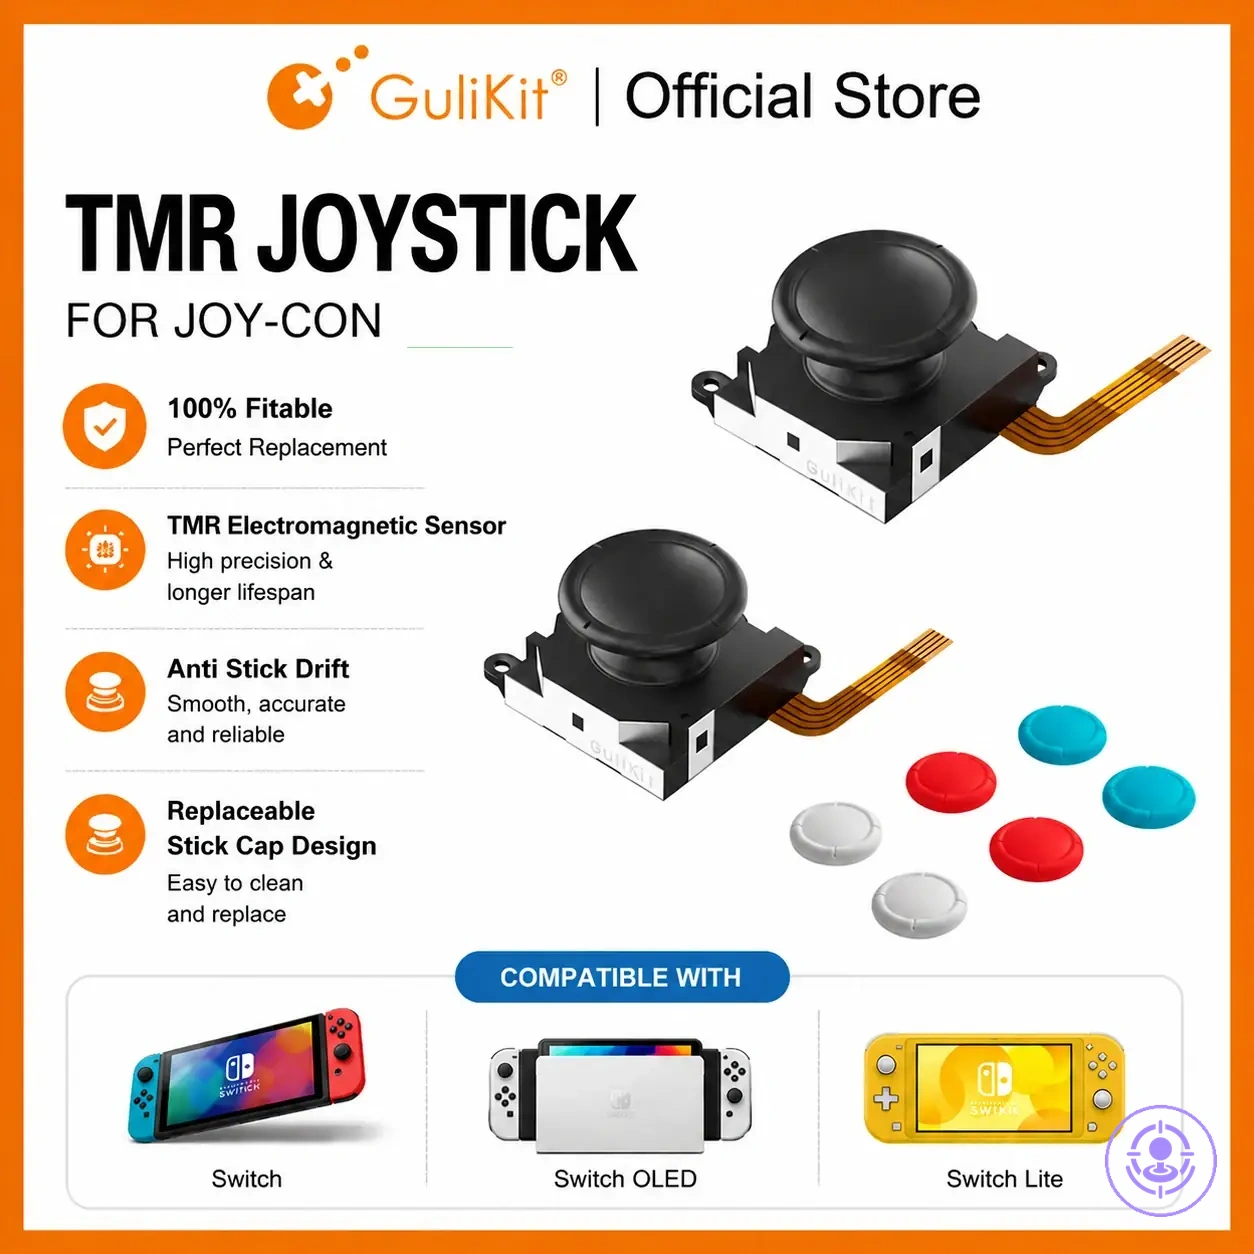
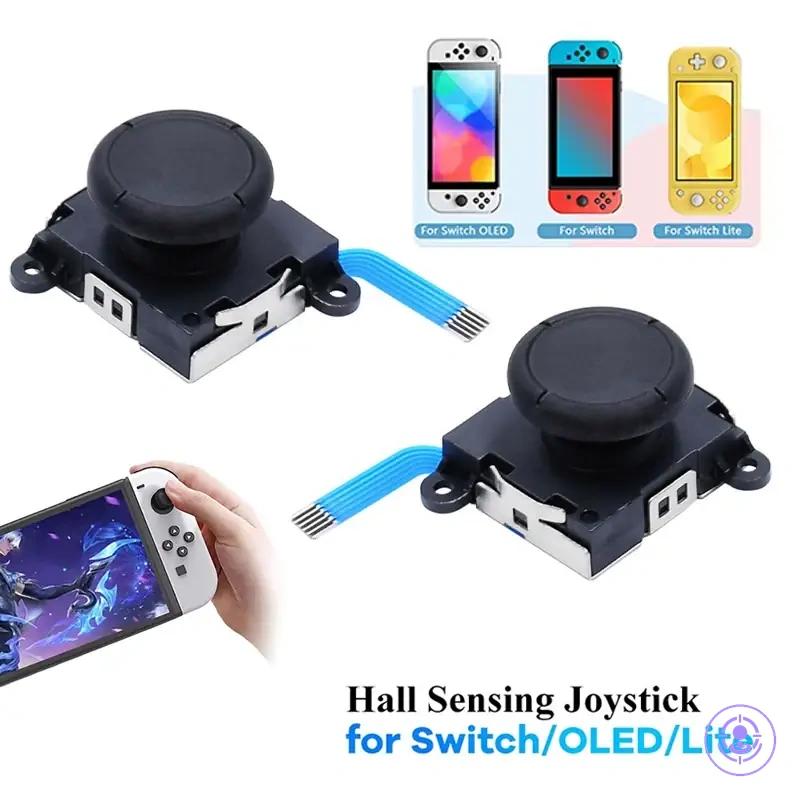
Standard sticks vs Hall-effect replacements as a kit-type decision signal
Whether you choose a standard replacement or Hall-effect stick can change what you need to verify in a kit. Standard replacement sticks have a familiar fit and may affect bundle priorities by focusing on basic checks. Hall-effect modules shift priorities by adding compatibility notes and setup considerations.
- Standard replacement
- Typical compatibility checks focus on physical dimensions and connector type
- Hall-effect
- Compatibility notes may include sensor alignment and voltage requirements
- Setup considerations often involve calibration and fit verification
Your choice depends on your device's mounting design and whether you are willing to verify calibration and fit during installation.
Cost-value expectations and avoiding misleading bundle claims
Value in a repair kit bundle depends on usable tools, consistent parts, and manageable downside risk—not on item count. A high item count can imply a good deal, but each piece only adds value if it serves a distinct repair need for your device. Without that fit, extra components add cost without improving the outcome.
Bundle claims often emphasise quantity or completeness, but what matters is whether each component matches your expected use. Since value depends on local pricing, reuse expectations, and tool fit, understanding what affects kit price range helps ground your evaluation. The following table maps common claim wordings to what they often imply and what to verify.
| Claim | What it often implies | What to verify |
|---|---|---|
| Large item count | Better value per rupee | Check if each item serves a distinct repair need |
| Complete set | No extra purchases needed | Verify whether tools for your specific device revision are included |
| All tools included | Universal compatibility | Test fit against known mounting points and screw types |
| Fits all models | One-size-fits-all solution | Cross-check with your device model and generation |
| Pro set | Higher quality and durability | Assess material consistency and part finish |
| Sealed packaging | Parts are protected and trusted | Inspect packaging condition and verify return terms if opened |
A common myth is that a large item count guarantees full value, but the truth depends on whether the parts cover your repair scenarios and on quality uncertainty in component consistency. For example, a bundle advertised as 'complete repair kit' may lack the specific driver bit needed for a Joy-Con crosshead screw. A neutral decision cue is to prioritise kits whose component list matches your known repair steps rather than those with the highest part count.
The products below are useful examples for comparing available options. Before buying, check that the compatibility criteria, key features, and product details match your needs.
Returnability, packaging signals, and what “value” usually means for kits
Returnability and packaging signals are secondary cues. They can reduce purchase regret and adjust value expectations for kits.
- Returnability: can reduce downside risk by allowing returns if a kit fails to work.
- Returnability: can increase decision confidence when other signals are unclear.
- Packaging consistency: can suggest the kit's contents match its description.
- Consistent packaging: can imply a higher likelihood that tools and parts are correctly included.
- Supporting cues: help adjust value expectations without proving kit quality.
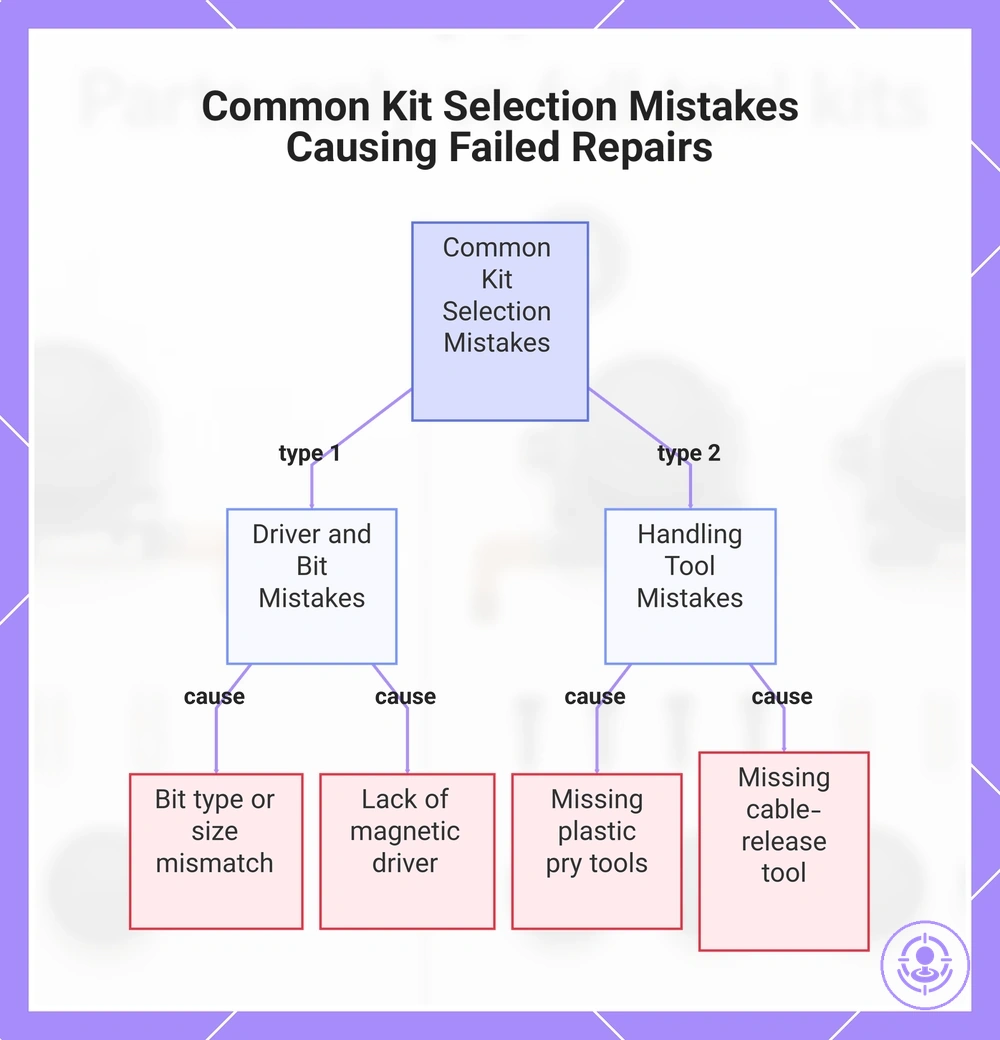
Common Kit Selection Mistakes That Cause Failed Repairs or Damaged Screws
Stripped screws from poor driver fit and cable damage from missing handling tools are two common kit selection mistakes that can cause failed repairs. Checking these features before buying reduces the risk of preventable failures.
Common kit selection mistakes typically fall into two categories: driver and bit mistakes, and handling tool mistakes. Each has clear consequences.
- Driver and bit mistakes
- Choosing a kit without a bit matching the screw drive type (e.g., Phillips vs. tri-wing) can cause cam-out, stripping the screw head and preventing case opening.
- Using a bit that is slightly too small or too large for the screw recess increases the risk of stripping, especially when the fit is loose.
- Selecting a kit with low-quality or unhardened bits can cause premature bit wear, which accelerates cam-out and screw damage during repeated use.
- Failing to confirm the kit includes a magnetic driver or bit holder makes it harder to keep the screw seated, increasing the chance of slipping and stripping.
- Handling tool mistakes
- Choosing a kit that omits spudgers or plastic pry tools can force the use of metal tools, which may dent or cut the plastic housing and scratch internal components.
- Missing a safe cable-release tool (like a plastic flathead or tweezers with fine tips) increases the risk of bending connector pins or tearing the delicate ribbon cable when disconnecting the battery or display.
- Selecting a kit without ESD-safe or non-slip grip tools may allow static discharge or accidental slips, stressing the connector or adjacent components.
- Ignoring whether the kit provides a small parts tray or magnetic mat can lead to lost screws or screws falling into the assembly, creating short-circuit risks or additional disassembly steps.
The likelihood of these failures depends on screw condition, user technique, and prior wear, so kit choice alone does not guarantee success—but selecting one with correct driver bits and basic handling tools substantially reduces preventable damage.
This chart shows two main categories of kit selection mistakes—driver and bit mistakes and handling tool mistakes—and the specific errors that lead to damaged screws or internal components.
Bit choice and driver fit mistakes that strip screws
Bit choice and driver fit mistakes that strip screws usually stem from poor tolerances and mismatched components. A proper fit ensures full engagement and reduces cam-out risk. The following fit indicators help identify engagement quality and stripping risk:
- Rocking or wobbling signals a size mismatch, while a steady fit engages fully.
- Slipping under light torque suggests insufficient engagement depth; a securely seated bit resists light torque.
- A worn bit tip with less grip raises cam-out risk, while a fresh tip with full surface contact reduces that risk.
- Corroded or painted screw heads need more caution, while clean recesses allow full bit seating.
- Cross-drive bits that lack a positive click when seated often indicate wrong type selection, whereas bits that click into place are correctly seated.
The level of caution needed and whether upgraded bits are justified depends on the screw's condition, material, and the torque applied.
Missing handling tools and avoidable connector or cable damage
Missing handling tools increase connector and cable damage risk by requiring higher force and reducing control, raising handling uncertainty. Common tool gaps that raise handling risk include:
- Prying with fingers or metal objects instead of a spudger — may crack connector housings or bend pins.
- Pulling on the cable body rather than using an extraction tool — can strain the wire and insulation.
- Twisting cables during removal without a proper fixture — increases the chance of tearing a ribbon cable.
- Using tools that are too thick or blunt for tight spaces — can scrape contacts or compress connectors.
- Applying excessive force to separate snug connectors when no leverage tool is used — risks breaking the connector.
- Bending cables at sharp angles when maneuvering without a guide — may cause internal conductor breakage.
Choosing a kit with suitable handling tools can reduce handling uncertainty and damage risk, especially for less experienced users.