Joy-Con drift repair kit durability: how long a repaired stick typically lasts
Joy-Con drift repair kit durability is how long a replaced joystick module maintains stable input without drift returning. This page focuses on lifespan expectations and maintenance factors rather than step-by-step installation guidance.
Two users who repair similar Joy-Con drift with the same repair kit may experience long-lasting stability or early recurrence. The difference usually depends on three variables:
- the quality of the replacement joystick
- how carefully the repair is installed
- how the controller is used afterward
A common assumption is that the same repair kit results in the same lifespan. Expect a range of outcomes rather than a single fixed timeline.
How long does a Joy-Con drift repair usually last
How long a Joy-Con drift repair usually lasts depends on individual conditions, making durability a range rather than a fixed outcome. The time before drift returns varies with how the controller is used and its environment.
The repair replaces worn components inside the joystick, but the new parts remain subject to the same mechanical wear. Drift recurrence is closely tied to the wear rate of the internal contact surfaces and the stability of the center position. Usage intensity and environmental exposure directly influence how quickly wear builds up and whether center stability degrades.
The durability of the repair depends on conditions such as:
- Frequent, intense gameplay that accelerates wear on the replacement stick.
- Exposure to dust, pet hair, or other debris that disrupts center stability.
- High humidity or dusty environments that can degrade internal components faster.
- Aggressive stick movements, such as rapid full-circle rotations, which hasten recurrence.
- Variations in repair quality and whether original or third‑party parts were used.
In some cases drift recurs relatively soon, while in others the repair holds up for a longer period.
This chart shows the key factors that determine how long a Joy-Con drift repair lasts before drift recurs.

Why durability varies between repairs even with the same kit
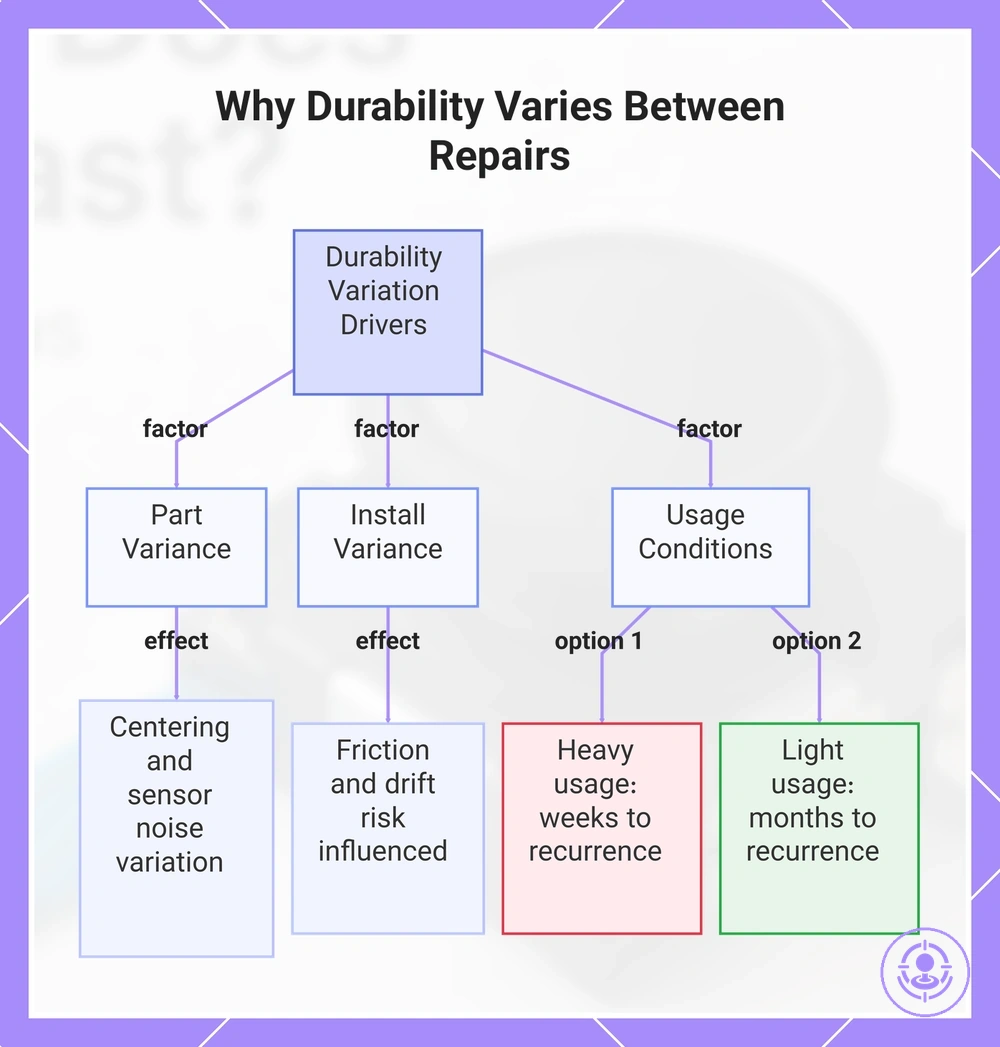
Durability varies even when using the same kit because of differences in component tolerance, installation variance, and user-specific usage conditions. These three drivers interact to produce different outcomes, explaining why the same replacement part can lead to different recurrence rates.
The main variance drivers fall into three categories:
- Part variance: manufacturing tolerance in the replacement joystick module can affect centering consistency and initial sensor noise.
- Install variance: the way the module is seated, the tightness of screws, and the alignment of the ribbon cable can influence friction and drift risk over time.
- Usage conditions: how often and how aggressively the stick is used, along with environmental factors like debris, can affect friction and sensor noise.
A module with slightly wider tolerance may show little drift risk when installed carefully and used lightly, but the same module can develop centering issues sooner under heavy usage or less precise installation. In one profile, a careful user may see months before recurrence; in another, a player who applies constant pressure may notice sensor noise within weeks. Because outcomes depend on these interacting factors, there is no fixed durability range after a repair.
This chart shows the three main drivers of durability variation after a joystick repair, explaining why outcomes differ even with the same replacement kit.
What a replacement joystick fixes and what it does not fix long-term
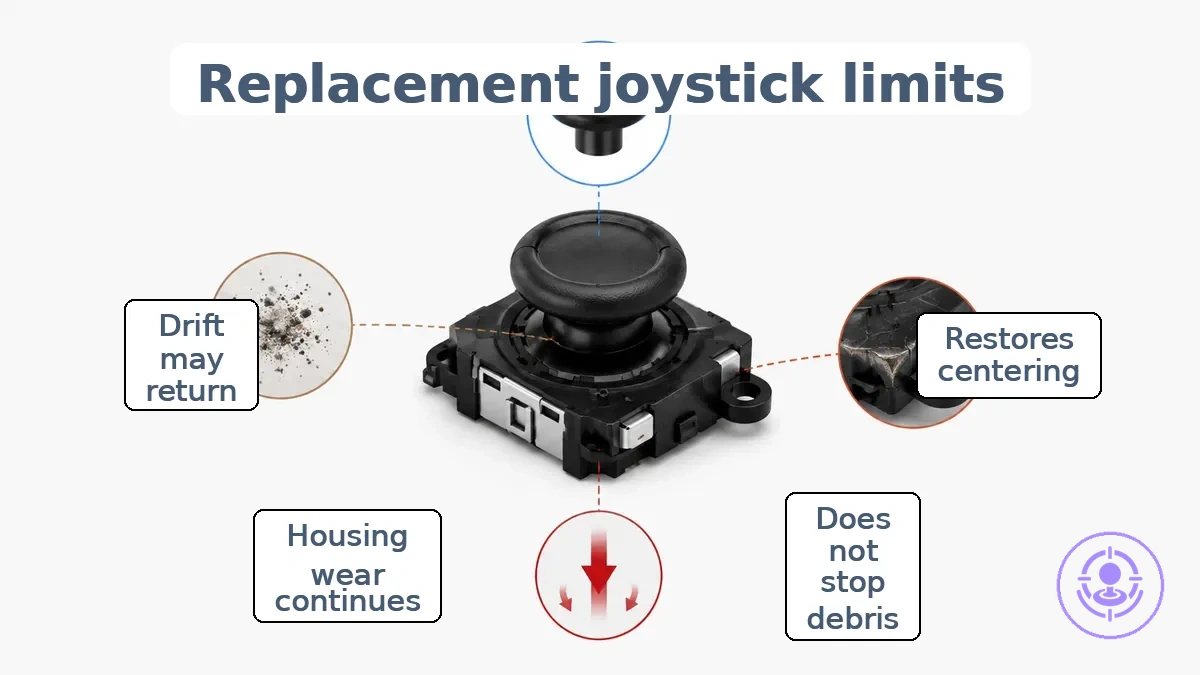
A replacement joystick repair replaces the worn stick assembly to restore centering and input stability when the internal potentiometer is the source of drift.
Long-term durability depends on continued exposure to debris and housing wear, which the replacement does not address. The diagram labels the replaced module and the surrounding exposure points, illustrating what a replacement joystick fixes and what it does not fix long-term.
What a replacement joystick fixes and what it does not fix long-term are as follows.
- What the replacement fixes: Restores centering, stability, and input accuracy by replacing worn potentiometer contacts.
- What it does not fix long-term: Does not eliminate exposure to dust, debris, housing wear, usage stress, or recurrence potential when environmental conditions persist.
Replacement does not equal immunity; even after a correct install, drift can return when debris, wear, and stress continue to act on the module, making long-term reliability conditional on use and environment.
The main factors that decide how quickly drift comes back after a repair
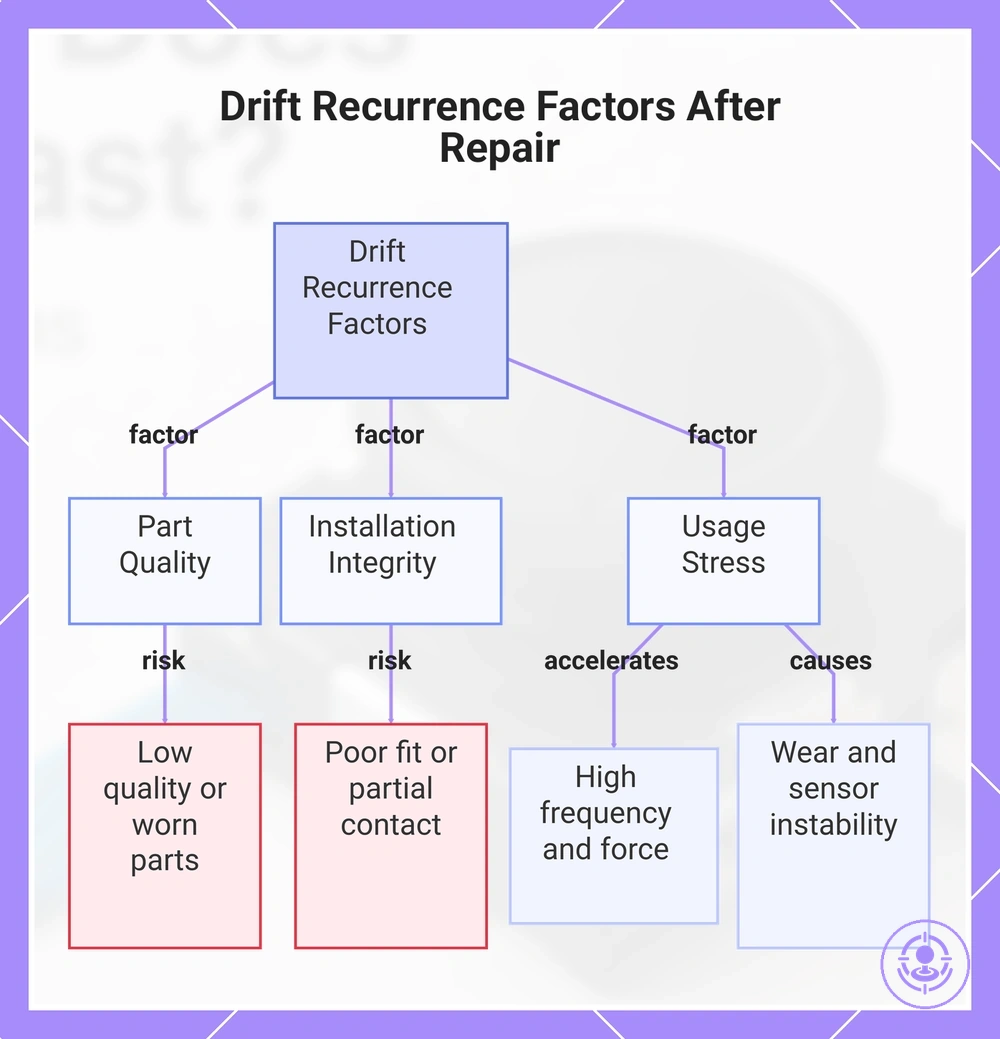
How quickly drift comes back after a repair depends on a set of main factors: part quality, installation integrity, and usage stress. Each driver can influence recurrence timing differently, and combined conditions may accelerate or delay drift return. The following checklist organizes these recurrence drivers by impact, helping you interpret what your controller's behavior says about the repair outcome.
- Part quality — The condition and construction of the replacement. Lower‑quality or previously worn parts can introduce early failures.
- Installation integrity — How securely the module is mounted and whether all soldered connections are clean. Poor fit or partial contact can trigger drift soon after repair.
- Usage stress — The frequency and force of joystick movements during gameplay. Higher stress accelerates mechanical wear and contamination buildup inside the potentiometers.
- Wear and sensor instability — Over repeated use, the wiper inside the potentiometer wears against the resistive track, creating variations in voltage readings that can lead to drift.
- Recurrence signals — Patterns in when drift returns can help identify the likely root cause.
A useful signal split: if drift reappears within a few days or after very light use, the cause is more likely linked to installation integrity or part quality. If it returns after several weeks of regular gaming, long‑term wear is the more probable driver. These patterns are conditional — they help narrow the likely factor rather than confirm it.
This chart shows the three main factors — part quality, installation integrity, and usage stress — that determine how soon joystick drift reappears after a repair, along with their key risks and mechanisms.
Replacement module quality, tolerances, and center stability
Replacement joystick module tolerance is the allowable deviation in a module's mechanical and electrical characteristics from its specified design. Loose tolerance may cause inconsistent centering over time, increasing drift recurrence risk. Neutral return is how reliably the stick resets to its center position after release; center stability is the steady sensor reading when the stick is at rest.
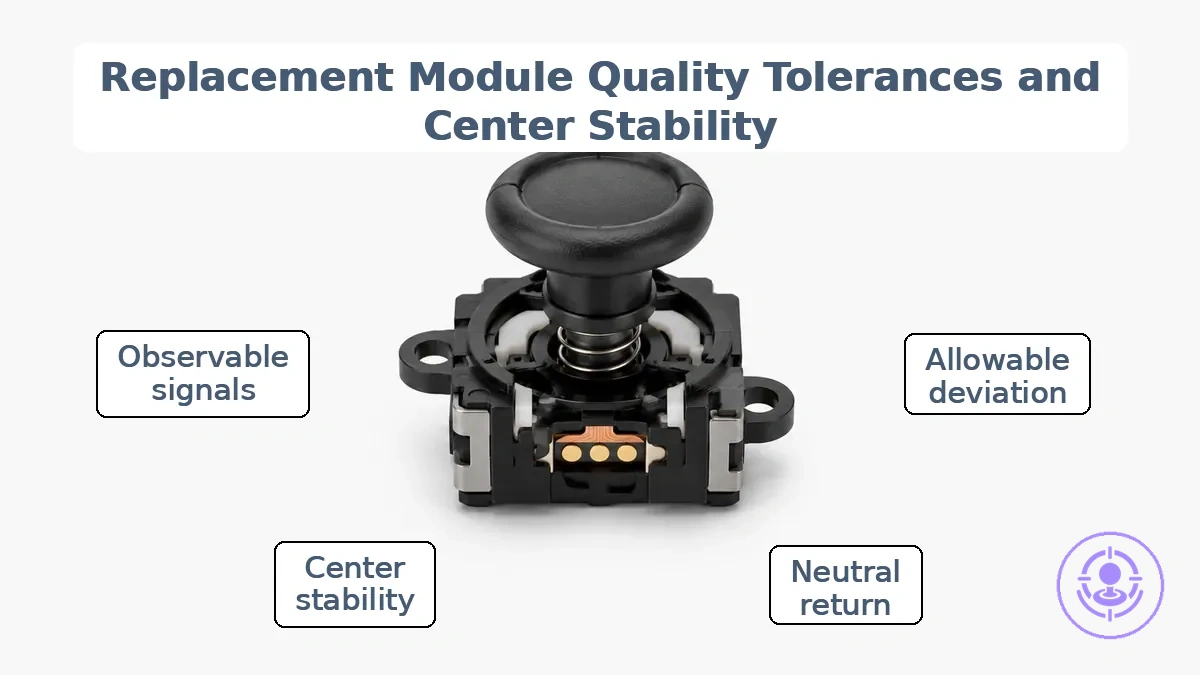
Observable quality signals can indicate tighter tolerance, which may help maintain stable sensor readings and slower recurrence. Evaluating these signals together with other quality signs that affect durability provides a more reliable basis for selection.
- Feel during manual rotation — uneven resistance or grit often points to poor mechanical fit within the module housing.
- Centering consistency — a module that returns to the same neutral position each time suggests better tolerance control.
- Early wobble or looseness — any side‑to‑side play after minimal use may signal insufficient manufacturing precision.
These indicative signals are not guarantees; no single observation fully predicts long‑term center stability.
Installation quality and cable or housing-related stress on the stick
Installation quality affects cable and housing stress. When alignment or seating is off, friction and housing bend increase internal resistance. Over time, these stresses accelerate wear and cause drift-like behavior sooner than expected.
Identifying and correcting alignment or seating issues early can extend stick lifespan. This checklist helps identify install-related stressors without assuming the install is wrong.
- Poor alignment between the housing and the cable connector, creating a sharp bend that increases friction
- Incomplete cable seating at the connector, allowing micro‑movement under tension
- Housing fit too tight or too loose, producing kinks or loops that add unwanted pressure on the cable
- Cable seated at an angle in the connector, causing asymmetric stress and intermittent readings
- Housing ends not properly trimmed or seated, causing drag on the cable and raising friction
These signals are suggestive; verify calmly before concluding that installation quality alone is responsible.
Play style and environmental wear factors that shorten lifespan
After repair, play style and environmental conditions can accelerate wear. The main categories that affect how quickly centering instability may return are pressure patterns, session length, and debris exposure.
These factors do not guarantee failure but can increase the risk of recurring drift. Common wear accelerators by category include:
- Pressure patterns – Frequent or hard inputs increase mechanical wear on the joystick mechanism, which may lead to centering instability over time.
- Session length – Longer continuous sessions keep the analog stick under constant load, potentially accelerating wear compared to shorter, spaced-out use.
- Debris exposure – Dust, lint, and other small particles can enter the housing and interfere with joystick movement, increasing drift recurrence risk when combined with normal motion.
Because play style and environment differ, the wear curve after repair can vary.
Maintenance Practices That Extend the Life of a Repaired Joy-Con Stick
Maintenance can reduce recurrence risk by limiting debris and unnecessary stress on the joystick sensor, but it does not guarantee permanent correction of drift.
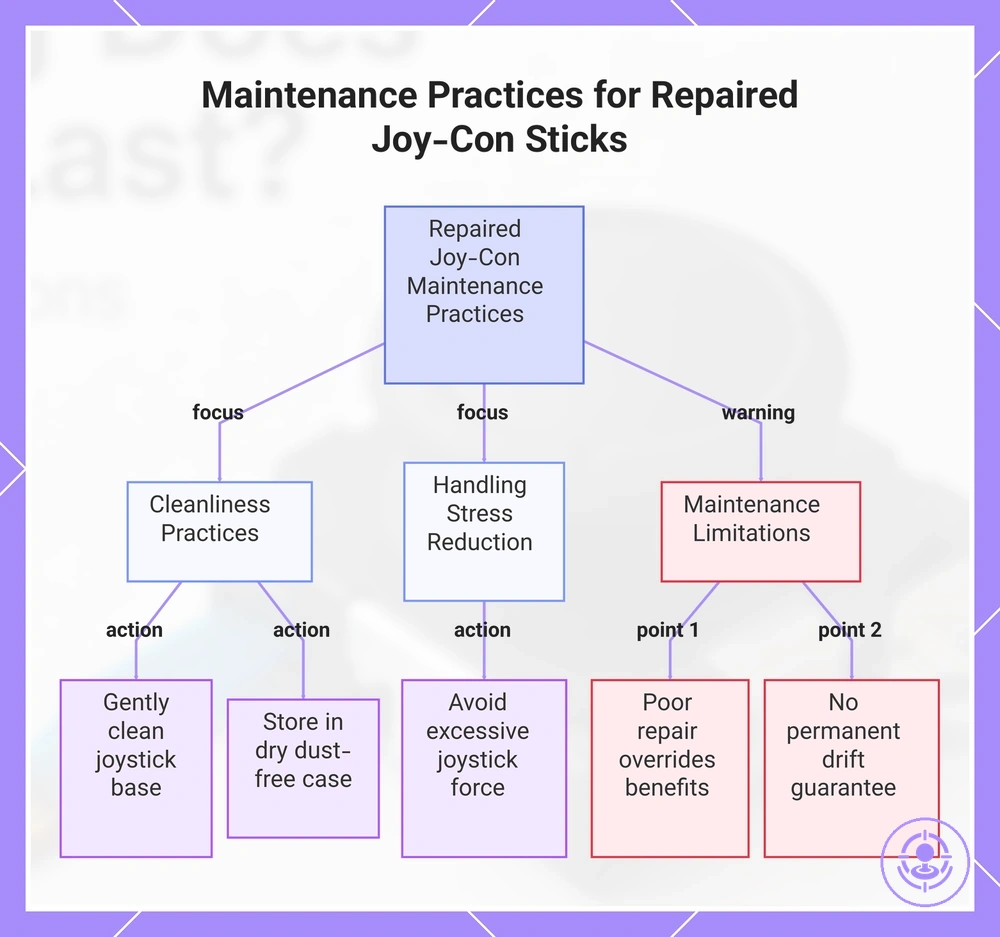
Maintenance practices that extend the life of a repaired Joy-Con stick are ranked here by their effect on longevity. These safe habits focus on cleanliness and reducing handling stress, which promote steadier sensor behavior and longer stable performance. When followed consistently, they can reduce the chance of recurring drift when the initial repair is mechanically sound.
- Gently clean the joystick base to remove dust and grime that can interfere with sensor accuracy (debris control).
- Recalibrate the control sticks through system settings to realign sensor tracking after cleaning or after extended use.
- Update the console and controller firmware to address software-related drift issues that may appear over time.
- Store the controller in a dry, dust‑free case when not in use to prevent particle build‑up.
- Avoid pressing the joystick with excessive force during gameplay to reduce wear on internal components (handling stress).
- Use the controller with clean hands and avoid eating or drinking near it to minimize dirt transfer.
- Check calibration periodically and repeat cleaning if drift symptoms return before attempting any disassembly.
Maintenance supports durability but does not override a poor initial repair or part variance. If the joystick module was damaged or incorrectly seated, even careful maintenance habits may not fully prevent drift from returning. With a solid repair foundation, consistent maintenance can keep the controller responsive longer.
This chart shows the key maintenance habits that reduce drift recurrence risk and their limitations.
Cleaning habits and debris control around the stick mechanism
Controlling debris around the stick mechanism helps maintain stability after a repair by reducing friction and sensor noise. When dust, dirt, or other particles enter the component area, they increase mechanical resistance and can interfere with the sensor's ability to detect movement accurately. Over time, this added friction and signal noise can lead to inconsistent input and a higher recurrence risk. These safe cleaning habits can help maintain stability and reduce the risk of introducing new problems.
A mini-checklist of safe practices includes:
- Keep the controller in a clean, dust-free environment when not in use.
- Use a soft, dry cloth to gently wipe the exterior around the stick.
- Use a dry cotton swab for light debris removal around the stick base.
- Blow out loose dust with canned air, holding the can upright.
- Avoid any liquid, spray, or solvent near the stick opening.
Cleaning alone does not fix drift, but it can support consistent input and reduce the risk of future instability when combined with a proper repair.
Storage, handling, and handling habits that reduce premature wear
These habits focus on minimizing mechanical stress during off-session periods. Sustained pressure from stacking, impacts from drops, or compression from tight storage can accelerate wear on the stick assembly even after a repair, as this strain compounds over time. The following habits reduce that mechanical load rather than on cleaning or gameplay adjustments.
- Store the controller upright or in a padded slot to reduce compression on the stick module.
- Keep the controller away from heavy objects to avoid sustained pressure that can deform internal parts.
- Use a protective case during transport to minimize impacts that may loosen the stick assembly.
- Place the controller on a flat, stable surface when not in use to prevent uneven stress on the joystick.
- Avoid wrapping cables tightly around the controller, as tension can transfer to the stick housing.
- Place the controller in a dedicated slot or holder to prevent accidental knocks that can cause impact stress.
These habits help keep the repaired stick assembly stable over time.
If drift returns soon: the most common reasons and quick checks
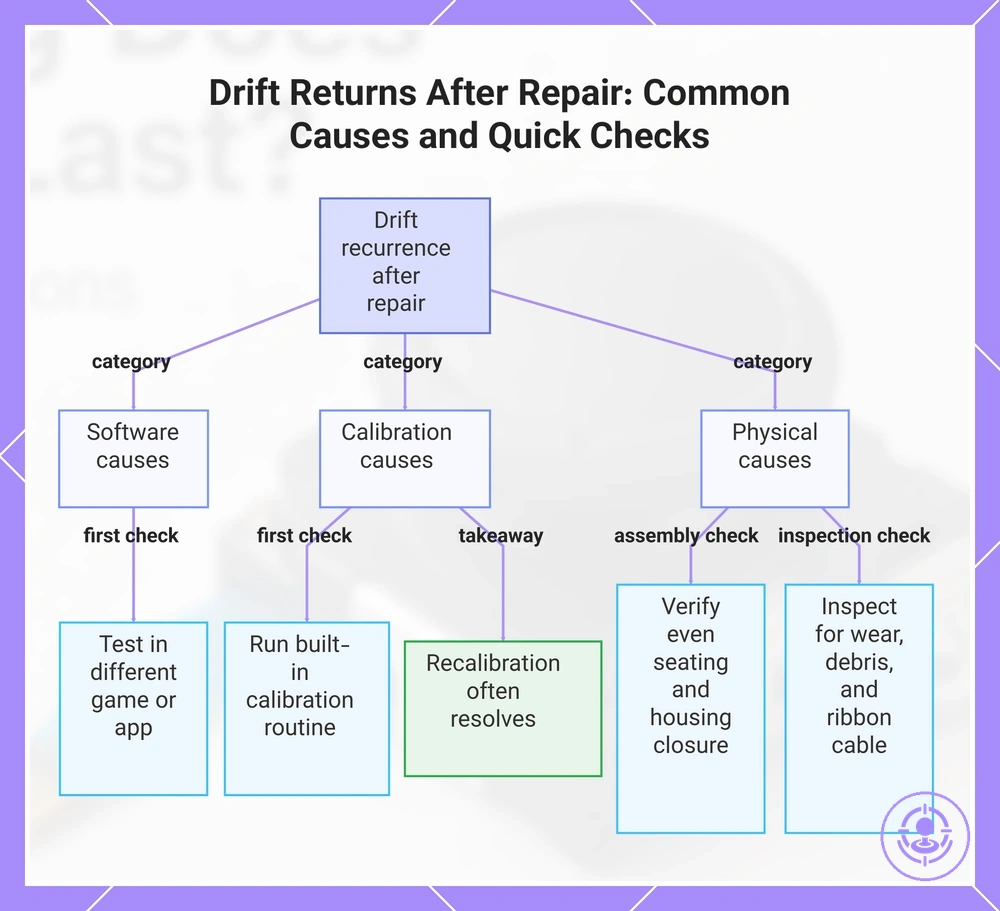
If drift returns soon after repair, it is often related to installation stress or calibration mismatch, but software settings or gradual physical wear can also cause early recurrence. This checklist groups these causes into software, calibration, and physical categories so you can identify the likely source without deeper disassembly.
Stop and consult a professional if you are unsure about any step.
- Drift returns immediately after reassembly – First safe check: verify that all components are seated evenly and the housing is closed without binding. This often points to assembly misalignment or pressure on the sensor.
- Drift returns after a few hours of normal use – First safe check: run the system's built-in calibration routine. This may indicate software settings or a calibration offset that may need recalibration.
- Drift returns only in certain games or applications – First safe check: test the same input in a different title. This suggests a software-level drift rather than a hardware issue.
- Drift returns gradually over days or weeks – First safe check: inspect the contact surfaces of the sliding mechanism for visible wear or debris. Gradual recurrence is more likely tied to physical wear rather than installation error.
- Drift returns intermittently and unpredictably – First safe check: check that the sensor ribbon cable is fully seated and not pinched. Loose connections can cause inconsistent drift signals.
- Drift returns only when the controller is tilted or pressed – First safe check: compare behaviour in stationary vs. handheld positions. This can indicate a loose internal component or strain on the sensor.
Early recurrence does not necessarily mean the replacement part is defective; many cases resolve after careful reinstallation or calibration adjustment. If drift recurs repeatedly after verifying alignment, connections, and calibration, the next logical step is to redo the repair with fresh adhesive or consider replacing the drift-prone module rather than continuing to troubleshoot.
This chart categorizes the main reasons for early drift recurrence after repair into software, calibration, and physical groups, and shows the first safe check for each symptom pattern.
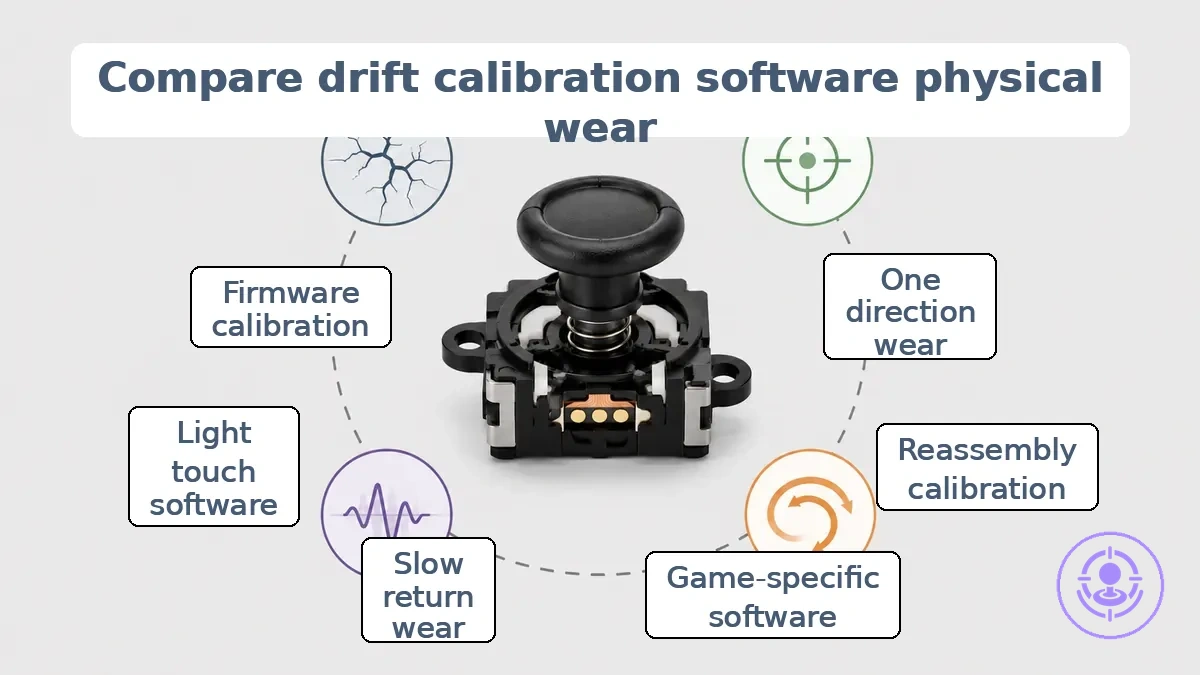
Drift vs calibration vs software settings vs physical stick wear
Drift vs calibration vs software settings vs physical stick wear — these four cause buckets are often confused because the observable symptom pattern — unintended movement at rest — can look identical across all four. Organizing symptom patterns by cause bucket helps you match your observation to the most likely source and a first safe action.
When a symptom reappears after a check, reassess the pattern instead of repeating the same check.
| Symptom pattern | Most likely bucket | First safe check | What it suggests |
|---|---|---|---|
| Stick drifts in one direction only at rest | Physical wear | Inspect stick module for debris or wear | Mechanical wear or contamination is likely |
| Drift appears after reassembly but was absent before | Calibration | Re-run controller calibration | Center point may need resetting |
| Drift occurs in one game but not others | Software settings | Check in-game deadzone settings | Game-specific deadzone or response curve is likely |
| Stick returns to center slowly or inconsistently | Physical wear | Check stick tension and spring condition | Mechanical wear or spring fatigue is likely |
| Drift appears only when stick is lightly touched | Software settings | Adjust inner deadzone in system or game settings | Deadzone threshold may be too small |
| Drift appears after firmware update | Calibration | Re-calibrate controller after update | Firmware may have reset calibration values |
When early recurrence points to install issues rather than normal wear
Early recurrence markers—how soon drift returns (onset timing) and how consistently it appears—distinguish install issues from normal wear progression. The markers below indicate when install issues, rather than normal wear, may be the cause.
- Drift that returns soon after repair suggests alignment or seating problems rather than gradual wear; centering markers and stability assessment provide verification.
- Drift that consistently pulls to one side from the start often indicates uneven install stress; a centering check helps confirm whether normal wear is actually the cause.
- Drift that appears right after reassembly suggests improper component seating; centering markers can confirm install-related stress.
- Drift that worsens quickly over a short period suggests ongoing install stress rather than normal wear progression; stability verification is a useful next step.
- Drift that does not respond to basic calibration often points to install issues; centering marker verification helps clarify the cause.
When to redo the repair, replace the module again, or switch controllers
The decision to redo the repair, replace the module, or switch controllers depends on three factors: symptom persistence, install confidence, and recurrence pattern. The checklist below maps your current symptoms and stability to the most appropriate next action.
When symptom persistence is high despite multiple repairs, install confidence may be low. When in doubt, choose the least invasive next step first—typically redoing the repair with a fresh approach.
- Symptom returns within weeks after recent repair: low confidence and early recurrence suggest replacing the module or switching controllers; a redo may only provide temporary stability.
- Symptom returns after months of consistent use: high confidence and late recurrence suggest a redo (with thorough cleaning or alignment) may suffice.
- New symptom after no prior drift: redo the repair first; the module may still be functional.
- Multiple redos attempted: consider replacing the module or switching controllers; repeated repairs may carry diminishing stability and increased time.
- Low install confidence from incomplete repair: consider replacing the module or switching controllers; a redo without improved technique likely repeats the outcome.
Consider two patterns: early recurrence after each repair, indicating low install confidence and high recurrence, versus a long stable period followed by drift reappearance, suggesting the original repair was mostly sound. If you are weighing whether a new kit is needed, evaluating if is the repair kit worth it can help decide which path aligns with your stability expectations. Regardless of the choice, check that the next action addresses the specific cause of recurrence rather than applying a generic fix.
Durability Expectations FAQ for Joy-Con Drift Repair Kits
The lifespan of a Joy-Con drift repair depends on the quality of the repair kit, how the controller is used, and how well it is maintained. For a broader overview of available solutions, visit the Joy-Con drift repair kit hub.
Question: How long does a Joy-Con drift repair typically last?
Answer: It can last for several years with quality parts and occasional use. Heavy daily gaming may cause recurrence sooner.
Question: Can drift return after a repair?
Answer: Yes, recurrence is possible. Drift returning is more likely when the internal components wear down again or when dust and debris accumulate over time. Regular maintenance can reduce the risk of early recurrence.
Question: Does the replacement stick have the same durability as the original?
Answer: The durability varies by the brand and material of the replacement stick. Some third-party sticks may match or exceed original durability, while others may wear faster. Checking user reviews can help set realistic expectations.
Question: What maintenance helps extend the life of a repaired Joy-Con?
Answer: Cleaning the joystick area periodically and storing the controller in a dust-free case can reduce the risk of drift returning. Avoiding excessive pressure on the stick also helps preserve the repair. These maintenance habits depend on the user's environment and usage patterns.
Question: When should I consider replacing the stick again?
Answer: If drift symptoms reappear despite cleaning and recalibration, the stick may need replacement again. The timing varies, but many users report a second repair lasting a similar duration as the first when using quality parts.
Do certain games or play styles make drift come back faster
Yes, play styles that involve high pressure and repetitive inputs can accelerate wear on analog stick components, potentially leading to earlier recurrence of drift. The effect depends on individual usage patterns, hardware conditions, and environment. Using moderate pressure and varied input patterns may help delay recurrence.
Can contact cleaner or lubricant extend the life of a repaired stick
Contact cleaner or lubricant may cause a temporary symptom change, but it does not guarantee long-term durability. Using these products introduces the risk of residue buildup and material interaction, which can affect internal components over time. Avoid such risky approaches.
A brief improvement in feel or responsiveness does not mean the underlying wear has been resolved. A more conservative approach to maintenance, such as routine inspection and gentle cleaning, may offer more predictable results for sustained function.
What does it mean if the stick feels loose, off-center, or inconsistent after repair
These sensations can indicate fit issues, part variance, or calibration mismatch, with meaning depending on severity and persistence. Quick checks separate minor settling from signals that may need action.
- Loose feel – May suggest fit issues with the joystick housing or alignment. First safe check: verify that the stick is seated correctly and that all mounting screws are snug.
- Off-center feel – May point to calibration mismatch or part variance. First safe check: run the controller's calibration routine or check for any software deadzone adjustment.
- Inconsistent response – Could indicate debris or partial contact wear. First safe check: clean around the stick base with compressed air or isopropyl alcohol.
- Persistence of any sensation – Persistence after initial checks may indicate a deeper component issue requiring further inspection.