Joy-Con Drift Repair Kit Price Range: Cost, Completeness, and Value
A Joy-Con drift repair kit price range reflects the completeness of what's included—replacement joysticks, screwdrivers, opening tools—rather than just a low sticker price; missing items can raise the true cost if extra parts are needed. This evaluation excludes full controller repair paths and drift diagnosis, focusing solely on how kit offers compare.
When comparing repair kit offers, the Joy-Con drift repair kit hub can help distinguish scope, tool readiness, and quality uncertainty.
Scope covers the number of replacement parts and compatibility with different Joy-Con models. Tool readiness indicates whether the kit includes the specialized screwdrivers and spudgers needed for assembly. Quality uncertainty can arise when parts vary in precision or durability. These factors help compare kit offers, and the typical contents of each category define the scope buckets for easier comparison before deciding.
It is often assumed that the lowest price kit offers the best value, but true cost depends on what is missing.
- Scope – changes whether you need to buy additional parts such as extra joysticks or button flex cables.
- Tool readiness – changes the need for separate screwdrivers and prying tools.
- Quality uncertainty – changes how often a replacement may need to be performed again.
- Missing items – can increase total effort and expense beyond the initial price.
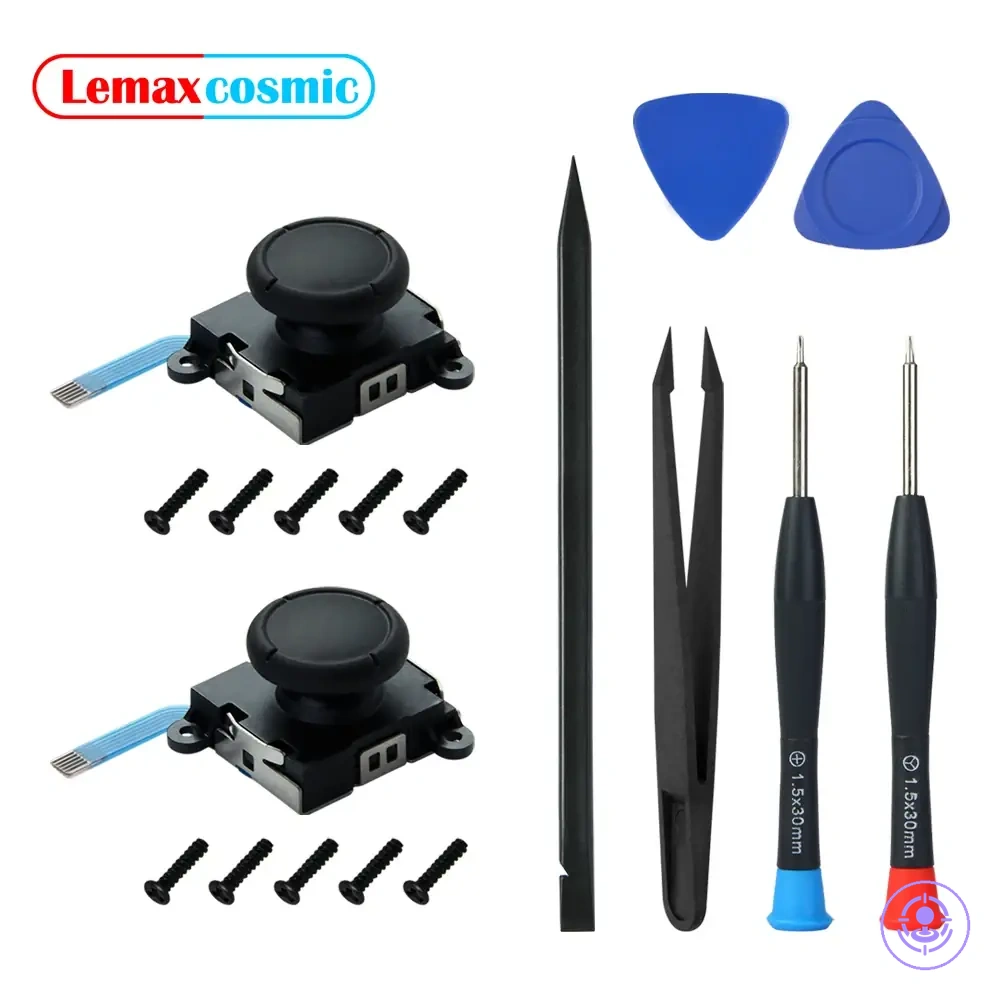
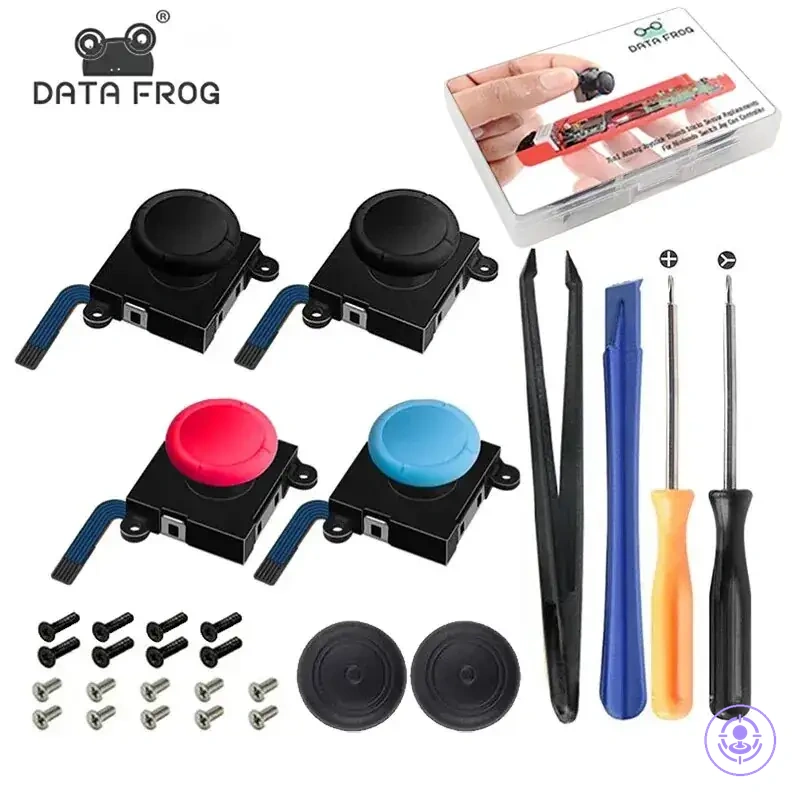
What sellers mean by ‘repair kit’ in Joy-Con drift listings
A ‘repair kit’ in Joy-Con drift listings is a product bundle that groups the components and tools needed to replace or adjust the joystick assembly. The label is inconsistent because some listings include only replacement joysticks (parts-only), while others bundle screwdrivers, opening tools, and small accessories. The mismatch between ‘kit label’ and ‘kit contents’ means buyers should verify the contents, not the title.
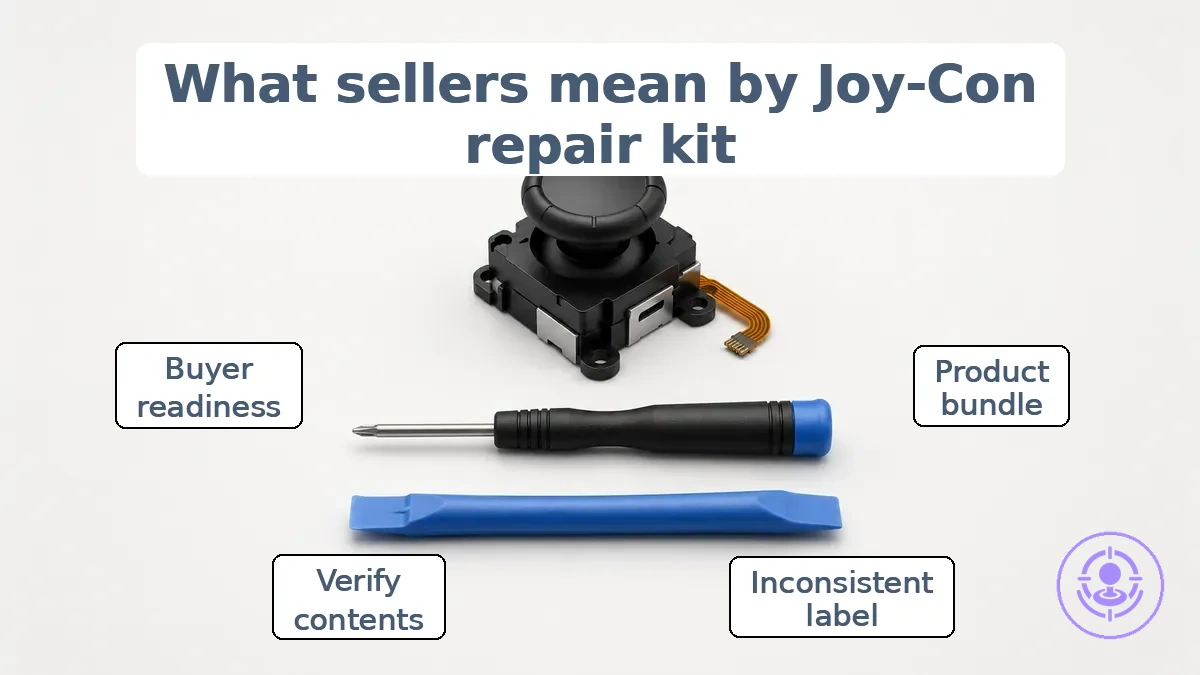
What sellers mean by ‘repair kit’ organizes typical contents into parts, tools, and small accessories.
- Parts
- Replacement joystick module
- Thumb stick rubber cap
- Metal latch or retaining bracket
- (Occasionally) replacement ribbon cable
- Tools
- Tri-point Y00 screwdriver
- Phillips #0 screwdriver
- Spudger (plastic pry tool)
- Tweezers
- Opening pick
- Small accessories
- Spare screws
- Adhesive pads or double-sided tape
- (Sometimes) compressed air duster
- (Sometimes) electrical contact cleaner
The distinction determines buyer readiness: a tool-included kit can allow immediate replacement, while a parts-only kit requires separate tool purchases and may delay the repair.
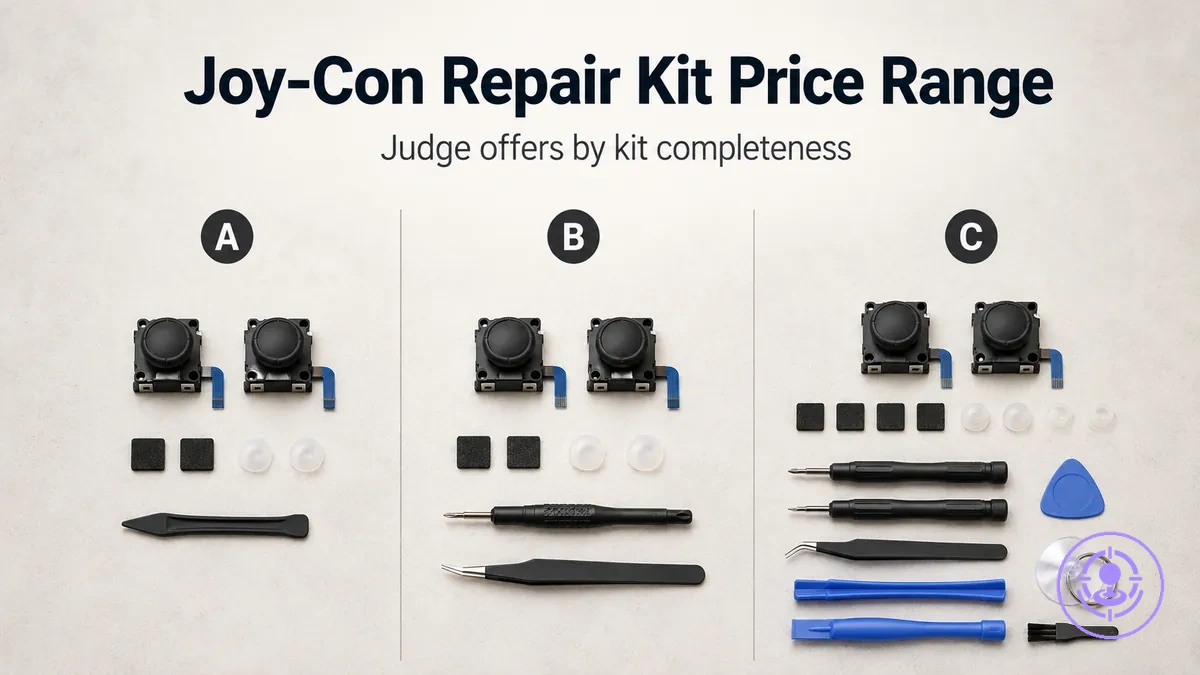
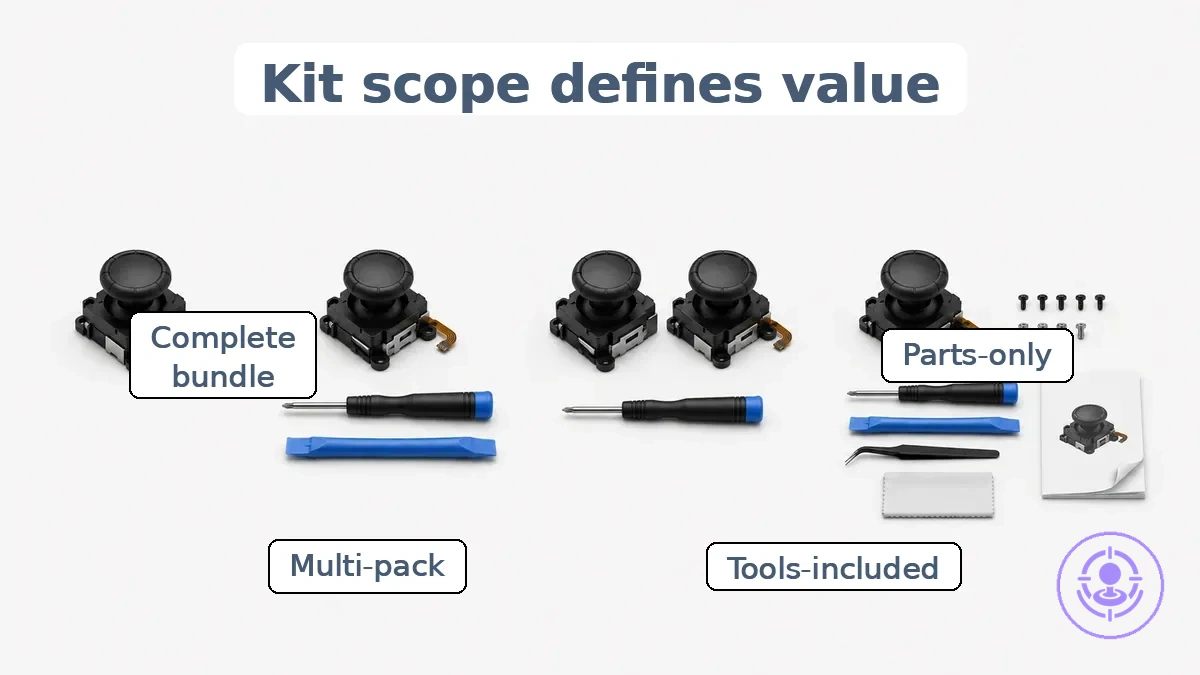
Price range anchors by kit scope
Price range depends on kit scope and included tools rather than the word 'kit' alone—scope defines whether you get only replacement parts or a ready-to-use set with the tools needed for installation. What each scope typically contains is detailed in repair kit types and what they include. The table organizes scope buckets by inclusions and likely add-on needs to help evaluate what each tier actually requires before purchase.
A comparison graphic uses the heading's scope categories to show how kit scope changes included items and add-ons.
| Scope bucket | Typical inclusions | Likely add-ons | Value implication |
|---|---|---|---|
| Parts-only | Replacement joystick module, sometimes a screwdriver | Separate screwdriver set, spudger, tweezers | Lowest upfront cost but requires tool investment; true cost rises with needed extras |
| Tools-included | Joystick module, screwdriver, spudger, opening tool | Replacement screws, adhesive strips, calibration tool | Higher initial price but reduces add-on needs; better readiness for first-time users |
| Multi-pack | Two or more joystick modules, basic tools | Same as parts-only if tools are minimal; otherwise fewer extras | Cost per repair drops when fixing multiple controllers, but scope still determines tool gaps |
| Complete bundle | Joystick modules, full tool set, replacement screws, adhesive, calibration guide | Few or none; bundle aims to cover all common needs | Highest upfront cost but lowest true cost when all items are needed; reduces second purchases |
Each scope bucket carries a different value trade-off. Parts-only and multi-pack kits often require additional tool purchases, increasing their true cost, while tools-included and complete bundles have a higher upfront price but reduce the need for extras. Same price, different scope can mean very different readiness levels, so compare within each bucket rather than assuming a higher price always means better value.
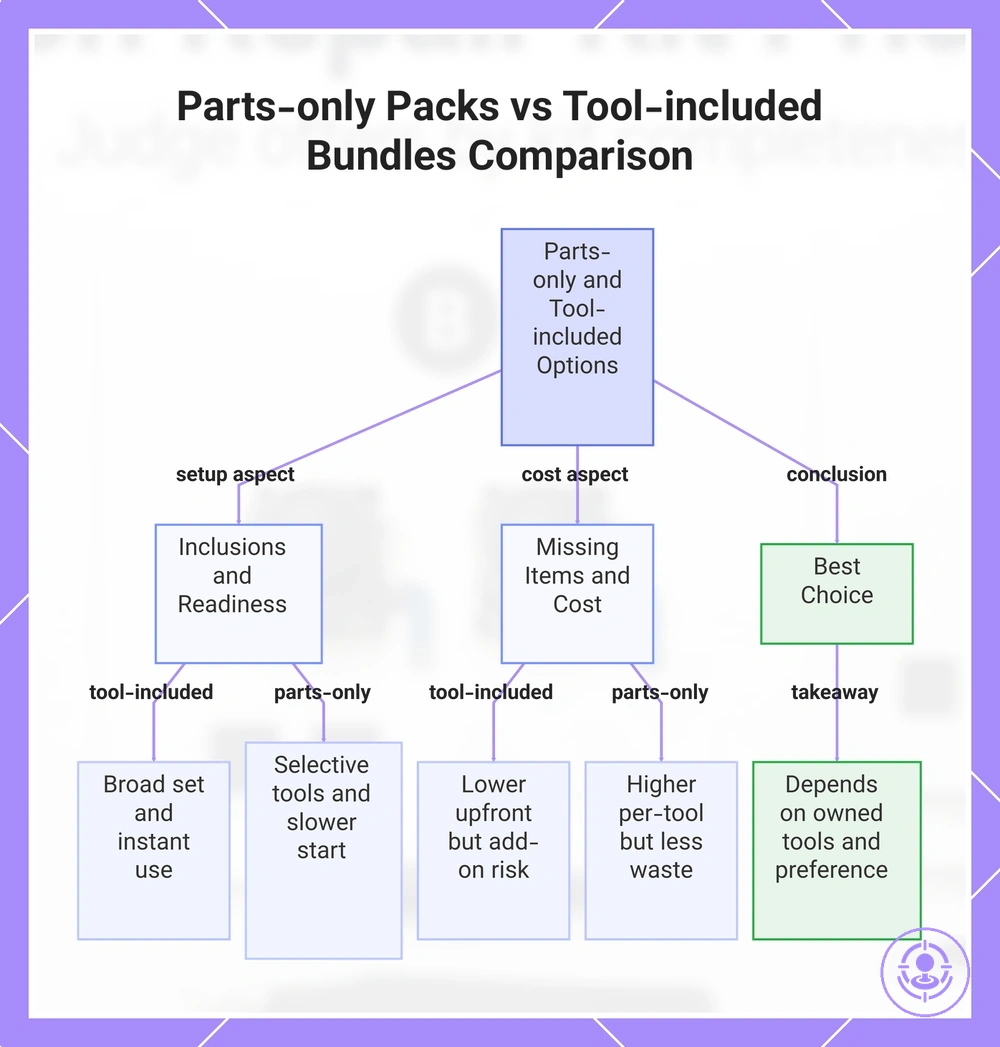
Parts-only packs versus tool-included bundles
The main difference between parts-only packs and tool-included bundles comes down to whether you pay for tools upfront or source them separately. This choice affects your setup cost, readiness, and the likelihood of missing items.
- Inclusions: Tool-included bundles often include a wide range of tools but may contain some you rarely use. Parts-only packs let you pick only what you need, but each tool must be purchased separately.
- Start-readiness: Tool-included bundles are ready to use right away—everything arrives in one box. Parts-only packs take more time because you need to locate and order each tool individually.
- Common missing items: Tool-included kits can omit specific sizes, so you may need to buy those separately. Parts-only packs avoid that issue by design, but you must confirm every required size is in your order.
- True cost: Tool-included bundles usually have a lower per-tool upfront price, but add-ons for missing items can raise the total. Parts-only packs often have a higher per-tool price but generate less waste from unused tools. Which option works better depends on the tools you already own and whether you value immediate convenience or a tailored selection.
This chart compares parts-only packs and tool-included bundles across setup, cost, and missing items to help decide which option suits your needs.
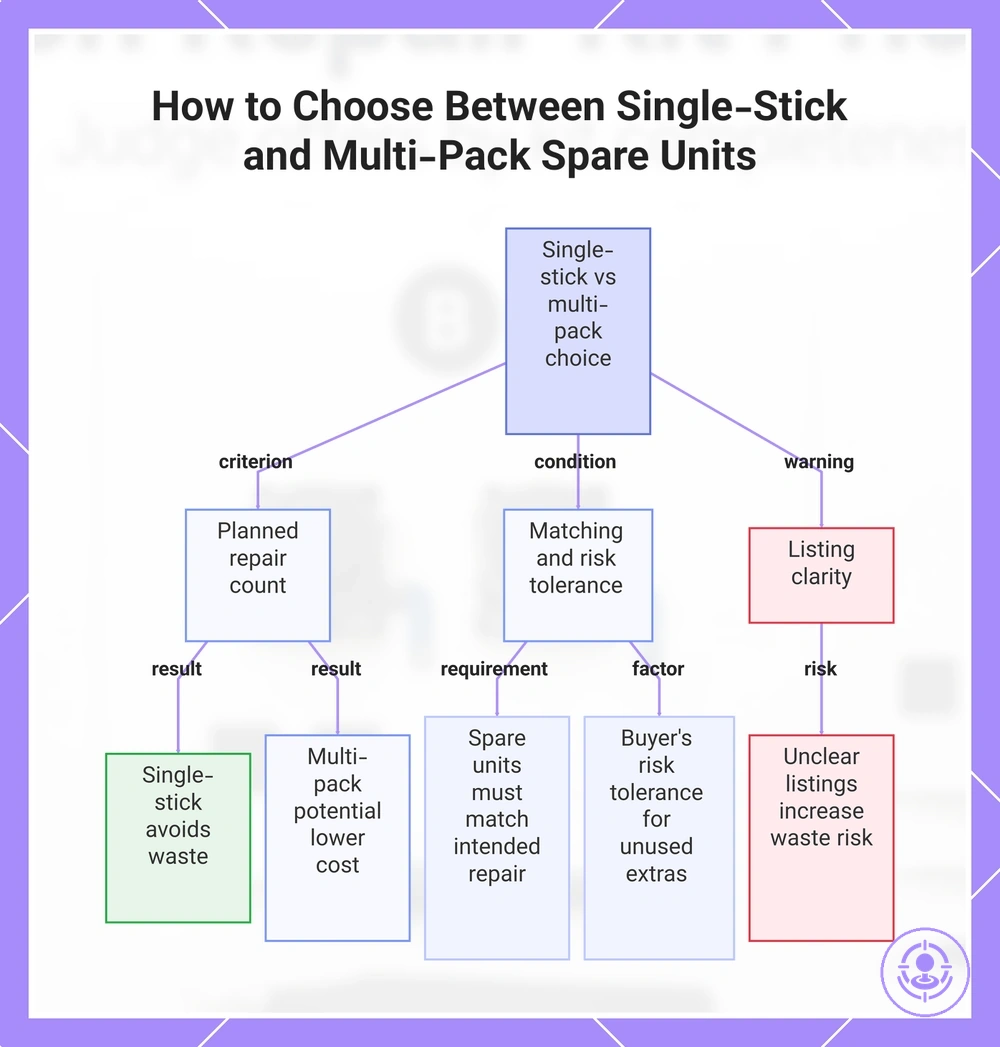
Single-stick replacements versus multi-pack sets
Per-unit value increases with quantity only when spare units match the buyer’s use and risk tolerance.
When extra units are needed for multiple repairs or as spares, a multi-pack can offer a lower per-unit price. When only one repair is planned, a single-stick purchase avoids waste from unused extras. The difference between value per unit and value in use matters: a multi-pack may seem cheaper per unit, but if extra units go unused, the overall cost is higher.
- Spare units reduce future order waits only if they match the intended repair.
- Listing clarity matters: unclear listings increase waste risk and can make multi-pack poor value because components may not fit or be needed.
- A multi-pack offers a lower per-unit price only if all extra units are used; otherwise the overall cost is higher.
- Whether the multi-pack’s per-unit value holds depends on the buyer’s risk tolerance for unused extras.
This chart shows the key decision factors and risks when choosing between single-stick and multi-pack purchases for spare units.
Pricing components that change the final cost
This checklist organizes the pricing components that affect the final cost. Parts, tools, and add-ons beyond the initial listing price are among these components.
- Verify: the kit includes all necessary replacement parts, or missing components require separate purchases.
- Verify: specialized tools for installation are included, or you may need an extra purchase.
- Verify: listed add-ons like adhesive strips or alignment guides are accounted for.
- Verify: shipping, returns, and conditional hidden costs may apply, and a missing component could delay repair.
- Verify: the kit description matches your specific model variant to avoid ordering an incomplete set.
- Verify: replacement parts are sold individually or as a bundle, affecting total cost if only one component is needed.
- Verify: the price includes support that could offset later expenses.
- Verify: the tool size or bit type matches your existing equipment to avoid an extra purchase.
Checking these components helps determine the true cost of a repair kit.
What affects price beyond the label
Price differences between repair kits usually stem from part consistency, tooling adequacy, completeness, and after-sales friction. A low price can mean lower scope or lower consistency, so the listed amount alone does not capture the true cost. These factors act as signals, not guarantees, of value.
The most common price drivers fall into four categories that link observable cues to risk and value impact:
Quality signals:
- Consistent material and finish across components reduce early failure risk and boost long-term value. Visible defects or mismatched colours may indicate higher risk.
- Precise moulding without flash or burrs suggests better quality assurance, reducing fit issues during installation.
- Uniform screw hardness across kits correlates with lower strip risk during tightening, preserving part usability.
Tooling signals:
- Well-fitting, hardened steel bit reduces damage risk to screw heads, directly protecting kit value and avoiding additional costs.
- A bit that matches the tri-wing or Y00 profile exactly lowers the likelihood of cam-out or rounding, protecting the fastener and assembly.
- Tooling that feels flimsy or has visible wear marks increases slipping risk, damaging the housing and reducing overall value.
Completeness signals:
- Kits that include all necessary adhesive strips, dust covers, and bracket screws reduce sourcing friction, raising effective value.
- Pre-applied thermal paste or alignment guides reduce the need for separate purchases and lower the risk of incorrect assembly.
- The absence of a documented parts list increases the risk of overlooking a required component, delaying repair and adding hidden cost.
Support and returns signals:
- A clear return policy and warranty coverage reduce after-sales friction, shifting risk from buyer to seller and improving the true cost equation.
- Responsive customer support and a no-questions-asked return window lower the risk of paying for a kit that does not fit or work as expected.
- Kits sold without any return option or contact information imply higher buyer risk, often making a slightly higher upfront price the better value.
- Detailed installation instructions that address common compatibility issues reduce user error chance, keeping value intact and reducing return friction.
Combining multiple signals across these categories can give a clearer picture of the kit's real worth than focusing on any single feature. When evaluating a listing, use these price drivers as a checklist instead of assuming that price alone guarantees quality.
This chart shows the three main categories of signals that determine the true value of a repair kit, beyond the listed price.

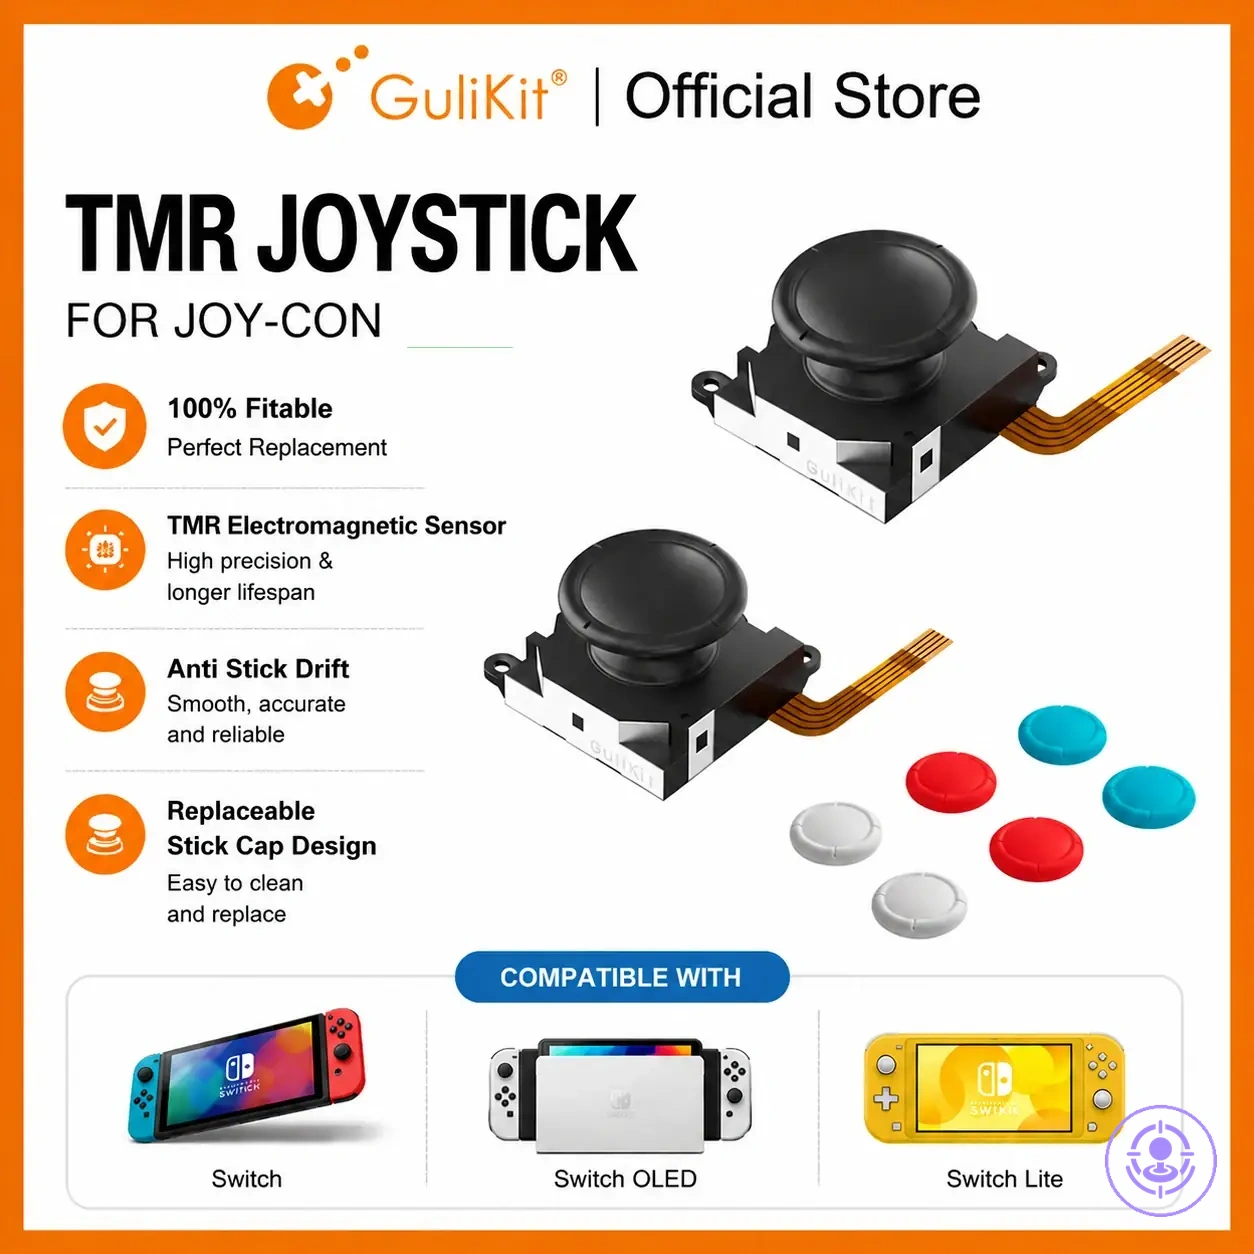
Joystick Module Quality and Fit Consistency
Joystick module inconsistency is a major value risk because fit and tolerance variance directly affect replacement likelihood and cost. Signal behavior and physical dimensions vary across modules, making listing cues a critical quality signs to look for in a kit.
- Cue: Listing includes precise dimensions or a side-view photo. What it suggests: The module’s fit and tolerance have been documented, reducing variance risk. Value impact: Lower replacement likelihood due to height or width mismatch.
- Cue: Packaging shows return/replacement policy for size issues. What it suggests: The seller acknowledges that fit inconsistency exists and offers a remedy. Value impact: Reduces financial risk if the module does not align with the housing.
- Cue: Product description mentions testing for center position or deadband. What it suggests: Signal consistency after movement is a known concern. Value impact: Higher chance the module will maintain stable zero values over time.
- Cue: Listing uses generic stock photos without any model-specific reference. What it suggests: The module may look complete in the image, but actual dimensions or consistency cannot be confirmed. Value impact: Increased risk of fit variance and replacement likelihood.
- Cue: Customer reviews mention “wobble” or “loose fit.” What it suggests: Physical tolerance between the module and mounting slot is inconsistent across units. Value impact: Defect risk in fit is present; may require shimming or return.
- Cue: Seller provides a defect rate or batch-testing note (e.g., “sampled before shipping”). What it suggests: The supplier has some quality control, though not a full guarantee. Value impact: Lower risk of receiving a module with extreme variance.
Verify these cues before purchasing; packaging and listing details, not appearance alone, indicate fit and performance risk.
Tooling quality for Joy-Con screws and safe handling
Poor bit fit can damage screws and extend the repair, reducing the value of your tool set. Use this checklist to verify tooling quality for Joy-Con screws and gauge damage risk before starting a repair:
- Check: driver type matches the screw head — tri-wing for outer shell screws and Phillips for internal fasteners.
- Check: bit precision helps prevent wobble or slip that can strip the screw head.
- Check: magnetic tip holds screws during insertion to reduce misalignment risk.
- Check: handle design allows controlled torque to avoid overtightening.
- Check: material hardness resists wear that could alter fit over repeated use.
- Check: set includes both needed driver types for complete access without makeshift tools.
A stripped screw is a common value failure during Joy-Con repair, often raising the true cost of what should be a quick fix.
Accessory quantity and replacement consumables
The quantity of accessories and replacement consumables matters because a missing item can interrupt the repair or increase the risk of damage.
- Enables progress
- Replacement joystick modules — missing one can stop the entire repair before it starts; immediate value.
- Precision screwdriver set that fits the tri-wing screws — a missing size can halt progress mid-way.
- Opening tools and spudger — reduces the chance of cracking the shell, may help avoid a costly side repair.
- Spare screws and small parts — losing a single fastener can interrupt assembly; spares keep the job moving.
- Convenience extras
- Extra adhesive pads or strips — convenient for reattachment but not strictly required when original adhesive is reusable.
- Tweezers for handling tiny connectors — speeds up work but can be replaced by steady fingers or a basic pick.
- Carrying case for leftover components — organisational value, usually with little effect on repair success.
- Magnetic mat for tracking screws — helps avoid loss but typically has little impact on whether the repair finishes.
Focus on items that prevent interruption; treat convenience extras as optional.
Support, Warranty Language, and Return Friction
Return friction and vague warranty language can raise the effective cost of a repair kit above its listed price. The true cost depends on how easily you can return a defective kit, how clearly the seller defines defect handling, and whether the warranty promises are backed by a straightforward process.
- Return Window → The time limit allowed for returning a defective or unwanted kit → A short window lowers your chance of a free replacement and may leave you with a non-working unit, raising effective cost.
- Defect Handling Procedure → The steps you must follow to report and return a faulty item → Pre‑authorization steps or strict inspection requirements can delay replacement and add hassle, raising effective cost.
- Warranty Language Clarity → How clearly the seller states what is covered and for how long → Vague terms like “defects in workmanship” without examples can make it harder to claim a replacement, lowering buyer protection.
- Replacement vs. Repair Policy → Whether the seller offers a new kit or attempts to fix the returned one → Replacement usually provides faster resolution; repair may involve longer wait times and potential for repeat issues, affecting net value.
- Return Shipping Responsibility → Who pays for sending the defective kit back → If the buyer pays return postage, that cost adds directly to total expense, especially for large or heavy kits.
- Restocking Fee → A charge deducted from a refund for non‑defective returns → A restocking fee can turn a full refund into a partial one, cutting the money you recover and raising the effective cost of the purchase.
- Proof of Purchase Requirement → The documentation needed to initiate a claim → Strict original‑receipt requirements can block a replacement if the receipt is lost, reducing buyer protection and making the kit effectively more expensive over time.
- Time to Resolution → The expected turnaround from claim submission to receiving a replacement or refund → Long delays can leave you without a working controller, increasing indirect cost through lost use and frustration.
Friction adds to the true cost; checking seller terms beforehand helps you estimate the real expense.
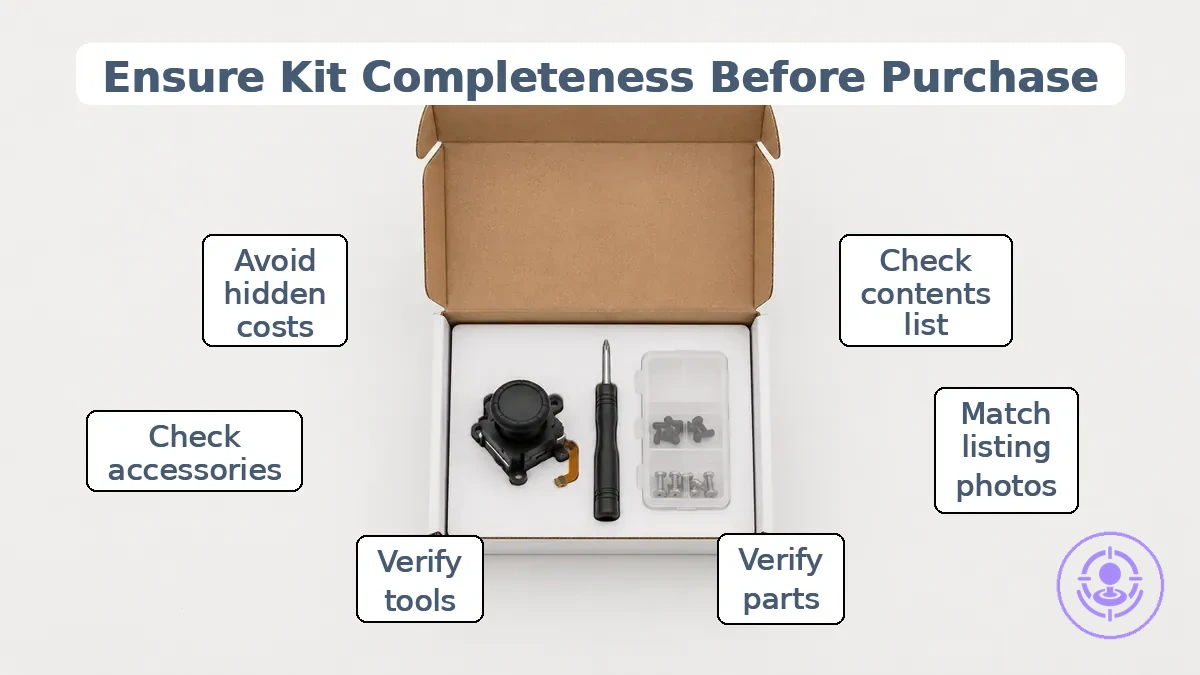
Offer Completeness Checks Before You Buy
Offer completeness checks before you buy to help you avoid hidden add-on purchases and avoidable failure points by verifying the listing against the contents list. A structured parts checklist for a complete kit helps you verify against photos and the contents list.
- Parts
- Replacement joystick modules
- Screws and fasteners
- Thumbstick caps
- Alignment brackets
- Ribbon cables
- Tools
- Precision screwdriver set
- Tweezers
- Spudger
- Opening pick
- Suction cup
- Cleaning cloth
- Small accessories
- Screwdriver bits
- Screw organizer
- Extra screws
- Calibration tool
- Adhesive pads
- Protective case
If a core part, essential tool, or required small accessory is missing from the listing photos or contents list, treat the offer as incomplete for your needs.
Minimum Viable Contents for a Typical Drift Repair Attempt
The minimum viable contents for a typical drift repair attempt are the tools and replacement parts that allow you to start and finish the common replacement path without interruption and reduce extra-cost risk. The checklist below organizes these items; confirm each is present before you start.
- Confirm a temperature-controlled soldering iron with a fine tip is included. Without it, you may not be able to desolder the old joystick module, and the repair may be interrupted.
- Confirm rosin-core solder is included. This type bonds correctly to the board and reduces the risk of cold joints that may cause intermittent drift after reassembly.
- Confirm a desoldering pump or braid is included. Without a removal tool, leftover solder can bridge pins and can make replacement difficult or unsafe.
- Confirm fine-tipped tweezers are included. They allow precise handling of small components and reduce the chance of damaging nearby traces.
- Confirm a replacement joystick module or drift repair board is included. This is the core component; without it, you have nothing to install.
- Confirm flux (paste or pen) is included. Flux helps solder flow cleanly and improves joint reliability, lowering the risk of a failed connection.
- Confirm isopropyl alcohol and cotton swabs or lint-free wipes are included. Cleaning flux residue and dust after soldering helps prevent unwanted electrical paths that can mimic drift.
- Confirm a screwdriver set with Phillips #00 and P2 bits is included. These sizes are commonly needed to open the controller shell without stripping screws.
This minimum set does not guarantee a successful repair or avoid all extra-cost risks; the outcome still depends on your technique, the quality of the replacement part, and the specific condition of the controller.
Nice-to-have inclusions that justify paying more
Not all nice-to-have inclusions justify paying more — only those that reduce damage risk or repeat attempts do. Convenience alone does not address core risks.
Reduces damage risk- Alignment guides or spacers reduce the risk of stripping screws or misaligning the joystick module, but only if the tool fits your specific controller revision. Without a proper fit, they offer no benefit.
- An anti-static wrist strap reduces the chance of electrostatic discharge damage in dry or carpeted environments. For most users, the risk reduction is minimal, but specific conditions may justify a slightly higher price.
- Spare ribbon cables or connectors reduce the risk of being stuck with a broken connector during installation, avoiding the need to order a separate part. They justify paying more only when the original cable is fragile or it is your first repair attempt.
- An extra joystick module of the same quality lets you retry immediately if the first is defective or calibration is off, reducing the need to reorder.
- A detailed step-by-step guide or video covering common pitfalls lowers the chance of mistakes that force a re-do, but only if it matches your specific model. If it doesn't match, it adds little value.
- An assorted screw set prevents pausing the repair to find replacements when screws are stripped or lost, reducing repeat attempts. This adds more value for users without a backup supply.
Pay more only when it changes risk or effort.
Listing clarity checks to avoid mismatched kits
Unclear photos and vague wording increase mismatch risk even when price looks good. This checklist organizes clarity checks to help avoid mismatched kits and the resulting return friction.
- Check photo clarity to correctly assess component dimensions.
- Check the contents list to avoid assuming missing parts are included.
- Check pack quantity to order the right number of pieces.
- Check for vague wording to reduce the chance of expecting a different kit version.
- Check included documentation to avoid setup errors from incomplete guides.
- Treat unclear descriptions as a red flag to prevent false expectations that lead to return friction.
Treat any listing with unclear details as incomplete until verified.
Value Tiers and Who They Suit
The right value tier depends on completeness, quality uncertainty, support signals, and the buyer’s tolerance for risk and extra sourcing. A budget tier may present higher uncertainty, while a higher-signal tier can reduce that uncertainty at a higher upfront cost. Tier is about risk and effort, not status.
Value tiers and who they suit are sorted by decision signals and buyer fit. The table maps these tiers to typical signals, best for, and the common trade-off.
| Tier | Typical signals | Best for | Common trade-off |
|---|---|---|---|
| Budget | Basic parts, limited support, variable quality | Risk-tolerant DIYers who can handle extra sourcing | Lower cost but higher uncertainty and effort |
| Mid-range | More consistent completeness, moderate support | Buyers wanting a balanced mix of cost and reliability | Moderate cost with moderate effort and risk |
| Higher-signal | High completeness, reliable support, clear documentation | Risk-averse buyers prioritizing convenience and time | Higher upfront cost but lower downstream risk |
A buyer who chooses a higher-signal tier despite a higher initial price reduces true cost when the kit includes all necessary components and offers easy returns, avoiding extra sourcing and wasted effort. In contrast, a budget tier may seem cheaper but can lead to additional purchases or frustration if parts are missing or quality is inconsistent. A practical buying rule: pay more for certainty signals, not for labels. For buyers minimizing effort and risk, a higher-signal tier often proves more economical over time.
The products below are useful examples for comparing available options. Before buying, check that the compatibility criteria, key features, and product details match your needs.
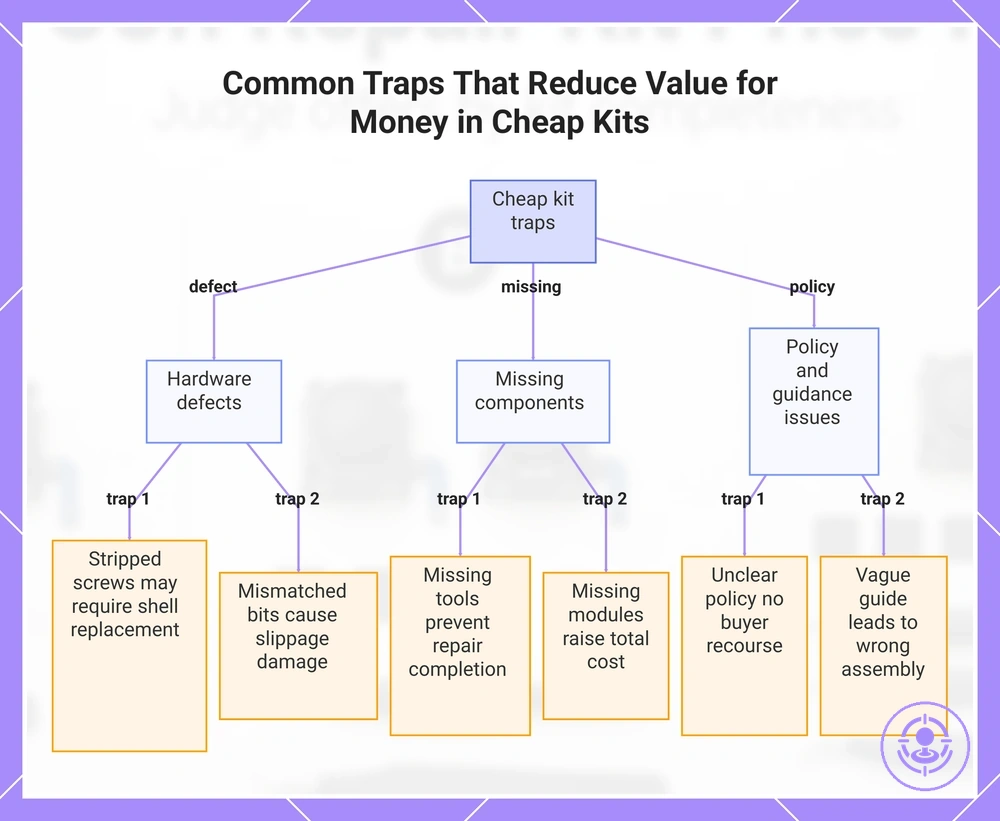
Cheap vs quality: common traps that reduce value for money
The lowest price can become costly when it creates predictable failures and unexpected expenses. A budget kit may have parts that strip, missing bits, or poor fit. The true cost appears after purchase. Cheap vs quality: the trap signals and likely outcomes below highlight common traps that reduce value for money.
- Stripped screw heads from low-grade alloy → Likely outcome: screws round off during first use, potentially requiring housing replacement and additional cost.
- Mismatch between included bits and console screws → Likely outcome: bits do not engage properly, causing slippage and potential screw damage, adding time and tool cost.
- Missing critical components such as tri-wing bit or flex cable → Likely outcome: may prevent repair completion, requiring a separate purchase and delaying the fix.
- Unclear or absent return policy → Likely outcome: if the kit is incompatible, you bear the full cost without recourse, reducing value for money.
- Thin adhesive pads that lose grip quickly → Likely outcome: buttons stick or housing rattles, potentially requiring reapplication or purchase of stronger adhesive.
- Incomplete set lacking joystick module or sensor ribbon → Likely outcome: drift may persist, and the missing module may require a separate purchase, raising total cost above a quality kit.
- Poorly molded plastic shell with sharp edges → Likely outcome: buttons catch or misalign, possibly leading to extra filing time and risk of further damage.
- Vague or no installation guide → Likely outcome: possible incorrect assembly, trial-and-error correction, adding frustration and time.
You protect value for money when you choose clarity in specifications and completeness over the lowest price.
The products below are useful examples for comparing available options. Before buying, check that the compatibility criteria, key features, and product details match your needs.
This chart shows common hardware defects, missing components, and policy issues that turn a cheap kit into a costly purchase, along with their likely outcomes.
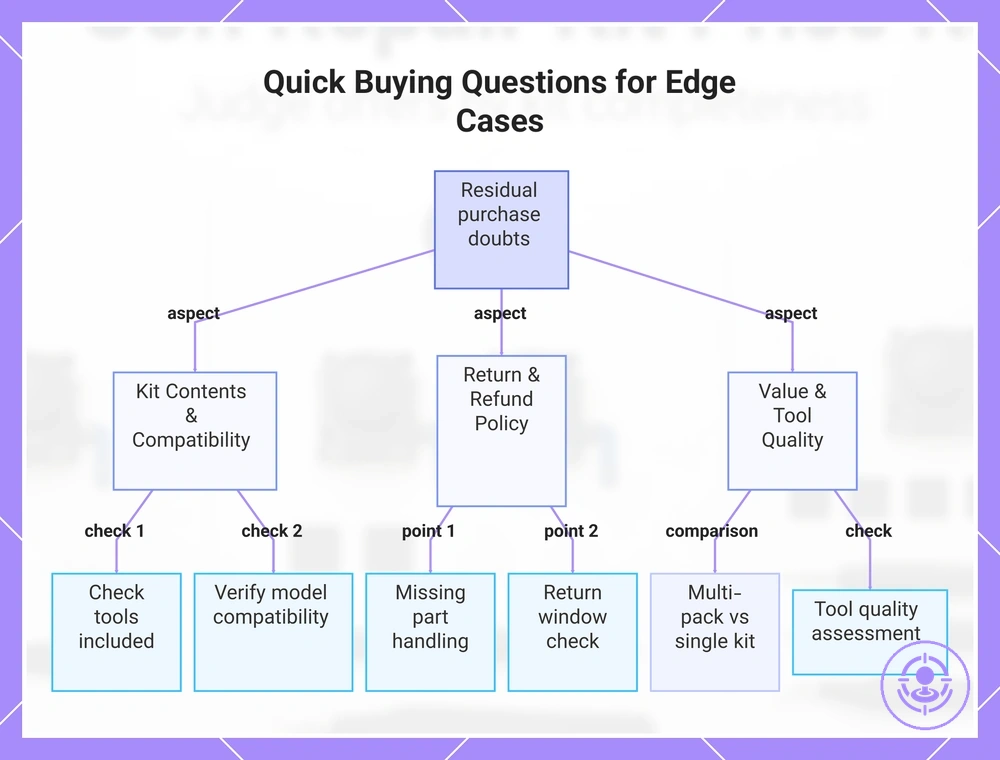
Quick Buying Questions for Edge Cases
Quick buying questions for edge cases cover residual purchase doubts that the main selection criteria do not fully answer. Each answer stays purchase-focused.
Question: Does the kit include all the tools needed for the repair?
Answer: Depends on the listing. Some kits include all necessary tools, while others are parts-only and require a separate purchase of a screwdriver set or spudger. Check the contents list before ordering.
Question: What happens if a part is missing from the pack?
Answer: It depends on the seller. Most sellers list the exact pack quantity and included parts, but if something is missing, the return window and refund policy apply. Contact the seller promptly to confirm coverage.
Question: Is the return window long enough if the kit does not fit my controller?
Answer: It depends on the seller's policy. Check the listing's return policy for clarity before purchase.
Question: Does the listing clearly state which Joy-Con models the kit supports?
Answer: It depends on the product page. Clear listings show model numbers and photos of compatible controllers, while unclear ones may omit key details. Contact the seller for confirmation when the listing lacks clarity.
Question: Is buying a multi-pack better value for money than a single kit?
Answer: It depends on your needs. Multi-packs often offer a lower cost per kit, but may include more parts than necessary. For a single repair, a single kit with all tools included is often sufficient and less wasteful.
Question: Should I worry about the quality of the included tools?
Answer: It depends on the brand and price point. Budget kits often include basic plastic tools that may wear quickly, while mid-range kits include metal tools. A kit with durable tools often offers better value for money, even at a slightly higher price.
This chart covers the main residual purchase doubts about repair kits: checking contents and compatibility, understanding return policies, and evaluating value and tool quality.